


You are using an out of date browser. It may not display this or other websites correctly.
You should upgrade or use an alternative browser.
You should upgrade or use an alternative browser.
1997 Seadoo XP Project
- Thread starter doberdann1019
- Start date
- Status
- Not open for further replies.
kicker
Well-Known Member
I looked into the missing rear engine mount bolt, and it seems to be there. Must just be loose. I got distracted and never tightened it but I will tomorrow. Hopefully its not broken, and just needs to be tightened.
View attachment 17649
If it is loose, take the bolt out and clean it and apply loctite 242 (blue) to the threads of the bolt. I would also check the bolts and grommets that hold your tuned pipe in place for tightness and worn rubbers.
doberdann1019
New Member
I started off the night by cleaning out the oil tank, after draining the remainder of the oil and removing the fittings on the tank I started off by cleaning out the outside of it and then did the best I could to rinse out the inside with water. Right now its drying out in my garage. Now I need to decide who's advice to follow, use gas, WD-40 or paint thinner to clean it. I am leaning towards using gas because that's naturally in the engine.

I also finished making all the new fuel lines. I added the inline fuel filter in after the existing filter/water separator and before the carburetors. In that section of pipe there is a fitting which is where the 8mm line ends and the 6mm lines starts (see part 60 in the exploded view iso). I put the inline fuel filter there instead of the fitting.


Finally tonight, I got the fuel selector valve off. It was very corroded and I couldn't get a socket or wrench on the plastic nut holding the valve. I used some pliers and sprayed PB Blaster to help get it free. Once off, I realized that I should buy a new one. There was gunk lining the inlets and outlet and the corrosion around the thread is bad. Also, I am pretty sure that the plastic knob hasn't actually been doing anything because it is stripped. The valve shaft was locked up pretty good and it was very tough to get it to rotate with some vice grips. Very glad I took it off to inspect.

See the next post for more pictures of the valve.
I also finished making all the new fuel lines. I added the inline fuel filter in after the existing filter/water separator and before the carburetors. In that section of pipe there is a fitting which is where the 8mm line ends and the 6mm lines starts (see part 60 in the exploded view iso). I put the inline fuel filter there instead of the fitting.
Finally tonight, I got the fuel selector valve off. It was very corroded and I couldn't get a socket or wrench on the plastic nut holding the valve. I used some pliers and sprayed PB Blaster to help get it free. Once off, I realized that I should buy a new one. There was gunk lining the inlets and outlet and the corrosion around the thread is bad. Also, I am pretty sure that the plastic knob hasn't actually been doing anything because it is stripped. The valve shaft was locked up pretty good and it was very tough to get it to rotate with some vice grips. Very glad I took it off to inspect.
See the next post for more pictures of the valve.
doberdann1019
New Member


CReynoldsMIZ
Well-Known Member
Yikes, yeah just get a new fuel selector. Gas or paint thinner, im not sure how well WD40 would work. I used paint thinner because it was laying around and it took 2 minutes and came out pristine, but im sure gas would work as well
SabrToothSqrl
Well-Known Member
I just did a 2000 GTX. fuel selector looked exactly like that.
doberdann1019
New Member
I am starting to rebuild the carbs and am finding they are dirty and there is some corrosion inside (at least by the diaphram). Any suggestions on what to use to clean that? I do not want to use anything that might hurt the carbs.


doberdann1019
New Member
So last night I started to rebuild/clean one of the carbs. This is the first one I have ever been in and was not sure what to expect. What I found I am pretty sure is not normal/acceptable and I'm glad I opened them clean. There was gunk and corrosion all over and I did not have the right tools to clean but took some pictures. I will pick up some carb cleaner and get to work this weekend.


I also looked into the engine intake where the carbs sit. I found the piston arms to be rusty which raised a red flag. Like I've said, I am new to jet skis but would not expect there to be any rust in the bottom end of the engine.

Thoughts?
I also looked into the engine intake where the carbs sit. I found the piston arms to be rusty which raised a red flag. Like I've said, I am new to jet skis but would not expect there to be any rust in the bottom end of the engine.
Thoughts?
doberdann1019
New Member
Finished rebuilding one of the carbs tonight, I let it soak in carb cleaner and cleaned it as best I could. Also Replaced all the parts that came in the carb kit. Its not spotless but its a lot better than it was.
Re-installing the check valve discs was challenging. I found it best to just lube up the rubber piece and use a small flat screwdriver to wedge it through the hole.


One thing I was not sure about was which spring to use under the diaphragm. There are 2 little springs in the kit but only 1 is used, and they are different. One is shorter and one is longer than the old one I removed. The spring on the right is the original. I installed the one which matched in color.

Hopefully tomorrow I will have time to start digging into the other carb.
Re-installing the check valve discs was challenging. I found it best to just lube up the rubber piece and use a small flat screwdriver to wedge it through the hole.
One thing I was not sure about was which spring to use under the diaphragm. There are 2 little springs in the kit but only 1 is used, and they are different. One is shorter and one is longer than the old one I removed. The spring on the right is the original. I installed the one which matched in color.
Hopefully tomorrow I will have time to start digging into the other carb.
doberdann1019
New Member
I might look into a pop off test then. Neither spring in the kit was a match, one longer and one shorter.
I got the new fuel valve in the mail today (thanks Minnetonka4me!) and installed all the new fuel lines I made.


Also tonight I reassembled the oil tank and started to take apart the second carb but ran into trouble when I could not get some of the screws out. I am afraid of stripping them so I am soaked it with some PB Blaster, hopefully that helps loosen up the screws.
The one side that I was able to open was dirty but better than the other carb looked.
Check the next post for some more pictures.
I got the new fuel valve in the mail today (thanks Minnetonka4me!) and installed all the new fuel lines I made.
Also tonight I reassembled the oil tank and started to take apart the second carb but ran into trouble when I could not get some of the screws out. I am afraid of stripping them so I am soaked it with some PB Blaster, hopefully that helps loosen up the screws.
The one side that I was able to open was dirty but better than the other carb looked.
Check the next post for some more pictures.
doberdann1019
New Member


I saw your crank pictures on another thread.... If it were mine and I was going to keep it I would take the engine apart and inspect closer. It looks like just surface rust but if any of the bearings have even a little rust it will come apart after a few hours and destroy itself. Your best bet is to order one of the WSM complete gasket kits from Amazon for $60 and inspect all the parts and replace all gaskets and seals. You have already come this far and it is cheap insurance.
As far as the carb springs if they look good just reuse the stock ones. The springs that come in the kit are not the correct ones to acheive the correct pop off pressure if you have a stock ski. I would also make sure that your needle and seats hold pressure if you are not replacing them. On an older ski I usually do the carb kits nad new needles and seats.
As far as the carb springs if they look good just reuse the stock ones. The springs that come in the kit are not the correct ones to acheive the correct pop off pressure if you have a stock ski. I would also make sure that your needle and seats hold pressure if you are not replacing them. On an older ski I usually do the carb kits nad new needles and seats.
doberdann1019
New Member
I would really like to take the bottom end apart but I am afraid of what I might find...
I installed the new motor mount and its solid as a rock.
Almost ready to but the carbs back on but I want to replace the small fuel lines that go between the carbs. (see pic) anyone know what size line this is and where I can get small enough hose clamps?

I installed the new motor mount and its solid as a rock.
Almost ready to but the carbs back on but I want to replace the small fuel lines that go between the carbs. (see pic) anyone know what size line this is and where I can get small enough hose clamps?
Im sorry I missed one of your posts.
The spring in the 800s do not match either one in the kits. It wont run right. Use your old ones unless they are bent or corroded.
On those small lines just push them back on...use a little spit if you have to. Not a critical thing to worry about.
The spring in the 800s do not match either one in the kits. It wont run right. Use your old ones unless they are bent or corroded.
On those small lines just push them back on...use a little spit if you have to. Not a critical thing to worry about.
donkey
New Member
um,guys,take a look at pik 5,post #4,his lines are hooked up different than mine are.are his right?are mine wrong?mine runs perfect btw,
heres a pik of the way mine were/are now. ,looks like his go straight to each other,where as mine cross.!?
i know his is a 787,and mine is a 717,but they are the same carbs right?
heres a pik of the way mine were/are now.
,looks like his go straight to each other,where as mine cross.!?i know his is a 787,and mine is a 717,but they are the same carbs right?
Last edited by a moderator:
DSchmidt54
New Member
^^ the carbs in the pic from donkey are correct the Y splitter is the main fuel in and i believe the joining line is i believe what they call a burst line.... for quick hits... similar to the one that goes from the mag side carb to the cylender....
kicker
Well-Known Member
The y fitting going towards the back of the ski is your return, the supply is on the bottom of the mag side carb.
The one with the black hoses is from a 717, the one with yellow is 787. Both are the same. Donkey, unless you have a different carb set up that I have not seen, I believe yours are crossed.

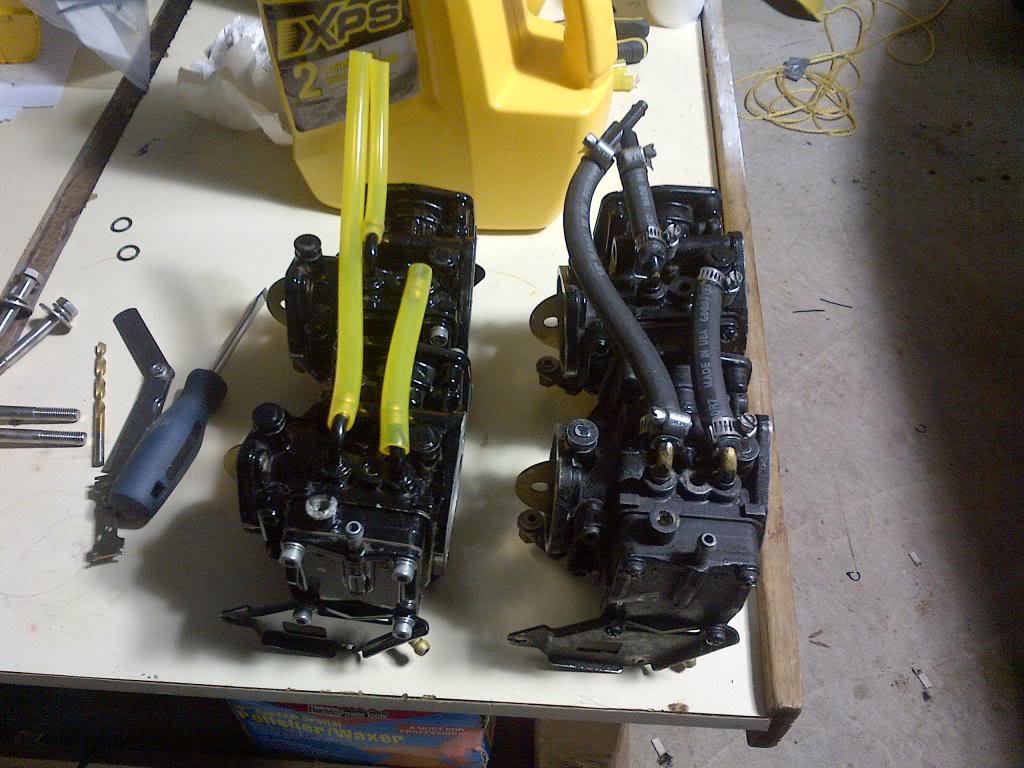
The one with the black hoses is from a 717, the one with yellow is 787. Both are the same. Donkey, unless you have a different carb set up that I have not seen, I believe yours are crossed.
doberdann1019
New Member
Im sorry I missed one of your posts.
The spring in the 800s do not match either one in the kits. It wont run right. Use your old ones unless they are bent or corroded.
On those small lines just push them back on...use a little spit if you have to. Not a critical thing to worry about.
Thanks, that's what I did. The spings looked good.
And that makes life easier, I will just put the small lines back on. Do you know what purpose they have? I did not seem them in the parts manual or in the carb manual from mikuni.
doberdann1019
New Member
I looked into the parts manual for the 787 that I have and it looks like mine is correct.

The small lines are for the accelerator pump. Make sure to spray carb cleaner into the nozzles and make sure they are clear and spray uniformly.
I would also "prime" the accel pump by pouring some gas into the inlet line and pumping it by hand. It is supposed to self prime, but I have had them refuse to work till I primed it manually...so I just do it while they are on the bench.
People say they were a stupid design, but when clean and working correctly they are kind of slick. Best part is when cold starting it you can flip the throttle a few times to "prime it" before you grab the choke and it will typically fire up instantly vs a 10sec crank.
If you are having trouble removing carb screws try one of these: http://www.summitracing.com/parts/shc-947641/media/images
doberdann1019
New Member
If you are having trouble removing carb screws try one of these: http://www.summitracing.com/parts/shc-947641/media/images
Thanks, I did end up getting them all and replaced them with hex screws.
- Status
- Not open for further replies.
Similar threads
- Replies
- 6
- Views
- 219
- Replies
- 3
- Views
- 261
- Replies
- 4
- Views
- 297