Inexpensive engine alignment tool- DIY

Note: This site contains eBay affiliate links for which SeaDooForum.com may be compensated
Status
Not open for further replies.

soccerdad

Well-Known Member
This entire thing was hashed out in another thread. http://www.seadooforum.com/showthread.php?78643-Engine-alignmenet/page2

Since there is a spelling error in the title, and there are several branches in the thread, I decided to post a new clean one.

Using concepts from others, I designed a different way to align a two-stroke, single shaft motor, without having to rent or purchase a SBT tool.

DISCLAIMER- This tool has raised some controversy. I am convinced it is as good or better than the SBT tool. I have heard the SBT tool is really nice, but I have NEVER used one. So, understand the principle, and determine if you want to use it, of course at your own risk.

The concept is simple. The parts do not have to be machined, just cut to length and deburred. And it can be done for around $35. The tool only fits one length drive shaft, so if you have different skis, you may need two or more tools. BUT if you buy 3' of the material (included in the cost), you should have enough material for two different tools! I have a 96 GTX and the leftover material is perfect to use on a 96 XP, GSX and others.

So how does it work? The standard drive shaft has convex splines that allow for some misalignment and flex while you enjoy your ski. This tool replaces the shaft with one that will not move around in the splines. It uses a straight 18mm shaft. The 18mm just fits into the ID of the splined holes in the PTO and prop in the pump. You put a short shaft piece into the PTO, and then put the longer shaft into the splines in the pump. Then you install the pump, tighten it down, and check the alignment. The two shaft ends should be in direct line with each other when it is correct. I also added an 18MM ID sleeve bearing (delrin) to act as a gauge. If you can easily slip the bearing over both shafts, and it turns easily, then you are good to go. The convex shaft allows for approximately 1" of free movement from limit to limit. This tool allows you to align everything as well as practical to make sure nothing binds up while having fun.

So what do you need? You need one 36" piece of 18mm tool steel (drill rod) and one 18mm sleeve bearing. That's it! I got mine from Mcmaster.com Shaft is PN 88625K78 ~$20 and bearing is 2640T23 ~$5. I built a test one out of 3/4 aluminum round bar and just turned the ends down to 0.708" and it worked just as well. So the GTX shaft is 21" long, so I cut the bar 21". Then from that bar I cut a piece 2 3/4" long. Then I deburred them. That is it. You now have your tool. The GSX/XP uses an 18" shaft, so you can use the left over material, along with the 2.75" piece for those skis (and many others).

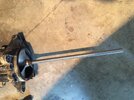
The high tech tool:
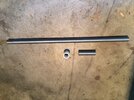
455.jpg

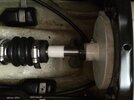
The tool in the pump:

456.jpg

The alignment area- note that you can move the shaft out of the PTO to meet up with the other shaft.
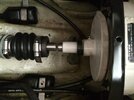
457.jpg

The two with the bearing over them

458.jpg

A final word- The 18mm is very close to the ID of the pump. My PTO easily accepted the tool but the pump was very tight. It seems the prop had a little burr inside from use. I sanded the shaft a little just to polish it up. It start to go on, but I decided not to force it too much. So I grabbed my spare pump and used it. The shaft went in easily, but with virtually no play. So, you may need to use some emery paper or sand paper to decrease the shaft end by .001 or so. Or it may work well. I am sure the material tolerance is in there as well. Or it just may be burrs in my pump.

So, here is a working option, that you can roll your own. It is easy on your wallet and fits in your tool box. And it will work on at least a few different skis. Enjoy. I hope it works well for you.
 
Last edited by a moderator:
I guess the real test to see how accurate it is would to be to use an actual alignment tool and see how close you were to that spec
 
I agree and would do it if I had one. I have looked at it every way I can think of, and just can't find a hole in the logic. Straight is straight. Honestly, if it was off with the SBT tool, I would suspect the SBT tool just as much as mine. Again, YMMV.
 
soccerdad, pretty clever. It all depends on the fit to the female splines. Good fit, good alignment. Less good, less good. One advantage of the SBT tools over ones using a pump and shaft is longer "baseline" of the SBT type tools, 3 or more times longer than a pump. For a given clearance bushing to shaft, less radial play of the shaft.

Still and all, nice effort.

Thanks, you would be amazed how little play there is in the fits. Yep, the SBT tool does have a longer bearing or baseline area, so they can have a little more tolerance to allow the shaft to slip in. Regardless, the convex shaft give you .5" in any direction. So I know that even if it is off by a 1/16" (or more), it would not be an issue.
 
Don - I like your thinking and did the same earlier this year to align my XP. I had a spare 140mm pump lying around and picked up a piece of round stock and fitted a socket onto the end to slip into the PTO. I know it may not be as precise as the official tool but if you take your time and view the tolerances it's pretty darn close.
Rob
 
The only issue I see is the thru hull fitting and the accordion boot. I've seen several thru hull fittings of center. I think you have a good idea, but you still need to validate it with the correct tool.

Sent from my SGH-T889 using Tapatalk
 
Racer-- I am curious how the SBT tool takes the thru hull fitting into account? Doesn't it just mount to the pump bulkhead plate? I have only seen pictures of them... It looks like the bearing tube may go all the way up to the thru-hull fitting, but it still mounts to the plate. The manual does not show any interaction with the thru-hull fitting/boot.

Some of the forum guys are in the Raleigh area. But that is about 1.5 hours away. Perhaps if I go that direction some time, I can borrow one and validate it. I realize it would be a long term wear problem and instant if there was a problem. This thing is so straight I don't see any issues. We will see when I put in the shaft and carbon seal assy.
 
The OEM/SBT style do not use the thru hull fitting for any alignment what so ever. It's all based off the support with the oil lite bushings in it, if I had to guess it's probably close to 12" of support, less to the pump side and more to the engine side. Wish I was home I could get you dimensions and pics. I think you have something, but like I said if that thru hull is off in any direction so is your alignment.

Sent from my SGH-T889 using Tapatalk
 
My system does not use the thru-hole at all. The shaft just goes through it. Maybe the pictures misled you. The shaft is only connected to the pump. If my system has a potential problem, it would be that the shaft is hanging there so it may sag a tiny bit. But as long as it is tight in the pump, the sag is minimal. You could take that into account if you wanted during alignment.
 
Last edited by a moderator:
I thought that white sleeve went into the carbon ring, my mistake. Now I see what your doing. I guess it will get one close enough. I relate everything back to machining, I work in that environment everyday.

Sent from my SGH-T889 using Tapatalk
 
Makes sense, the oem alignment tool used the pump with no impeller installed iirc. Many people ask why you can't just use the driveshaft, that's because the shafts are tapered at the ends of the splines so they can have some movement of the engine without binding the shaft. What you've basically made is a driveshaft with no splines and no taper.
 
I Agree, I Think the method would get things fairly close to where they should be. But once you have used the SBT tool, you can see how dang accurate it is made. There is just no give or flex in that tool. I would be willing to bet each pump is slightly different than the next. especially the plastic ones that most skis have.

are those hull fittings ever close to center? Seems like most are off quite a bit....
 
I really don't think a high degree of concentricity on the thru-hull fitting is needed. The carbon ring / seal carrier form a face seal. Radial alignment is not too important IMO. Now I'm not talking about a carrier bearing arrangement (or what ever they are called). Don't know the first thing about 'em.

If you've ever busted into your dishwasher, you would have seen a similar seal arrangement. The motor shaft can be in pretty bad shape and the seal still don't leak because it is not sealing on the rotating shaft.

On edit: Add to that, the engine is sitting on rubber. It's gonna move around :)
 
Last edited by a moderator:
It should get you "Close Enough". So good job on that.


BUT... since you are using your pump... then it may not really be good, since the housing can be warped... the bearings could be loose, or the shaft could be slightly bent. (just something to keep in mind)
 
Lets not lose sight of the goal: The goal is to align YOUR engine to YOUR pump :)

True....


But using a real alignment tool may show you that there are other issues lurking. If you align with a tool... then feel binding after you bolt up your pump... you know there is something else wrong.


One last thought.....


The little plastic sleeve to bring the 2 poles together is too short. I would make it at least 6"~10" long. Right now... I'm sure there is enough play to introduce some miss-alignment.

Honestly... I would make the pole one piece. I know when I'm aligning engines... sometimes... the tool will start to slide into the engine, and then bind before it bottoms out. (when the PTO is warn) That's why the real tools are built to slide in and out.


Please don't take what I'm saying as a negative thing. I love garage/home engineering, and guys who come up with inexpensive solutions... but in this case... you could have probably used the driveshaft, and just "Eyeballed" it, and gotten the same results.
 
Last edited by a moderator:
I know when I'm aligning engines... sometimes... the tool will start to slide into the engine, and then bind before it bottoms out. (when the PTO is warn) That's why the real tools are built to slide in and out.

Doc's comment reminded me of something missed in this topic. you can have the back of the engine dead nuts with the SBT tool, slide in the shaft the rest of the way & it can bind, showing the front of the engine needs to be higher, or lower. Thats just as important as left to right if you think about it..
 
The tool can be made in one piece as well. AKA, just a straight piece of 18mm shaft. Then you will have full penetration into both the pump and PTO, with no possible flex were I am using the bushing. But you really need two pieces for setup, since if it is off, you can't put the pump on. For an XP or GSX, you could have a 2 piece to do the main setup, and then put in the solid shaft as a final verification. A GTX would need a little more material. I you could buy 4', you would be set. You also could use a longer steel bushing if you wanted. And remove the boot/carbon seal and make the shaft into the motor longer and the main shaft shorter. Or you could buy an SBT tool.

Again, this gets it really close. The real drive shaft does have a full inch of deflection travel in the convex splines. I sleep soundly at night knowing that I am WELL within the limits of the shaft, even with flex or movement over time. I assembled the ski today with the real shaft and pump. It slipped together like it was coated in butter. The carbon seal is square and almost perfectly centered. I am not landing this thing on a moving comet. I am comfortable that it worked for me. This has been a great discussion and at least it has some people understanding the power transmission system better.
 
The tool can be made in one piece as well. AKA, just a straight piece of 18mm shaft. Then you will have full penetration into both the pump and PTO, ......


You said shaft, and penetration. :lol:

Again, this gets it really close. The real drive shaft does have a full inch of deflection travel in the convex splines. I sleep soundly at night knowing that I am WELL within the limits of the shaft, even with flex or movement over time. I assembled the ski today with the real shaft and pump. It slipped together like it was coated in butter. The carbon seal is square and almost perfectly centered. I am not landing this thing on a moving comet. I am comfortable that it worked for me. This has been a great discussion and at least it has some people understanding the power transmission system better.


Yes... the real shaft allows for some miss-alignment. BUT... the straighter you are... the longer it will last.


As I said before... I love to see innovation. I just want to bring up some of the other "Got-cha's" that lurk in the process.
 
Thanks Doc! I agree, I have learned lots on this and will watch out and post back if any got-cha's hit. And "the straighter you are ... the longer it will last" is always a good philosophy! :p
 
Soccerdad, you're my hero! I just posted about swapping a Yellow engine for a white one in a 92 GTX, and for whatever reason totally forgot about aligning the new engine.. Duh!!! Anyway, I was dreading ordering a $200 tool, although I would use it a few times, then I saw your post. Makes perfect sense. If you're a machinist or deal with tight tolerances, this is a no-brainer. I have been called the "man with the calibrated eye", so I went ahead and went to McMaster and ordered the stuff. THANKS for even putting in the part numbers in your post. Anyway, I'm sure I can make this work, and for those skeptical readers, if you know how to align bearings and shafts in machinery, this is a piece of cake.

Thanks again!!
 
Thanks for coming up with this alternative technique, I can't wait to hear confirmation of its performance with the standard test jig.
 
Status
Not open for further replies.
Back
Top