Problem with supercharger rebuild

Note: This site contains eBay affiliate links for which SeaDooForum.com may be compensated
Status
Not open for further replies.

russ22

Premium Member
Premium Member
Hi
Having problems with supercharge rebuild (2015 GTX 260hp)
I have followed all the instruction but the new shaft feels very tight to spin it by hand
I have got up to step 13 on SBT instruction, I have put the new bearing in the housing
then put the bearing on the shaft
Put the thrush washer and space on the shaft
inserted the shaft and bearing into the housing
then put the step collar and o ring and then install the impeller and notice that the shaft was tight to turn
it sounds like it is binding on something I think it could be the step collar.
I notices that the step collar is turning with the shaft, is this normal
Can I remove the retaining disk while the shaft is still install in the body to try and find out what is causing the binding
I am using a brand new kit
the bearing went on the shaft and in the housing ok
I have not started to put the gear or washer etc on yet so I could take the shaft out if needed
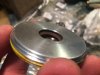
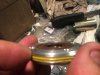
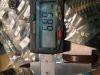
I did notice that the oil seal in the new retaining collar sits higher than the oil seal in the old retaining collar

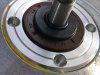
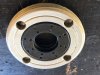
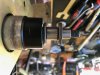
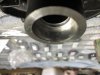
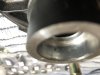
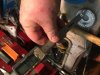
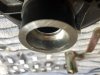
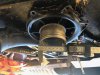
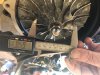
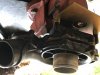
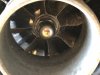
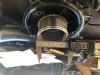
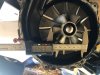
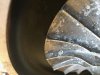
I bought this jet ski at an auction the ski was a repo. the housing has some damage but should not effect it unless it has bent the housing some how, it looks like a bearing has gone (see pics)
The guy must have started to put a new S/C kit in the S/C as the bearings and shaft that I took out of the S/C looked new

I just need to find out why the shaft is tight to turn and what it is binding on


Thanks
 

Attachments

  • new retaining disk.jpg
    new retaining disk.jpg
    640.2 KB · Views: 28
  • old retaining disk.jpg
    old retaining disk.jpg
    630.3 KB · Views: 29
  • S-C Rebuild.jpg
    S-C Rebuild.jpg
    536.5 KB · Views: 26
  • IMG_1529.JPG
    IMG_1529.JPG
    2.4 MB · Views: 26
  • IMG_1534.JPG
    IMG_1534.JPG
    2.7 MB · Views: 28
Step collar being the part that goes on the shaft, into retaining disk and has the oring on it, correct? No, it should not rotate.
 
It will rotate when the impeller is mounted and torqued down
It might have a tight fit on the shaft
Remove seal and spacer and check if shaft it’s free to turn if yes then your good to go as you are feeling the friction between seal and spacer

The seal does look like standing a little proud
 
Step collar being the part that goes on the shaft, into retaining disk and has the oring on it, correct? No, it should not rotate.
what should I do to fix it so that the step collar is not turning
could it be that the step collar is the wrong size although it came out of the same kit
 
If it bottom out during installation and there’s a gap between spacer hat section your good to go providing the shaft rotated freely when spacer is removed
 
This is very strange, I knocked the shaft out about 30mm (Aussie Measurements HaHa) and took the step collar out and the shaft turn very easy and free
I knocked the shaft back into the housing luckily the back bearing did not come all the way out of the housing so it went back into the house with a couple of taps
The shaft still turned with out any resistance, I then pushed the step collar back in this time it went in very easy and the shaft still turns with no resistance.
something wasn't setting correctly but I don't know why I did not do anything different
I have not torque the turbine yet so that may push the step collar in further.

Dose anybody think that I should try and knock the oil seal into the retaining disk or just leave it I have pushed it in as hard as I can by hand??????????????

Thanks for everyone's advice
 
There’s a tool to knock it in
Use a socket of the appropriate size and give a tap or too listen for a dull sound which means it’s all the way in
It shouldn’t matter if it’s a little proud as the impeller is tightened up against the shouldered bush
As long as the seal lip makes contact with shouldered bush long flat surface
I am presently building one today and will take a pic of the seal installation
It’s also a SBT Kit
 
There you go it flush
I measured the thickness of seal and depth first
 

Attachments

  • 9C151DAC-24DE-4FD2-BFA1-78BF77D55D03.jpeg
    9C151DAC-24DE-4FD2-BFA1-78BF77D55D03.jpeg
    1.6 MB · Views: 24
  • 28059312-13EB-4B33-92BF-5C3B6F91303A.jpeg
    28059312-13EB-4B33-92BF-5C3B6F91303A.jpeg
    1.5 MB · Views: 25
Measurements
 

Attachments

  • 1598366B-A15A-4745-B711-D767E1F8DD54.jpeg
    1598366B-A15A-4745-B711-D767E1F8DD54.jpeg
    1.8 MB · Views: 25
  • 4D6895F0-3C4F-48C2-9074-5ECFDFC944F4.jpeg
    4D6895F0-3C4F-48C2-9074-5ECFDFC944F4.jpeg
    1.7 MB · Views: 23
I used a socket to hammer the in the seal and it is now the same as yours so that's for the pics
All working good now

One more question which way do the 2 x flat spots on the splined lock washer go towards the gear or away from the gear. The SBT instruction don't say.
I watched the SBT supercharger rebuild video on SBT web site and the video shows the flat spots going towards the gear yet the seadoo service manual shows the flat spots going away from the gear, which is correct or does it not matter.
I cant see what diffrence it would make but better to be sure than sorry ??????????????
 
I personally think it doesn’t matter but there’s a picture on here on another supercharger Thread
It’s the one about drive Gear breaking

I install flat side towards bearing side
 
I have another problem with re-building my seadoo 260hp supercharge. The turbine impeller does not fit into the S/C housing, I don’t know if I have the correct turbine impeller.

Before I go into the details, I feel I should give you some back ground of where I got this supercharger from.

I bought a seadoo GTX 260hp is LTD from an auction (REPO), the motor had been completely pulled apart, everything was there except for the crank case.

The 260hp supercharger housing had been split, the 2 halves were held together very loose bolts.

The turbine impeller was fitted to the shaft but the nut was loose.

I have rebuilt the S/C with a new SBT S/C kit.

When I pulled the S/C apart I notice that the housing had some damage, which indicated that a bearing had failed (see photo)

I rebuilt the S/C had everything torqued up including the impeller, checked the slippage which was correct was correct and then tried to bolt the housing together. The housing would not come together, the turbine impeller is about 1-2mm in dia too big to go inside the housing inlet side. I measured the impeller and housing Diameter see Photos (260 dia case No1) & (260 Dia impeller No2) the housing is 64.27mm Dia and the impeller is 65.84mm Dia.

I have looked at the impeller there is no major damage that I can see would cause this. It is possible that the previses owner replaced the impeller with the incorrect impeller but I cannot find any info in the service manual how to check impeller wear or specs.

I have been told that the 260 S/C and the 215 S/C have different turbine impellers is this correct.

I also have a working 215hp S/C (see photos attached) I took the inlet side housing of that S/C and tried to see if that would fit but same problem the impeller was to big.

Can someone give me advice on what the problem could be

I have attached photos of my 260hp S/C and the 215hp S/C
 

Attachments

  • Damage to housing 1 (1).JPG
    Damage to housing 1 (1).JPG
    2.9 MB · Views: 29
  • 260hp case.jpg
    260hp case.jpg
    652 KB · Views: 31
  • 260hp Impeller Dia No2.jpg
    260hp Impeller Dia No2.jpg
    626.5 KB · Views: 29
  • 2015 S-C 260hp No4.jpg
    2015 S-C 260hp No4.jpg
    451.8 KB · Views: 28
  • 260hp no gap in wall.jpg
    260hp no gap in wall.jpg
    576.2 KB · Views: 33
  • 215hp case.jpg
    215hp case.jpg
    628.2 KB · Views: 34
  • 215hp No3.jpg
    215hp No3.jpg
    552.9 KB · Views: 35
  • 2015 S-C 260hp. closeup turbine No2.jpg
    2015 S-C 260hp. closeup turbine No2.jpg
    689.7 KB · Views: 36
That impeller is trash. Do not use it, it's bent and chipped. Being out of balance, it will destroy the supercharger at 45,000 RPM.

Chester
 
Status
Not open for further replies.
Back
Top