Need advice selecting seat cover replacement

Note: This site contains eBay affiliate links for which SeaDooForum.com may be compensated

bigJake

Well-Known Member
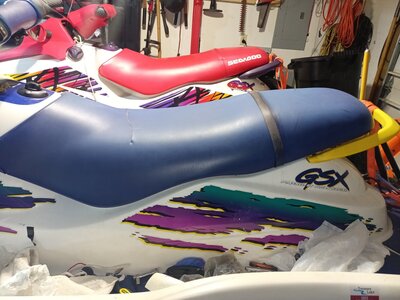
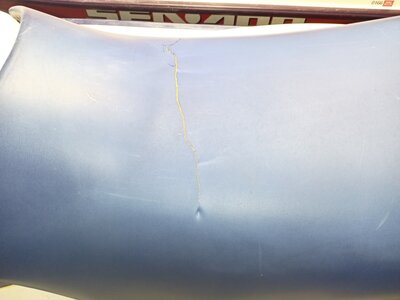
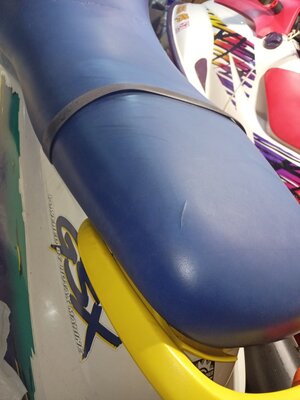
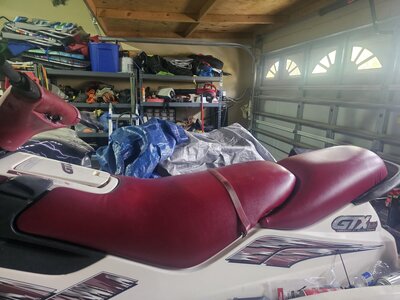
I need to replace the seat cover on my 96 GSX. Doing a quick google search, I see at least primary options

  1. BlackTip Jetsports, $99.95 (plus tax, free shipping) The description says this is a molded cover to fit the seat, but the blue color (at least on their website) appears to be a much lighter blue then the original color.
  2. Ritco Products. $84.54 including shipping and tax. This also appears to be a molded cover and the color showing on their website is much closer to the original seat color.
  3. DIY Seat Skins $47.99 + tax, Free shipping. This is just a flat piece of material that you must stretch to fit the seat and appears very close to the original color. According to their website it is better to go with the flat sheet of material and stretch it to fit your seat vs a pre-molded cover because your seat may have changes shape and it will be a sloppy fit. (See below)
So I'm looking for feedback and recommendations from those that have used these replacement covers. Did you get a nice fit from a pre-molded cover just going over top of the existing cover and foam, or was it a bit sloppy because the seat had changed shape over time? I don't believe that I have any major distortions on the shape of my seat. The cover has just dried out and cracked when I sat on it while doing maintenance in the garage.

Is it much simpler to install a pre-molded cover?
If you have used the DIY Seat skins that you must stretch to fit your seat, was this fairly simple to do to get a good fit for half the price?
If I use a flat sheet of material from DIY will I have to create pleats around the back of the seat instead of having a perfect fit?

This is from the DIY Seat Skins website:

WHY WE RECOMMEND OUR PRODUCT OVER A SEWN OR MOLDED SEAT SKINS:
No two seats are ever the same or will be the same. Wear and tear comes from the weather, the user and usage as well as the care. A sewn seat is specific to that size and area only- it can not be reconfigured in any fashion. The same goes for a molded seat skin, once the mold is made it can not be changed. Additionally no thread or hard seam to rub on skin, additionally no dry rotting of thread because of the sun. The bases of each seat are made of foam, some wears, breaks down, and loses density over time- these conditions all support how and why anything sewn or molded will never look right and sag. Upholstery shops like ourselves make each cushion, seat etc by hand to the seat- they do not come pre-made because of the above.

We have made our seat skins to fit any make or model as they are not formed/sewn or molded. This allows the form to be completed when installing the product. Our product is flat for a purpose as we state above; yet the skin we provide is pre-cut to the skeleton of your seat if flattened out. This pre-cut patter with require trimming and some cutting during installation.
 
Last edited:
I used the DIY seat cover on my GTI, I thought it turned out good, no pleats but you really have to work it in order not to have the pleats. The seat I did was pretty rough shape, the only thing I would have done differently would be to glue a 1/4 layer of foam down first. Every little imperfection in the foam shoes through the vinyl. You can see the work if you like, I have a thread for it GTI seat skin replacement. I can take a few pictures to show how the curve at the back of the seat turned out if you want. I went with the DIY as it was cheaper, seamless and I stenciled on the seadoo logo for an OEM look. I wouldn’t recommend the DIY if there are dips and concave areas that would need to be glued but for a basic seat like an HX seat or XP it worked great. I’ve never used any other cover so don’t know their quality but from what I’ve read Jet trim makes a real high quality cover that looks great
 
Also have a look at marinevinylfabric.com . I have never bought from here but came across it one time and saved the site. Marine vinyl for 13.99 a yard, probably same 2 way stretch as from DIY. They also have some marine vinyl for 7.99 a yard. 2 yards would probably be more than you would need for the GSX seat
 
Thanks for the reply Burt. I checked out your thread. Impressive how well your seat turned out considering how rough it was when you started. Here are some pics of my current seat. Except for the split across the seat in the dip and the small slice on the rear it's in pretty good shape. The vinyl still seems fairy pliable except for where it split. The foam cracked there too under the vinyl. Notice how I can press down on one side of the split and the foam separates. Do you know if there is something I can glue the foam back together with? Maybe some silicon caulk? I was hoping that I could just duct tape the areas of the seat that are split before covering with the new material as I was hoping this would not turn into a major project, with so many other household projects I have going. Based on having to glue your cover down, do you think that the dip where the crack is would have to be glued to hold the new material down? If that's the case, I'd probably go with a pre-formed cover to avoid all the extra work of trying to glue it down and not creating wrinkles. It's interesting that until you mentioned it, I never even noticed in all these years that the '96 did not have the Seadoo lettering on the seat but my '97 does. Thanks.
 

Attachments

  • IMG_20230402_205745.jpg
    IMG_20230402_205745.jpg
    369.6 KB · Views: 25
  • IMG_20230402_205751.jpg
    IMG_20230402_205751.jpg
    262.9 KB · Views: 20
  • IMG_20230402_205803.jpg
    IMG_20230402_205803.jpg
    305.8 KB · Views: 13
  • IMG_20230402_214018.jpg
    IMG_20230402_214018.jpg
    179 KB · Views: 13
I didn’t have to glue down the whole cover, I only glued the area where my seat curves down sharply because if I didn’t the vinyl would tent over this area. Looking at the contours of your seat I don’t think you would need to glue down any of the new vinyl. Also I think your seat would turn out better than mine did because your foam is in better shape, you shouldn’t even need to add a layer of 1/4 in foam. As for that crack in your foam just put a pair of nitrile gloves on, hold the crack apart, spray the adhesive and let it stand for about a minute or so till it racks up and then press the 2 pieces of foam back together. I will look back and see what adhesive I used but any adhesive for foam will work. I’m not sure, but the adhesive seems almost like it is a spray contact cement. I took my old vinyl off because it was very hard and brittle and I was worried if I left it, it might damage the new vinyl but you might be able to pull the new vinyl right over top of the old. If you don’t have to take the old vinyl off I would think it would be a couple of hours tops to put the new vinyl on, that’s with taking your time.
 
this is the adhesive i used for the foam. The 3M adhesive may be better, Ive never used it, but this gorilla adhesive worked good.
IMG_7083.JPG
 
I didn’t have to glue down the whole cover, I only glued the area where my seat curves down sharply because if I didn’t the vinyl would tent over this area. Looking at the contours of your seat I don’t think you would need to glue down any of the new vinyl. Also I think your seat would turn out better than mine did because your foam is in better shape, you shouldn’t even need to add a layer of 1/4 in foam. As for that crack in your foam just put a pair of nitrile gloves on, hold the crack apart, spray the adhesive and let it stand for about a minute or so till it racks up and then press the 2 pieces of foam back together. I will look back and see what adhesive I used but any adhesive for foam will work. I’m not sure, but the adhesive seems almost like it is a spray contact cement. I took my old vinyl off because it was very hard and brittle and I was worried if I left it, it might damage the new vinyl but you might be able to pull the new vinyl right over top of the old. If you don’t have to take the old vinyl off I would think it would be a couple of hours tops to put the new vinyl on, that’s with taking your time.
Yes, please let me know what adhesive you used on the foam and yes I would be interested in seeing some pics on how you did the back of the seat. Did you have to make a bunch of slits in the vinyl underneath the seat to form the contour without it bunching up under the seat or did it just stretch to coform to the contour?
 
yea I was looking at staplers earlier, I have an electric stapler but not sure if it will work or not, I was going to try a couple test staples on the existing seat or just grab a cheap pneumatic one.
 
IMG_7209.JPGthis is about the only picture i have of the back of the seat, I don't have any pictures of me actually doing it. I layed the seat upside down on top of the vinyl making sure it was roughly centered, tacked the front with a couple staples, pulled fairly hard and tacked it at the back, then tacked one side, pulled the other side and tacked it. Then i worked one side to the other pulling the cover down to the side as well as back to the back or up to the front depending on which way you are working first and placing a staple every 3 inches or so that way if you need to pull a few staples its not so many to pull. I had to pull a few staples here and there. Once you are all done with staples every 3 inches or so then you can fill it in with staples. At the back Once you get there working from the middle of the seat just keep splitting the gap with no staple in 2. So once you work to the back side to side before you start to hit the curve of the seat you may need to pull that first staple you put in the very back and tighten it up as much as you can, then start spitting the difference between staples on the curved part of the seat. Pulling down on the vinyl and wiggling it back and forth, then put staple, go to other side and do same on curve, keep pulling and wiggling the vinyl down in between staples on the curved part till its done, you can work every last wrinkle out of the vinyl. No, you don't have to make any slits in the vinyl but you want to do it in a warm area, just room temperature but it helps on the curves to warm the vinyl up a litte with a hair dryer.
 
just looked online, looks like that stapler i bought was 50.00 but i think you will need one with any seat cover. If your electric one doesn't do the trick that one i bought worked great. Don't know how long it will last as ive only used it for that one job.
 
Yes, I will definitely tape over the crack. I really appreciate all of your input. I was just looking at the MarineVinylFabrics site and if I'm looking at the right material (Marine Vinyl Fabric Upholstery) it's only $8.99 a yard so less than $20. Probably the same stuff that the DIY site is selling for $48.
 
Unless shipping gets me, I’m definitely going to order from marine vinyl fabrics.com next time. I like the idea of having a new seat cover for 20.00. One last thing came to my mind, when your doing the curve at the back of the seat, keep bunching in your mind. Basically bunch the vinyl while your pulling it down or I guess up is the better word since the seat is upside down. Once you get going you will be fine. And you can always pull a staple or 2 to re pull if need be. I had to pull a few to do a good job. No problem, interested to see how it turns out. Have a good night
 
Unless shipping gets me, I’m definitely going to order from marine vinyl fabrics.com next time. I like the idea of having a new seat cover for 20.00. One last thing came to my mind, when your doing the curve at the back of the seat, keep bunching in your mind. Basically bunch the vinyl while your pulling it down or I guess up is the better word since the seat is upside down. Once you get going you will be fine. And you can always pull a staple or 2 to re pull if need be. I had to pull a few to do a good job. No problem, interested to see how it turns out. Have a good night
I'll probably get the order in tomorrow and will post pics when I get it done. Thanks again.
 
Here is my experience. I have a 98 GTX ltd. I got some flat vinyl to recover my seats from Joanne's, they were the only ones with the color I needed. I viewed a lot of videos on YouTube and the sticky on this forum. While I think it turned out ok...I won't do it again. I was too hard to do . The hardest part is the backs, where it curves. The flat vinyl tends to want to bunch up. I could not get it completely free of wrinkles, but when the seat is on, the wrinkles cant be seen. I did have a heat gun and it helped tremendously. The vinyl I bought doesn't seem to be as thick. I think I'll pay the extra and get the fitted stuff.
I did put a thin layer of foam between the seat and the new cover, that does make difference,. My seat had blemishes and I did have to do some foam repair prior.
I paid about $45.00 (2 yds) for the vinyl and about $25 for the foam sheet, plus some spray glue for the foam. I also removed my old cover, it was rough and brittle.

Psst.. I haven't put the strap back on , I just got done last week recovering it.
 

Attachments

  • 20230403_110507.jpg
    20230403_110507.jpg
    493 KB · Views: 18
  • 20230403_110518.jpg
    20230403_110518.jpg
    386.7 KB · Views: 16
  • 20230403_110447.jpg
    20230403_110447.jpg
    298.6 KB · Views: 20
Thanks for your input Grim.

I submitted a question to MarineVinvlFabrics.com yesterday to clarify if their Marine VInyl Fabric was the correct material to use for a jetski cover. This is the response that I got back: "I would suggest using our 4 way stretch black vinyl to stretch cleanly over the existing seat. It can be stretched and stapled underneath."

So I called the company to confirm the 4 way stretch only comes in black and that the regular Marine Vinyl Fabric was only 2 way stretch so would be difficult to get to conform to the contours of the seat without leaving wrinkles. The reply was that they sell the 2 way stretch to professional upholstery companies all the time but it does require the use of a heat gun and some experience to make it fit properly.

Now learning about 2 way vs 4 way stretch, that made me go back and look at the product description on DIY Seat Skins which says:
Naugahyde is a hard 4 way stretch (2 way stretch) material
So I sent them the following question:

"From further investigation, it seems that I want to use 4 way stretch material. I'm told 2 way stretch material requires use of a heat gun and some experience to properly fit it to the contours of the seat. Your product description says "Naugahyde is a hard 4 way stretch (2 way stretch) material." Should I interpret that to mean that your product is actually a 2 way stretch material and "hard 4 way" means that it will stretch 4 way stretch the use of a heat gun?"

Their response:

"Sure. Elastic stretches and rots. 4 way stretch was never used on your seat initially for that reason.
Good luck on your seat job. Heat is not required with our products but could be needed if coverage issue arises.
Your friends at DIY Seat Skins!"

So after all this I'm even more confused as to which way to go to get the best results.


Here is my experience. I have a 98 GTX ltd. I got some flat vinyl to recover my seats from Joanne's, they were the only ones with the color I needed. I viewed a lot of videos on YouTube and the sticky on this forum. While I think it turned out ok...I won't do it again. I was too hard to do . The hardest part is the backs, where it curves. The flat vinyl tends to want to bunch up. I could not get it completely free of wrinkles, but when the seat is on, the wrinkles cant be seen. I did have a heat gun and it helped tremendously. The vinyl I bought doesn't seem to be as thick. I think I'll pay the extra and get the fitted stuff.
I did put a thin layer of foam between the seat and the new cover, that does make difference,. My seat had blemishes and I did have to do some foam repair prior.
I paid about $45.00 (2 yds) for the vinyl and about $25 for the foam sheet, plus some spray glue for the foam. I also removed my old cover, it was rough and brittle.

Psst.. I haven't put the strap back on , I just got done last week recovering it.
Did you apply the heat to the exposed finished side, or the underside of the cover? Do you have to be pretty careful not to apply too much heat and burn or melt the vinyl?
 
Did you apply the heat to the exposed finished side, or the underside of the cover? Do you have to be pretty careful not to apply too much heat and burn or melt the vinyl?
I applied heat to the finished side, I made it hot to the touch but not much more. I noticed it did stretch better but still not enough to overcome the few wrinkles I had. I'm sure it is more because of my technique than the materiel. I am not sure why kind of stretch the vinyl was either...never heard of 2 or 4 way stretch.
 
Did you apply the heat to the exposed finished side, or the underside of the cover? Do you have to be pretty careful not to apply too much heat and burn or melt the vinyl?
I applied very little heat, and only with a hair dryer. I did my cover in the summer, I put the vinyl in the back of my car with the windows up for an hour before I used it but I doubt it actually made much difference as it probably cooled to room temperature fairly quickly. As long as your working in a warm room it will be fine, just turn the heat up and work in a t shirt.The vinyl I used from DIY is a 2 way stretch, they said the 2 way stretch is better vinyl than the 4 way stretch, can’t remember why but....you can definitely make that curve with no wrinkles or pleats you just need to be sure to work from the center pulling down and back before putting the staple in. And when your doing the curve bunch and pull under in between each staple, keep bunching and pulling splitting the difference between the staples on the curve until it’s filled in with staples,
 
I watched a you tube video of a woman doing a bar stool with vinyl, she was able to do the stool with no wrinkles and that’s a circle. I will do a google search and see if I can find that video
 
Back
Top