


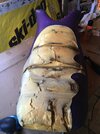
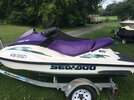
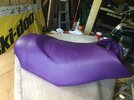
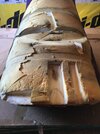
Hello Everyone, I’m pretty new to the forum so this is my first post. I just finished repairing my 2002 GTI foam seat and installed a new skin from DIY SeatSkins.com. This was the first time I repaired a seat but absolutely loved the experience with diyseatskins, excellent quality skin, came 2 days after ordering, good price and they are only a text away for any questions. So I thought I would share with everyone how I went about the seat skin replacement. 1. The old vinyl was very hard and brittle and had 3 or 4 good size tears in it so I thought it better come off. I took a utility knife with the blade out only an1/8th if an inch and cut through the old vinyl in strips that were about 2 or 3 inches wide. Then used a hair dryer to heat up the vinyl until the glue became pliable again, used a flat screwdriver to get started separating the old vinyl from the foam and once it was started just pulled it slowly on an angle while heating it ahead of the pull. Once the old vinyl was removed I cut out the nasty foam using an electric turkey carving knife. Then pieced in new foam which I sourced from an old car seat, I glued the foam in using Gorilla multi purpose spray adhesive( make sure to have a small dish of acetone on hand, drop the spray nozzle in the acetone after using to keep it clean), just spray both pieces of foam anywhere that they are going to come into contact, wait 1 minute till tacky and place it in. Once the new foam was in, I roughly trimmed it with the electric carving knife to contour to the existing foam and then sanded the foam repairs flush using 40 grit sanding disc on a drill. After the foam seat was sanded I skimmed any remaining imperfections with silicone and a plastic spreader, let that dry. I used duct tape and taped around the perimeter of the seat where the foam meets the plastic just for some added protection and then pulled the new seat skin on which comes as a flat piece of 2 way stretch vinyl. The Purple colour I received was a very good match. When pulling the new seat skin on, I made sure it was centered under the seat with the seat upside down, tacked the vinyl at the back of the seat with 2 or 3 stainless steel staples. I had to glue the skin to the seat where it dips before adding anymore staples, if I didn’t the vinyl would just tent right over this area. After I glued where the seat dips down I just pulled the vinyl forward and tacked it on the one side near the middle of the seat, then went to the other side, pulled the vinyl forward towards the front and down tight around the side. From there work forward or backwards from the Center pulling the vinyl ahead and down around the side and place a stainless 5/16 T50 staple every 5 inches or so, i didn’t staple it fully until after I had it pulled tight around the entire seat, that way it’s not so difficult when you will have to pull a staple or 2 to pull it tighter in that area. Once you get the vinyl worked to the front you will have to make a cut at the front of the seat down the Center, just go slow to be sure not to cut to far. I have a seadoo logo stencil coming from pwcgraphics.com who I’d like to mention was also a pleasure to deal with. The only thing I would do different next time is I would stretch and staple a 1/4 inch thick piece of foam over the entire seat first, this foam would also need to be glued in the seat area that dips down sharply. I will try and post some pictures now and another one after I paint the seadoo logo’s on. I’ve spent a lot of hours reading seadoo forum and it has been an unbelievable help for me, hope there’s something here that can help someone else. I put the painters tape on so I could see where to apply the glue to underside of the skin, the tape is slightly visible from beneath.
Attachments
-
 A9ECE0DC-AA6D-4B56-A5FD-DE20E4C33209.jpeg297.5 KB · Views: 45
 -
 442B585D-768C-4E66-9925-383676EB3BBE.jpeg374.6 KB · Views: 39
 -
 0E6EC8FE-CE16-4B0F-8A9F-D59FF66E6421.jpeg437 KB · Views: 34
 -
 955225C8-4903-456B-B3D9-DDBBC14C96B7.jpeg274.5 KB · Views: 36
 -
 4F9E394D-D353-47C0-AFFA-0CCEC4FBED7F.jpeg201.5 KB · Views: 32
 -
 DB43284B-8CA1-4C72-A1BA-5B6970557954.jpeg269.4 KB · Views: 33
 -
 90D7ECCA-43B2-469B-800B-D3B7BB88FDED.jpeg285.2 KB · Views: 32
 -
 03756D20-25C8-4411-AFCC-4360B0A6169A.jpeg346.1 KB · Views: 34


