Yes, so when I said to bunch the material, she described it as gathering. She was using four way stretch but you can do it with the 2 way. The main reason I went with the DIY was I didn’t want the blacktip logo,


-
This site contains eBay affiliate links for which Sea-Doo Forum may be compensated.
You are using an out of date browser. It may not display this or other websites correctly.
You should upgrade or use an alternative browser.
You should upgrade or use an alternative browser.
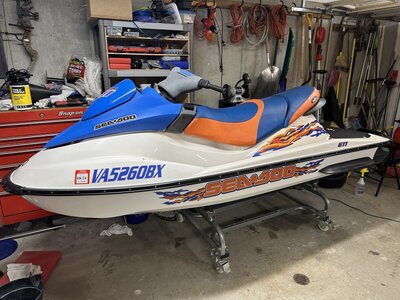
Need advice selecting seat cover replacement
- Thread starter bigJake
- Start date
- Status
- Not open for further replies.
bigJake
Well-Known Member
Yea, after seeing that and watching a couple other youtube videos, it looks like it should be pretty easy. Now I'm trying to decide between DIY and MarineVinylFabric, They are pretty much the same price when you add shipping. The color on Marine VinylFabric shows the actual material and it looks really close to the original seat color. The colors on DIY are computer generated colors so can't really tell the actual colors, they sent me a really badly lit 1" square picture of color swatches which wasn't really helpful so I may just go with the Marine Vinyl.
The shipping must be substantial for marine vinyl fabric.com then? Compared to DIY shipping. I really couldn’t offer any advice on Color, will either place send you a sample by mail? I’m in Iroquois Ontario and DIY said 50.00 to send me a sample so I said no. Was disappointing as they should have been able to put it in an envelope and mail it for whatever regular international postage is, probably 3.00 or so (been awhile since I’ve mailed an actual letter) I went ahead and ordered the purple and I was very pleased with the Color but it was and would be a concern for me too if I was ordering another. Are you planning to instal it over the old vinyl? I’m thinking it will turn out real nice going over the old vinyl, should give it some rigidity.
bigJake
Well-Known Member
Marine Vinyl is $18.98 + $17 shipping and tax = $35.95The shipping must be substantial for marine vinyl fabric.com then? Compared to DIY shipping. I really couldn’t offer any advice on Color, will either place send you a sample by mail? I’m in Iroquois Ontario and DIY said 50.00 to send me a sample so I said no. Was disappointing as they should have been able to put it in an envelope and mail it for whatever regular international postage is, probably 3.00 or so (been awhile since I’ve mailed an actual letter) I went ahead and ordered the purple and I was very pleased with the Color but it was and would be a concern for me too if I was ordering another. Are you planning to instal it over the old vinyl? I’m thinking it will turn out real nice going over the old vinyl, should give it some rigidity.
DIY is on sale from $48 down to $39 with free shipping.
Marine Vinyl is sending 3 free color samples. I initially ordered 4 colors and they wanted $15 shipping, I changed to to 3 and it was free, go figure
I asked DIY to send 2 color samples and thye said $4
Yes I plan to install over the old vinyl. I'll duct tape the cracks. to smooth it out.
I have done a couple on 96 GTSs, 99 SPX, and 04 GTIs. I have had great experience with Blacktip, and even better with JetTrim. I wouldn’t go over top of the vinyl, I used 1/4” closed cell foam that I got from Amazon. For wide cracks I filled those in with some of the foam, and then went over the whole thing with a layer of the foam and taper cut the edges. I used a narrow crown air stapler with 1/2” stainless staples that had held up well. Trying to find photo of GTSs, will post when I find.
Attachments

Curious why you wouldn’t go over the old vinyl? With the seat I did with the DIY flat vinyl I took the vinyl off because it had multiple cracks that had turned up, lots of missing foam that had rotted away, wish I had used the 1/4 foam to pull over first to hide the small imperfections but in Big Jakes circumstance with it only being 1 crack and no missing foam if he uses the flat vinyl wouldn’t he be better off going over the old vinyl as the old vinyl is glued down, slightly more firm than the DIY vinyl and although the old vinyl can be taken off Without damaging it, it can be tricky. I’ve never went over the old vinyl but have an HX that has no rips and vinyl is faded. I was planning on going over the old vinyl on that one. Would make the seat firmer and more like original. Anyways, yes what problems would come from going over it?Not the best orientation, but before and after
It’s a lot easier for the second layer of vinyl to start pulling away over top of another layer. With the vinyl being wrapped around the edge of the seat base and stapled directly to it, it’s more secure with nothing squishy under to “wiggle” and work the staples out. I don’t know if it would for sure on a ski, but have had that issue with redoing furniture seats.
If that became an issue maybe pulling the old staples and trimming an inch or so of the old vinyl off where it attaches to the base would remedy that? Then your only stapling through the 1 layer.
Personally I would probably pull it. Have never tried it in a ski so I don’t know how it would compress and release with multiple layers as you sit on it and stand up, or possibly not breathe as well to let water evaporate out. To me I’d just rather not risk having to redo it, but that’s just my personal thoughts.If that became an issue maybe pulling the old staples and trimming an inch or so of the old vinyl off where it attaches to the base would remedy that? Then your only stapling through the 1 layer.
Any updates, did you receive the samples yet,Marine Vinyl is $18.98 + $17 shipping and tax = $35.95
DIY is on sale from $48 down to $39 with free shipping.
Marine Vinyl is sending 3 free color samples. I initially ordered 4 colors and they wanted $15 shipping, I changed to to 3 and it was free, go figure
I asked DIY to send 2 color samples and thye said $4
Yes I plan to install over the old vinyl. I'll duct tape the cracks. to smooth it out.
bigJake
Well-Known Member
Yes, Sorry, I've been meaning to post an update but have been at he lake house the past few days doing maintenance.Any updates, did you receive the samples yet,
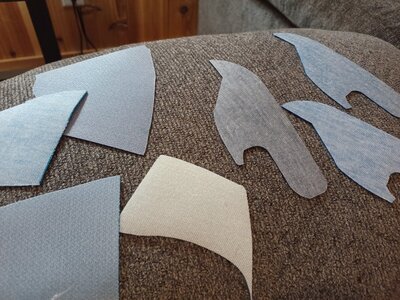
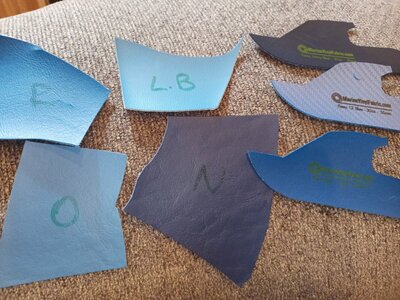
I received samples from both DIY Seat Skins and Marine Vinyl Fabric. It's hard to really tell for sure but the Marine Vinyl may be a hair thinner as it seems to be slightly more pliable. I think it's because the lining on the DIY vinyl appears to be a little thicker Both seem to have pretty much the same amount of stretch, so I think either will work. Just based on trying to gouge then with my fingernail, they both seem to have about the same durability. So I think my decision is going to be based simply on the DIY Navy blue (bottom center in the sample picture) is the closest match to the original seat color.
I tried my electric stapler and it only sank the staples half way so I bought an Arrow pneumatic stapler and 1/2" SS staples. The curious thing is that on the box of Arrow SS staples it says "Not recommended for marine use"? I know there is another type of staple that I;d probably have to buy online for twice the price, but everyone seems to say to just use the SS staples.
When I flipped the seat upside down to test the electric stapler I discovered that the edge of the original vinyl past the staples has gotten very hard over the years and the little puckers between the staples will make it impossible to just go straight over the original cover and be able to staple properly so I had the same thought that you suggested in prior post to remove the staples and cut the original viny; back a half inch or so to allow the new vinyl to be stapled directly to the seat as opposed to trying to staple thru the old vinyl.
I'm reluctant to actually remove the old vinyl because where the seat has the one split, the vinyl is definitely stuck to the foam, so not sure it it was actually glued on or just stuck to the foam over the years so I figure why risk tearing holes in the foam getting the old vinyl off. Although the youtube videos I've watched, the old vinyl appears to just come right off. I'll have a better idea on that once we get back home and I pull the staples, I'll be able to tell if the old vinyl is stuck to the foam. all the way around or if it might easily lift off maybe gently using a putty knife, but my gut is telling me to just go over the old vinyl. That reminds me, I've been so busy since we got here that I forgot to order the new vinyl .
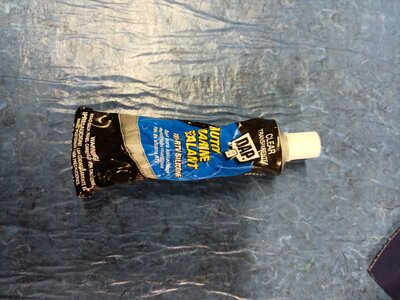
Also, I was looking at the various Gorilla glues at Home depot to see if one of the squeeze bottle versions would work to glue the foam back together where the seat has that split. The foam split is about 1" deep so will be pretty difficult to hold that apart to use the spray can Gorilla glue. The white glue bottle said it was good for foam board which I realize is a totally different animal, but I talked to the guy there in the paint dept where the glue was, he seemed pretty knowledgable and he seemed pretty confident it would work on the seat foam. I tested it on a 2" wide part of the split two days before we left home. The bottle says it fully cures in 48 hours but I had to apply it pretty thick to get good coverage on the foam and fill the very slight gap between the split. It was still tacky when we left home so I won't know if it adhered well to the foam or not until we get back home later this week.
The attached photos show front and back of the samples, the DIY samples are on the left, the Marine Viny samples cut into the shape of a boat are on the right. Note how the backing on the Marine vinyl seems more transparent, indicating that it is thinner than the backing on the DIY vinyl.
Attachments
it’s been great weather to be working at your lake house if your getting the same weather as us here in eastern Ontario. Hopefully that adhesive works out for you, too bad you weren’t able to open the crack up enough to use the gorilla spray adhesive as it bonds on contact and yeah that’s weird that box saying not for marine use, have to check the boxes I have left over to see if it says the same on them.
bigJake
Well-Known Member
Our lakehouse is in central PA, 85 degrees yesterday and a nicer 76 today. So far my relaxation at our "vacation" home has consisted of picking up a million branches from the major wind storms the past couple weeks, cutting the grass and power washing the house and decks. I got tree guys coming 7 am monday to cut 4 trees down, so more fun with the subsequent cleanup.. I need a vacation every time we get home after spending time at our "vacation" house.it’s been great weather to be working at your lake house if your getting the same weather as us here in eastern Ontario. Hopefully that adhesive works out for you, too bad you weren’t able to open the crack up enough to use the gorilla spray adhesive as it bonds on contact and yeah that’s weird that box saying not for marine use, have to check the boxes I have left over to see if it says the same on them.
Lol, hard to feel sorry for you but yeah always lots to do when the seasons change.Sounds about the same as here. We got some ice rain about 7 or 8 days ago caused a lot damage to the trees and power outages followed by heavy rain so lots of flooded basements, but has been gorgeous since. Temps right around 24 CelsiusOur lakehouse is in central PA, 85 degrees yesterday and a nicer 76 today. So far my relaxation at our "vacation" home has consisted of picking up a million branches from the major wind storms the past couple weeks, cutting the grass and power washing the house and decks. I got tree guys coming 7 am monday to cut 4 trees down, so more fun with the subsequent cleanup.. I need a vacation every time we get home after spending time at our "vacation" house.
bigJake
Well-Known Member
24 Celsius??? Talk American, we don't know what that shit means here. LOLLol, hard to feel sorry for you but yeah always lots to do when the seasons change.Sounds about the same as here. We got some ice rain about 7 or 8 days ago caused a lot damage to the trees and power outages followed by heavy rain so lots of flooded basements, but has been gorgeous since. Temps right around 24 Celsius
Lol, just converted it. 75 Fahrenheit24 Celsius??? Talk American, we don't know what that shit means here. LOL
bigJake
Well-Known Member
When people ask me what gauge my pistol is, I tell them 0.354331 inches LOLLol, just converted it. 75 Fahrenheit
That should confuse the shit out of them
bigJake
Well-Known Member
US gvmt tried to convert us to the metric system back in the 70's but it didn't fly. They started putting both Imperial and Metric labels on everything thinking they could slowly switch over, here we are 50 years later still with both measurements on every label but no actual progress toward conversion.When people ask me what gauge my pistol is, I tell them 0.354331 inches LOL
, I just googled up when we switched. I guess 1975, the year I was born. We have converted most things here, pop cans are in ml, gas is by the litre but I pretty much always use a standard tape measure, Lumber is still standard You get used to using both, especially when your forced to
bigJake
Well-Known Member
yea much easier to grasp if that's what you grew up with. I was born in 59 so was well indoctrinated in the old system when they attempted the switch in the 70s and most people were just opposed having to learn something new so it was a total failure.. I honestly don't know if they currently put more emphasis on teaching kids the metric system in grade school now or not. Good questions to ask my niece the next time I see here if her grade school kids are being taught the metric system. If they did, the change could occur naturally rather than trying to force feed it as they did in the 70s. But of course the current emphasis is on teaching grade school kids that there are 87 genders and they can decide which one they want to be on any given day and instructing them on how to get a sex change so they can be on a beer can., I just googled up when we switched. I guess 1975, the year I was born. We have converted most things here, pop cans are in ml, gas is by the litre but I pretty much always use a standard tape measure, Lumber is still standard You get used to using both, especially when your forced to
I hear you, thank god my youngest is 15 and none of that was in the curriculum, but I do worry about what my grandchildren will be taught once I have some. They aren’t taught to write anymore, only to print. All types of nonsense. I remember hearing a few years ago about some schools adopting a no contact policy, meaning that kids in elementary school couldn’t give another student a hug. I’m not a political person but sometimes the powers that be over step their boundaries in my opinion. Anyways, just ranting now
bigJake
Well-Known Member
I hear ya, I remember seeing several cases of 5 year old kids getting kicked out of kindergarten for sexual harassment for giving their friend a hug. Kids that age don't even grasp the concept. This county has gone totally crazy and I and really afraid that we have already passed the pint of no return. Good chatting with you, I'll post an update as I start to make progress on the new seat cover. Thanks again for all of you input/advice.
bigJake
Well-Known Member
Well I finally got a chance to install the new seat cover.
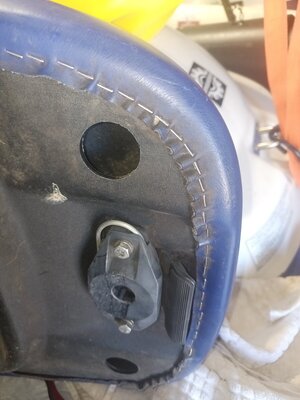
First off I removed the staples and trimmed off the old stapled/wrinkled area of the edge of the old cover. The crack in the foam had actually separated and there was almost a 1/8" gap in the foam so the spray adhesive was not an option as I needed something to fill the gap. I initially tried Gorilla White glue but that did not work well. The instructions I received with the new seat cover said to fill any holes in the foam with auto/marine silicone which worked very well. I then taped over the crack with 3 layers of Gorilla tape. The squeeze out of the silicone created a slight ridge even though I tried to wipe it off flush so it took a couple of layers of the gorilla tape to smooth out the ridge.
Of course it was 85 degrees last week and sunny but 40 degrees and rainy today so I had to do it in my 65 degree basement shop. I had a space heater going and used a hair dryer but when I started out I totally underestimated the amount of heating with the hairdryer and stretching required to get a tight fit. The instructions that came with the cover said to start at the rear and work your way up the sides. I got a perfect fit on the rear of the seat but as I tried to work my way up the sides it was a total disaster with large wrinkles that I couldn't work out. Because I didn't have the vinyl warm enough it was like trying to form cardboard to the seat. In retrospect I'm not sure if the problem was starting on the narrowest part of the seat or just not heating and stretching the vinyl enough. Anyway the only way it looked to me like it was going to work was to start at the widest part of the seat up towards the front so I left the back tacked in place and tacked the widest part and kept working it until I got that area pretty tight, I then worked forward over the front of the seat. This was a real PITA, it took numerous heating/stretching cycles to get the vinyl to conform to the contours of the seat. It took a while but I finally got the hang of the heating and stretching process. One I had a perfect fit on the front I worked backwards again, pulling my previous staples as I went and restretching it for a tight fit.
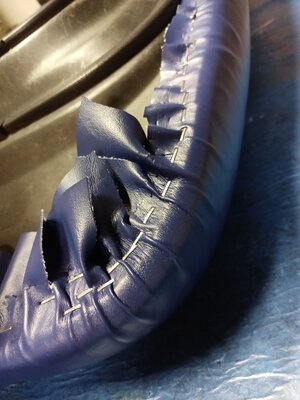
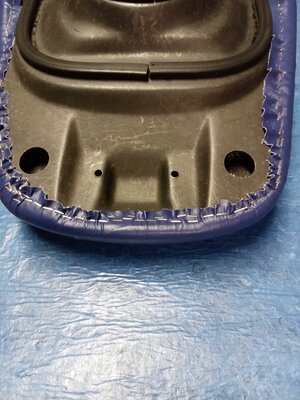
Then when I got to the back rounded portion of the seat it was another disaster. The one attached pic shows all the wrinkles on my first attempt.
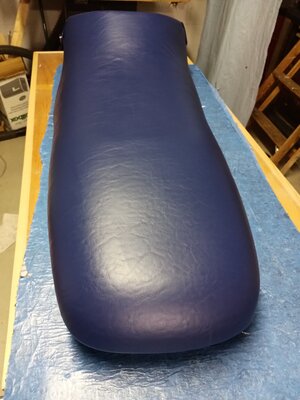
It seems counter intuitive that even though I had all of that excess material that I was trying to form around the back of the seat creating all of those wrinkles, I finally figured out that with heating and stretching I was able to stretch all of those wrinkles out and get pretty much a perfect fit with no wrinkles at all. The last picture shows the back after I heated the vinyl and stretch out all the wrinkles. So I'm pretty satisfied with the end result even though it took me all day. Now that I understand the process it would probably take a couple hours with the vinyl that stiff and having to use so much heat from the hairdryer. So the takeaway for anyone wanting to attempt this to make it much easier is to do it outside on a warm sunny day where the sun is keeping the vinyl soft and pliable so it doesn't require the numerous cycles of heating and stretching that I had to do to get the vinyl to conform tightly to the seat. The other option is to just spend the extra money and buy a preformed cover which would probably cut the install time down to 1 hour.
First off I removed the staples and trimmed off the old stapled/wrinkled area of the edge of the old cover. The crack in the foam had actually separated and there was almost a 1/8" gap in the foam so the spray adhesive was not an option as I needed something to fill the gap. I initially tried Gorilla White glue but that did not work well. The instructions I received with the new seat cover said to fill any holes in the foam with auto/marine silicone which worked very well. I then taped over the crack with 3 layers of Gorilla tape. The squeeze out of the silicone created a slight ridge even though I tried to wipe it off flush so it took a couple of layers of the gorilla tape to smooth out the ridge.
Of course it was 85 degrees last week and sunny but 40 degrees and rainy today so I had to do it in my 65 degree basement shop. I had a space heater going and used a hair dryer but when I started out I totally underestimated the amount of heating with the hairdryer and stretching required to get a tight fit. The instructions that came with the cover said to start at the rear and work your way up the sides. I got a perfect fit on the rear of the seat but as I tried to work my way up the sides it was a total disaster with large wrinkles that I couldn't work out. Because I didn't have the vinyl warm enough it was like trying to form cardboard to the seat. In retrospect I'm not sure if the problem was starting on the narrowest part of the seat or just not heating and stretching the vinyl enough. Anyway the only way it looked to me like it was going to work was to start at the widest part of the seat up towards the front so I left the back tacked in place and tacked the widest part and kept working it until I got that area pretty tight, I then worked forward over the front of the seat. This was a real PITA, it took numerous heating/stretching cycles to get the vinyl to conform to the contours of the seat. It took a while but I finally got the hang of the heating and stretching process. One I had a perfect fit on the front I worked backwards again, pulling my previous staples as I went and restretching it for a tight fit.
Then when I got to the back rounded portion of the seat it was another disaster. The one attached pic shows all the wrinkles on my first attempt.
It seems counter intuitive that even though I had all of that excess material that I was trying to form around the back of the seat creating all of those wrinkles, I finally figured out that with heating and stretching I was able to stretch all of those wrinkles out and get pretty much a perfect fit with no wrinkles at all. The last picture shows the back after I heated the vinyl and stretch out all the wrinkles. So I'm pretty satisfied with the end result even though it took me all day. Now that I understand the process it would probably take a couple hours with the vinyl that stiff and having to use so much heat from the hairdryer. So the takeaway for anyone wanting to attempt this to make it much easier is to do it outside on a warm sunny day where the sun is keeping the vinyl soft and pliable so it doesn't require the numerous cycles of heating and stretching that I had to do to get the vinyl to conform tightly to the seat. The other option is to just spend the extra money and buy a preformed cover which would probably cut the install time down to 1 hour.
Attachments
-
 IMG_20230502_232421.jpg389.8 KB · Views: 15
 -
 IMG_20230502_222308.jpg336.1 KB · Views: 14
 -
 IMG_20230502_123530.jpg420.8 KB · Views: 14
 -
 IMG_20230502_232812.jpg429.2 KB · Views: 13
 -
 IMG_20230428_160424.jpg324.4 KB · Views: 14
 -
 IMG_20230428_161723.jpg348.9 KB · Views: 15
 -
 IMG_20230503_104610.jpg365.1 KB · Views: 14
Last edited:
- Status
- Not open for further replies.
Similar threads
- Replies
- 0
- Views
- 70
- Replies
- 8
- Views
- 1,032
- Replies
- 2
- Views
- 1,274
- Replies
- 3
- Views
- 422