


-
This site contains eBay affiliate links for which Sea-Doo Forum may be compensated.
You are using an out of date browser. It may not display this or other websites correctly.
You should upgrade or use an alternative browser.
You should upgrade or use an alternative browser.
The stereo journey begins! - Updated July 30th, now completed
- Thread starter Sako7STW
- Start date
Once the panels were cut out, I sanded them down, rounded the edges, and primerd them. I then took nail hole fillers and smoothed out any dings. Once that was done, several coats of high gloss black was applied till it had a deep rich, smooth look.
Attachments

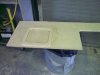
Next I mounted the Sub Panel (aka Baffle) to the boat panel. I used short stainless sheet metal screws through the back of the boat panel into the Baffle. I choose to use sheet metal screws because they have a more aggressive threading. be VERY careful not to drill too deep. I take a peice of electrical tape and wrap the drill bit just above the depth I want to go so the tape stops the bit from going too deep. WORKS GREAT!
Attachments


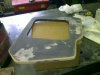
I then covered the baffle with masking tape to protect the beautiful fish from dings and scratches while I was mounting the panels back in the boat. It also needed protection as once the panels were installed I traced the sub opening onto the boat and used a jig saw to remove the fiberglass needed to make room for the sub to fit. Before mounting the panel I applied a liberal amount of clear silicone to the back of the panel so it would seal the panel to the boat. There were a few larger gaps that needed filled and I used weatherstripping for that.
Attachments

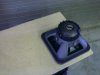
I applied a thin layer of clear silicone to the back of the spacer ring. I then put the spacer ring on the sub and connected the 10ga. speaker wire to the sub. I placed the sub in its opening and screwed it through both panels and the boat with stainless 1/4" x 2 1/2" sheet metal screws. This sucked everything down nice and tight which sealed it perfectly.
Remember to predrill the holes as the screws will not go through the fiberglass otherwise. Also when using the jig saw, be prepared with many blades as you will ruin plenty of them. The fiberglass is some seriously hard stuff!
Remember to predrill the holes as the screws will not go through the fiberglass otherwise. Also when using the jig saw, be prepared with many blades as you will ruin plenty of them. The fiberglass is some seriously hard stuff!
Attachments
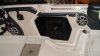
After the sub was done the that left the tower speakers. I had to drill holes in the bottom of the tower and where the speakers mounted. I ran the wire using bailing wire to pull the wiring through the tower. I didn't take pics of that sorry. But here is a pic of the boat with the speakers on the tower. I hope this thread helps someone with some ideas and how to think "out of the box" when it comes to stereos. Where there is a will, there is a way. Be imaginative!
Attachments

custompartsguy
Well-Known Member
Not to burst any bubbles but that looks like standard mdf board, as well no matter what type of wood it needs to be properly prepped, except teak wood, I am a professional marine electronics tech and I can say that imo that is the incorrect way to do things, I am not trying to bash anyone Im just stating professional advice, that wood should not have just been primered and painted, correctly done it should have been fiberglassed and then you can primer and paint it, I just see too many boats where things have been done incorrectly. As well in terms of wiring anything less then marine grade wire would not pass an inspection, it does not matter how fast something drys out, the moisture will form in that type of wire and corroide from the inside out without being able to tell, I visited a local car audio/ so called want to be marine audio installer and they informed me that for marine audio all they use is car audio wiring, from that I can tell you who I would explain customers stay away from. Car audio speakers are not going to last on a boat either, the only place car audio speakers are ok to install on a boat is inside a cabin ie: master state room, anything with a full closed off cabin on it. Externally placed on a boat they are going to corroide and weather away and rot from the outside weather, Im sorry to say but this is why they have car audio and marine audio.
I will agree on one thing only, that this system does look good looking at it however imo it is very incorrectly installed and wrong wiring. Sheet metal screws are also incorrect to use in wood and fiberglass, they offer quality stainless screws that are self tapping and over great bite much more over sheet metal screws once again imo, in my professional opinion.


These are examples of quality marine grade wiring in a boat, I am just trying to help you here as I see way to many incorrect jobs that I have to repair on customers boats.
Note they are all marine grade wiring, proper lug crimps and heat shrink that is adhes lined to seal out water. All buss terminals are also marine grade and tinned, the stereo that is being installed is 3000 watts in this 22' Mako that I now own and the fuse holder is also marine grade and tinned. I am sorry but electrical tape and liquid tape and silicone does not seal out moisture and water only marine grade terminals, wiring and buss bars and fuse holders should be used in a boat.
Heres what happens when you use non marine grade wires and connections in a boat, this was covered in silicon, liquid electrical tape then about 50 layers of electrical tape........ You can see what still happend!
I will agree on one thing only, that this system does look good looking at it however imo it is very incorrectly installed and wrong wiring. Sheet metal screws are also incorrect to use in wood and fiberglass, they offer quality stainless screws that are self tapping and over great bite much more over sheet metal screws once again imo, in my professional opinion.
These are examples of quality marine grade wiring in a boat, I am just trying to help you here as I see way to many incorrect jobs that I have to repair on customers boats.
Note they are all marine grade wiring, proper lug crimps and heat shrink that is adhes lined to seal out water. All buss terminals are also marine grade and tinned, the stereo that is being installed is 3000 watts in this 22' Mako that I now own and the fuse holder is also marine grade and tinned. I am sorry but electrical tape and liquid tape and silicone does not seal out moisture and water only marine grade terminals, wiring and buss bars and fuse holders should be used in a boat.
Heres what happens when you use non marine grade wires and connections in a boat, this was covered in silicon, liquid electrical tape then about 50 layers of electrical tape........ You can see what still happend!
custompartsguy
Well-Known Member


No matter what the use this will happen over time to non marine grade electrical items on a boat. It may not be a month or a year but it will happen. On top of this if your boat is insured and lets say there is a fire they will fully inspect the vessel if non marine grade electrical items are at fault they will not cover the loss.
Point being its better to spend the money up front and do it right, this is a 22' Mako I am restoring and my cost on items so far in electrical is around $600 and its a 22' boat, I can assure you I have 4-3 times the electrical of a seadoo boat in this mako and cost is far better then problems down the road.
Non marine grade playwood and even worse not fiberglassed is going to rot and cause major headaches for you or whoever purchases the boat from you.
Just my professional opinion but I would rip all that wiring out of the boat and install proper marine grade wiring, buss bars and fuse holder, then remove the sub and use marine grade wood and fiberglass the wood then you can paint the wood, then install only marine speakers on the exterior of the boat.
I'm truly sorry if I have offended anyone however I only practice safe wiring and installs, while it is not cheap you can expect my work to hold up as it should, I do this for a living every day and can offer my services local to anyone that would like the work done correctly, I can fully re-wire a boat for you big or small no matter what type of boat.
I agree on the wiring. All i use is tinned wire and I seal all connections. When I pulled out the factory wiring though, it wasnt tinned wire and was totally corroded.
custompartsguy
Well-Known Member
I agree on the wiring. All i use is tinned wire and I seal all connections. When I pulled out the factory wiring though, it wasnt tinned wire and was totally corroded.
That is a very true point, a lot of boat manufactures (will remain unamed) just so happen to use non tinned wiring in the manufacturing of boats, however sometimes outside sources are used for their wiring. Most of this holds up well or long enough however if you notice all marine* true marine cable is tinned..... Makes you wonder?
The other thing is make sure wires are not ran next to sensitive electronics or FUEL lines! You don't know how many boats I have to re-wire and badly corroided wires are laying on top of fuel lines!
Wires will never last forever however I can say that marine tinned wire will last longer then non marine wire.
Its also about proper care as well.
You bring up great points. You don't know or see everything that was done to the system however. The sheet metal screws I used are Stainless and cost me a fortune. Some were selftappers others were not needed as the holes were already there.The wood was sealed with the EPOXY paint that is UV resistant and will stand up to YEARS of use on houses decks. Good enough for this application. Wire WILL NOT corrode if the moisture cannot get to it. Every connection is sealed with not only stuff I mentioned, but also marine grade silicone. If it is good enough to seal the hull of your boat, it is good enough to seal a wire connection. I took pictures before sealing so that it could be seen and would look better in the pictures. Any post mounted connector, butt connector, ect. is also heat shrinked. All the connectors are INDUSTRIAL grade that are rated for outdoor use. That means they can get wet for years with no adverse effect. It is the same stuff used at my plant that has lasted years and years. I said it before and I will say it again, I am 100% confident in the installs ability to withstand it's intended use. The ONLY car audio grade speaker is the sub, the rest are all marine speakers. They way I use the sub, 3 years will probably be as long as it will last anyways and will need replaced. Never had one last much longer than that. Dont forget, this is not a free air sub install, it is in a sealed enclosure.
As for how it sounds, It sounds freaking amazing. The bass is extreme when I want it to be. The vibration is not as bad as I thought it would be. I have heard ALOT of marine sound systems, and I can honestly say that few have even came close. My biggest disappointment has been on the tower speakers. They just dont live up to my standerds. I would really like to change them out for a set of Wetsound Pro485's but the buget wont allow it this year I dont think. I am going to look into seeing if the new Kicker HLCD's will work in these enclosures and maybe try that. I am also going to a high capacity dual system battery setup instead of the single. The charge keeps up fine when i am running only the inboat sounds, but when I get after the tower speakers it cannot keep up.
As for how it sounds, It sounds freaking amazing. The bass is extreme when I want it to be. The vibration is not as bad as I thought it would be. I have heard ALOT of marine sound systems, and I can honestly say that few have even came close. My biggest disappointment has been on the tower speakers. They just dont live up to my standerds. I would really like to change them out for a set of Wetsound Pro485's but the buget wont allow it this year I dont think. I am going to look into seeing if the new Kicker HLCD's will work in these enclosures and maybe try that. I am also going to a high capacity dual system battery setup instead of the single. The charge keeps up fine when i am running only the inboat sounds, but when I get after the tower speakers it cannot keep up.
Last edited by a moderator:
custompartsguy
Well-Known Member
Thats your opinion, I was just offering my professional opinion as a professional marine mechanic. No matter what car wiring/cable is incorrect and will never pass inspection. Water will still get inside the wires trust me. One should only use marine cable, marine lugs and marine heat shrink adehesive lined.
But the good news is it is not my boat to worry about, I am just trying to offer professional advice. Best of luck on the build!
As well on the wood epoxy paint is not a sealant.....The wood still needs to be marine wood and fiberglassed....... Once again this is only my opinion coming from a professional marine mechanic.
Have fun and enjoy the boat.
Im not trying to put you down at all just explaining how it should be done......
If I lived in Florida where it is humid all of the time and the boat is used 12 months a year I would agree, but I dont. I live in a dessert and am lucky to get 5 months of use. I can completely drench the boat and it will be dry in the morning. Last season there was hardly a water drop on the Sub baffle board. Again, like I said, The epoxy paint is used on house decks. It is rated for 10 years in that application which see's far more use and abuse than this boat does. IT WILL NOT ROT or RUIN before the boat is hammered. The boat is stored under cover indoors after being allowed to dry out. I have zero worries of your concerns.
On that note I, for the record, will agree that what CPG is saying is a better route to go and would incourage anyone doing an install of this nature to use what he is saying. Marine grade is better. BUT, I also believe that not everything requires that level. Biggest thing is to take your time and be VERY thorough in your connections and protecting them. If you got car audio and thats all you can afford, GO FOR IT. Any tunes is better than no tunes.
I went out to look at my tower speakers on the boat today and I am very pleased to report.....ZERO, ZIP, NOTTA, corrosion on any of the components in the bottom of the boat (the most vulnerable place). All look like new and the copper that can be seen through the silicone is still nice and shiny new.
Well I am not a happy camper today.......Well this morning I went and got the Kicker KMT6's (tower speakers) out off the boat for the guy that bought them. They have been out maybe 5 times last summer. Well I got looking at them and the surround on one of the 6" mids was cracked up BAD and ready to start splitting. Silicone to the rescue. The other three were perfect? Called the guy and told him what i found and how I fixed them, knocked $50 off the sale price for him. Yep, Kicker is going to get a mouthful from me! I will for sure be doing a very thorough inspection of the other speakers in the boat!
Well I got part of the upgrades done last week. I got the 3 battery setup done and mounted the new Liquid Acoustics tower speakers. Spent some time out on the water and let me tell you, these tower speakers are AMAZING. they have a sonic quality that is simply unmatched. They could be heard from 600+ yards away! This was using my Kicker 4 channel amp bridged and I think the amp is a little weak for these bad boys. So now I am going to install a ZED Audio Kronos 2 channel amp. These speakers are a 2ohm load each so the Kronos will be pumping a true 500 watts to each speaker set! Plus with the class D design, battery usage should go down even though it is more power according to Zed. I will have the new amp installed before the 4th of July weekend where they should get a true test.
Now all that is left is to get my new amp installed and install the onboard 3 bank battery charger. This is proving to be a challenge as it has to be mounted where water at best may splash on it. It cannot be submerged. These boats do such a good job of staying pretty dry so I am not overly concerned just going to be selective on placement. Going to have to get creative I am sure. I will get some pics but just didnt have time to run get the camera for the first part but I will. I promise.
Now all that is left is to get my new amp installed and install the onboard 3 bank battery charger. This is proving to be a challenge as it has to be mounted where water at best may splash on it. It cannot be submerged. These boats do such a good job of staying pretty dry so I am not overly concerned just going to be selective on placement. Going to have to get creative I am sure. I will get some pics but just didnt have time to run get the camera for the first part but I will. I promise.
Hi Sako. How did you remove the interior side panels? Did you just remove the grab handles then pull hard on each of the connected locations to pull the entire side panel off? I noticed that some of the pop connectors come out easily and some end up staying mounted in the fiberglass body. I just want to make sure I'm removing it properly and that it will go back on again when I have run my speaker wire for adding two additional speakers to the pre drilled locations. Cheers! Rich.
Hi Sako. How did you remove the interior side panels? Did you just remove the grab handles then pull hard on each of the connected locations to pull the entire side panel off? I noticed that some of the pop connectors come out easily and some end up staying mounted in the fiberglass body. I just want to make sure I'm removing it properly and that it will go back on again when I have run my speaker wire for adding two additional speakers to the pre drilled locations. Cheers! Rich.
Yep it sounds like you did the same as I did. kinda a pain to replace the pins with new ones but not a biggy.
Sonny, no I didnt have any clearence issues with the 6.5"s I did have to build out the baffle for the 12"s however.
Sako, sorry to bother you again with more questions. ok so you just yanked the side panel off, but there seems to be a metal bolt or something at the lowest part of the side panel - did you have that obstacle as well? I also have a 2006 Utopoia 205 SE. Shall i just pull hard to get that sucker out too? Where did you manage to buy new pins from?
The pre drilled rear speaker holes are smaller in diameter than the front speaker locations - will they accomodate a 6.5" speaker, it doesn't appear so - but there is of course the side panel which makes the speaker sit about 1/4" shallower so maybe with this factor the size of the speaker holes in the rear is sufficent for a 6.5"? i know you made new holes as you had to move yours a little but just wondering what your thoughts are on this?
also to drill the hole, if i need to make it bigger, shall i just slowly open it up with a drill but i.e. keep shaving some off to make it bigger or shall i get a 5" hole saw and just open the hole up bigger that way?
i ran the speaker cable yesterday on one side but got a bit panicked because it took so long and am now not sure i should continue - only your post is giving me the confidence to continue!
So sorry I took so long to answer, hope I am not too late. I forget to come back and check this. I am trying to remember exactly but yes the pannels are bolted now that i think about it. I just cant remember exactly where or how I got to them. Once I got the bolts undone there was still some pins that stuck. I got the replacement pins from an autoparts store. They are common.
I used a hole saw to drill mine. I removed the pilot bit and used the hole saw as a template to draw a marker line. Then took a razor blade and cut the vinyl so I could then saw it. Best way to make sure the holes lined up. After sawing I used a big pair of needle nose pliers to remove all the material that was behind the panel. I remember there being a support rib of fiberglass that i had trim back to make clearance that used the pliers to rip away.
I used a hole saw to drill mine. I removed the pilot bit and used the hole saw as a template to draw a marker line. Then took a razor blade and cut the vinyl so I could then saw it. Best way to make sure the holes lined up. After sawing I used a big pair of needle nose pliers to remove all the material that was behind the panel. I remember there being a support rib of fiberglass that i had trim back to make clearance that used the pliers to rip away.

gioakjoe
Active Member
I'm surprised a sub at that location even makes sound you can hear, lol.
sealed off the square opening behind the seat bust made it removable so i can still get in there if need be, also sealed around all the edges inside there to help all in all works great I could not figure a better spot to mount a 10 inch sub on that boat.
Similar threads
- Replies
- 9
- Views
- 2,551
- Replies
- 0
- Views
- 3,345
- Replies
- 23
- Views
- 4,738