Recovering seat issue

Note: This site contains eBay affiliate links for which SeaDooForum.com may be compensated
Status
Not open for further replies.

snrusnak

Member
Disclaimer, I've never recovered a seat...

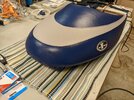
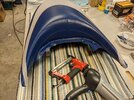
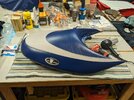
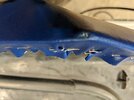
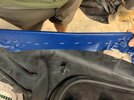
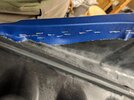
Seeing if anyone can give some advice. We ordered Jet Armor seat covers and they don't seem to fit right. We have a pair of 2005 Sea Doo GTX's. They're identical other than one is NA and one is supercharged. They are nearly correct, but the front corners seem to have way too much slop. For example, in the attached pictures, this is the rear seat. The foam/plastic comes to a point but the seat cover is sewn with like a 1" vertical seam at this location. When installed, it has a bunch of empty void that you can't really stretch out. Anyone have any ideas? Haven't stapled anything yet as they don't seem like they'll fit right. Got an email in to Jet Armor. Very frustrating as we were hoping to hit the water soon and this is the last thing we need to finish up.

Any help is appreciated. We bought these jet ski's used and I thought they were 2005 GTX's. Now I'm wondering if they're some other variant of that model and we ordered the wrong covers !!! :(
 

Attachments

  • PXL_20220326_162517080.MP.jpg
    PXL_20220326_162517080.MP.jpg
    174 KB · Views: 41
  • PXL_20220326_162447014.jpg
    PXL_20220326_162447014.jpg
    166.8 KB · Views: 40
  • PXL_20220326_162438913.jpg
    PXL_20220326_162438913.jpg
    164.6 KB · Views: 36
That's the correct cover. You should do the front corners last. The pocket is merely to hold it in the proper place while you do the rest of the seat. You can cut the back side of the pocket down the center and you'll have plenty of fabric to pull.
It helps to warm up the vinyl with a heat gun, but be careful, or just set in the sun on a hot day. Take your time. Make sure you remove the old cover, use stainless staples.
 
Thanks for the response. We already removed the old seat covers and let them fully dry in the shop next to the dehumidifier for a week or two (they were SOAKED). Getting the covers off was a nightmare. They were pulling foam with them, we had to go super slow and use a putty knife to separate the cover from the foam as to not rip foam off with the cover. Turned out ok though. Also bought some really good 3M spray adhesive and glued the few cracks in the foam back together, which worked excellent also. I also bought Monel staples (should hold up even better than stainless, supposedly).

So I believe what you're saying is that I can cut that seam at the pocket with a knife to stretch it exactly how it needs to lay flat, to avoid that bunched up look? It just seems odd as it's sewn together with like a 1" vertical seam, instead of a corner, or just left unsewn (If I'm gonna have to cut it anyway...).

Thanks for the help!
 
Ok, we dove in and got it figured out, just like suggested. We actually started at the back and ot it stretched and a few staples to hold it. Then stretched the front center and stapled. Then the sides and worked to the corners from there. We cut the "pockets" at the front corners and were able to pull and stretch and get them to look great.

The electric staple gun we got from harbor freight wasn't cutting it, it wasn't strong enough to push the staples in. We also bought Monel staples but for some reason they were all broke apart almost to individual staples so that wasn't gonna work. Got an arrow pneumatic stapler and stainless T50 1/4" staples and they are working excellent.

Have a little trimming and touch up on this one but we got one done!!!!
 

Attachments

  • PXL_20220328_011403158.jpg
    PXL_20220328_011403158.jpg
    415.4 KB · Views: 30
  • PXL_20220328_011413636.jpg
    PXL_20220328_011413636.jpg
    425.2 KB · Views: 30
  • PXL_20220328_011408995.jpg
    PXL_20220328_011408995.jpg
    455.3 KB · Views: 31
  • PXL_20220328_011358044.jpg
    PXL_20220328_011358044.jpg
    385.2 KB · Views: 29
Looks good. The Porter Cable gun I have makes everything easier and faster.

If you tear up the foam underneath or have a rough chewed up area, you can use a 1/4" layer of soft foam over the complete top which will leave a smooth look that you can get online or any fabric store.
 
Thanks. We were able to VERY slowly and carefully get the old seat covers off without any real damage to the foam. The foam had a couple cracks that were there from the covers being cracked. We sprayed them with this really good 3M spray adhesive and stuck them together then sprayed a thin layer over the crack and they sealed up way better than I expected. The Arrow pneumatic gun is also working great. Got both rear seats done, will do the front this weekend!
 
Well, it was going so great on the rear seats, but the fronts are way more difficult... I'm not sure how good the fronts are gonna turn out. Worst case, we will buy another set and pay a pro to redo them next season if they're that bad. We are having to stretch the material so much to get the looseness out of the fabric that the staples are tearing through since they're under so much tension. But so far, they're OK just not great like the rears turned out. We have some staple tear through real close to the edge of the seat where it's almost visible as a few spots have really narrow area to staple, but we got 1 seat like 75% done this evening and it's still OK I think. Will probably finish it up tomorrow evening and will see how it looks...
 
So we took the other front seat to a local shop and they told us they'd put it on for $125. We are letting them do it. The one we already started we decided to finish and while it didn't turn out GREAT we did manage to salvage it and it looks decent. We got all the slack out of it, and it really looks good overall except for two spots...the front center edge that goes around the glove box, we somehow got the cover slightly off center so the sewn seam there is partially on top of the edge and partial wrapped over the edge. Kind of annoying but oh well it'll work and at least the seat overall looks good. When we were messing with it Sunday we thought we were never gonna get the slack out of it and thought we would have to purchase a new one. The other thing is the front plastic corners don't seem to fit right at all. They have a ton of gap between them and the seat. I think cause we had to stretch the cover so much to get the slack out we really compressed the foam down, and now the plastic corners don't fit right.

Thoughts?
PXL_20220405_234520868.jpg
PXL_20220405_234513326.jpg
 
$125 is pretty steep for less than an hour of work. You should start in the front center to make sure everything starts on center, then go to rear center to also make sure it is centered. Then middle left and middle right and finally stretch the corners in place, then fill in staples between everything. You have to put staples in with 3 or 4 at a time, and even stress, on your initial pulls so that it doesn't rip the fabric. It takes some experience to get good at it. You will learn how much pull and the correct direction of the pull especially going around corners. I've done a couple hundred and still don't like doing them but kind of the nature of the beast of rebuilding skis.

Show pictures of the seat and the underside when you get it back. The last seat someone said they had a professional install it had wrinkles coming over the edges and I had to pull a bunch of staples and fix it because they had no clue how to work the vinyl around a corner.
 
10-4, thanks for the input. This was our first time and a learning experience. The rears came out great, I honestly don't think they could have been done better. They look perfect. The front one we definitely screwed up. I tried to start at the front and get it lined up, then do the back, then sides, but there was just so much extra slack in the center. So we pulled staples and redid it a few times. We ended up salvaging it and getting the slack out, but the front ended up slightly off center. And, we had to pull so damn tight in several spots to get the slack out that I think we like really overstretched it. We tried to put several staples in each spot and it still tore in some spots. I believe if we did another one right now it would go better. But at the moment I was very happy to pay someone $125 to do it just to be done with it and so we can be on the water this weekend. Hopefully they do a good job, I will post pictures. If it really comes to it, I'll buy another cover and redo it but I think we will be able to live with it. It looks good other than the off center part at the front edge, and honestly 9 out of 10 people wouldn't notice or even think it looks bad.
 
Well ski-d00, you were absolutely right. The shop I paid did an unbelievably bad job. Most Staples weren't even into the plastic. I can't believe they are a professional upholstery shop. The Staples were tiny like from an office desk stapler, and I don't believe stainless which I specially asked for and they said they would use. I had to redo the whole thing. Luckily I could salvage it... Why is it so hard to find someone to do good work??? This was my first seat and it was better than theirs.... pathetic

Just need to figure out how to make the front corner plastic pieces look good as they don't really fit properly I guess cause the foam is so old and shrunken up.
 

Attachments

  • PXL_20220408_233448911.jpg
    PXL_20220408_233448911.jpg
    213.7 KB · Views: 11
  • PXL_20220408_233441948.MP.jpg
    PXL_20220408_233441948.MP.jpg
    158 KB · Views: 11
  • PXL_20220408_233446811.jpg
    PXL_20220408_233446811.jpg
    351.7 KB · Views: 11
  • PXL_20220408_233443791.jpg
    PXL_20220408_233443791.jpg
    299.7 KB · Views: 11
  • PXL_20220408_225607675.jpg
    PXL_20220408_225607675.jpg
    169.9 KB · Views: 11
  • IMG_20220408_171318_01.jpg
    IMG_20220408_171318_01.jpg
    230.1 KB · Views: 11
  • IMG_20220408_174436_01.jpg
    IMG_20220408_174436_01.jpg
    289.5 KB · Views: 11
  • PXL_20220408_225603157.MP.jpg
    PXL_20220408_225603157.MP.jpg
    333.4 KB · Views: 12
Status
Not open for further replies.
Back
Top