Oil Tank Replacement Access - 2001 GTX 951 Carbureted

Note: This site contains eBay affiliate links for which SeaDooForum.com may be compensated

KenG3842

New Member
I'm looking for help and/or guidance...
I have two 2001 GTX carbureted 951 relatively low-hour fresh-water machines, and both have oil tanks leaking at the parting line seams. I've been able to use them by not filling the tanks above the seams. This reduces the amount of leakage significantly, but not completely, so it's still a hassle. I cannot find repair facilities willing to work on machines this old. There are on-line forum threads and videos covering oil tank replacement, but I haven't found any that are done with the 951 engine still installed.

I'm a pretty handy and technical guy with plenty of tools, but have only limited experience working on these Jet Skis. The engine is really packed into these machines, and accessing the rear oil tube at the lower rear of the tank appears to be impossible without first removing at least the Exhaust Head Pipe (see attached photo). In removing the Exhaust Head Pipe, access to the lower nut that secures the Head Pipe to the Exhaust Manifold looks to be very difficult without first removing the carburetors. So... I'm beginning to question how deep I want to get into this job.

My questions are:
1. If I get special tool (529-035-505) for accessing the removing the lower flange nut mentioned above, can I remove the Head Pipe without having to remove the carburetors? And if so, is there even access to get the nut hand-started for reinstallation?
2. Once the Exhaust Head Pipe is disconnected, is there enough clearance to actually remove it from the engine compartment? (There doesn't appear to be - see attached photo)
3. Is this job even worth doing, or am I better off to keep using them the same way I've been (by keeping the oil levels below the tank seams, and cleaning the minimal seepage from the hulls occasionally?

Any advice is greatly appreciated!
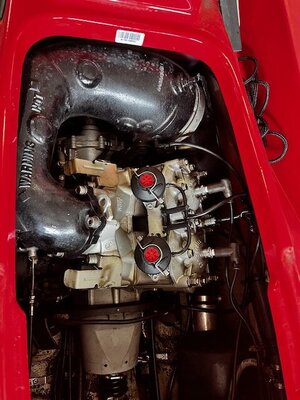
Photo 1.jpgPhoto 2.jpg
 
I appreciate the response...
Yes, I think it will. Problem is that I've got no access to the rear bottom of the tank to disconnect the Tank Outlet Tube from it (or to disconnect the other end from the oil pump) with the Exhaust Head Pipe installed. There doesn't seem to be enough extra length in that tube to allow the tank to be pulled forward far enough to gain the access needed to disconnect the tube (by reaching down thru the console opening). That's why I'm thinking that I'll need remove the Exhaust Head Tube to get the access needed to disconnect that tube so that I can pull the tank out thru the front.
Please let me know if I need to rephrase this for more clarity.
 
Not familiar with the 951 in the GTX hull, I think if you take that first section of the exhaust off there might be enough room to get to the oil lines. The 96 tanks don’t have the seem you can usually find them on eBay I have same issue with my tank on my 97 just haven’t gotten around to changing my tank out yet.
 
I have a 98 GTX Ltd , it has the 951, and I have taken the exhaust off, in one piece, several times without carb removal. I do have the special tool, it is cheap, but the first time I did take it off with regular tools ( it was a challenge for that one nut). It is doable and it does give you a lot of room afterwards. Getting it out of the hull is also a challenge but once you figure out how to slightly turn it and rotate it out, it will be easy after that. Whether you want to do it or not is up to you but I personally don't like things that are bad on my seadoos/cars/ boats...etc. Its winter time so it is a good time to do it.
Also I wouldn't start this until you have a solution for the oil tank, whether it is a good repair procedure or a new /used oil tank. There are a few threads about repairing them, some worked, some didn't!
 
Shamrock,
Thanks. Once I figure out the best approach, I'll make sure to post it as an optional approach for others.
Grim,
Thanks for your input.
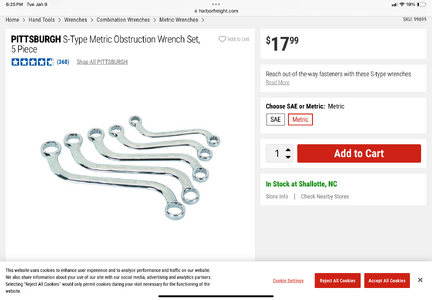
I may end up pulling the Exhaust Head Pipe, but I want to explore all other options first. I'm curious about the wrench you used to access the lower nut on the Exhaust Manifold Flange... was it like the ones in the attached photo?

With the Fuel Tank straps, Fill Tube, and Oil Level Sensor removed, I can shift the tank forward a couple of inches before the tube from the Tank to the Pump goes taught. In this position, I've got one hand access (thru the console opening) to reach below the rear of the tank and grab the tube. I'm going to try to cut the tube just below the tank outlet, and pull the tank out thru the front.

While the tank is out, I'll replace the line to the Oil Pump that I previously cut (with New Tygon Tubing F-4040-A and a new Oil Line Filter), leaving enough extra length in the tube to be able to attach it to the Tank Outlet Nipple while I still have access to the nipple (before the Tank is fully located back into its fully installed location). The only risk I see is that I'll be adding some length to the tube that runs from the Tank to the Pump. As long as there's no "sink trap" in the routing, this extra length should not be an issue.

I spent my entire career in the automotive industry, and did a lot of serviceability engineering over the years. There's a special place reserved in Hell for the guys that designed these jet skis.

Photo 3.PNG
 
If I can remember correctly I used a normal wrench and it was pitched at an angle(they may have been stubby wrenches too), it didn't bite well but it was enough to get it loose enough to get a socket with an angle adapter on it , it was tedious , that is why I got the special tool, it was on eBay for like $10. It you have thin walled sockets they may go on easier, I don't though. Also try 12pt sockets.
I replaced the oil line as well and the filter. I added a little length too, it didn't hurt. Just make sure you get the right oil filter, generic/aftermarket stuff doesn't work well on seadoos. Also make a note that you will need to bleed the oil line when it is back together.
If you don't have them already, download the parts manual and the maintenance manual, they will help. I rebuilt most of my Seadoo using those two items. They are free.
The wrenches in the picture may work well, the special wrench is curved shaped so you can get leverage.
 
Question one yes, you can get the nut off with the special wrench. Special wrench does not look like the ones pictured. The pipe flange has a notch/cut out, the nut and washer do not have to be fully removed. this eliminates having to start the nut “blindfolded“. it is a pain to keep the Washer raised up while you put the pipe in.
question 2 Yes the pipe will come out in one piece. It’s a pain and you have to figure it out. Be extremely careful of the RAV valve solenoid.
question three my tank leaks and I wait for the oil light to come on and add 1 quart
take your oil line apart at the filter. leave the hose from the filter to the pump attached to the pump, it has a crimped clamp.
I think the thing to do is drain the oil tank and pull the red fitting out of the bottom ( going to replace the grommet anyway.) and pull the tank out the front.
 
Last edited:
While that is true you don't have to take the nut off for removal I always did , it makes it easier to remove the pipe..IMO. I always put it back on though before installing pipe because it is hard to get started with the pipe in the hull. You will figure out what works best for you, once you have done it a few times.
 
Grim and Tobytd
Thanks for the info and suggestions.
I was able to remove the tank without removing the Head Pipe, but it wasn't easy. Problem is that I can either SEE thru the Console opening, or get ONE ARM thru the opening, but cannot do both. So everything done thru that opening is a blind one-hand operation. I was able to get it apart that way, but putting it back together, and reaching the Oil Pump to bleed it, will likely require removal of Head Pipe. The info you've provided will be helpful, as I didn't realize that that Manifold Flange Nut didn't need to be fully removed.

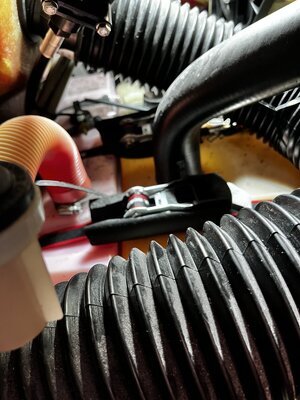
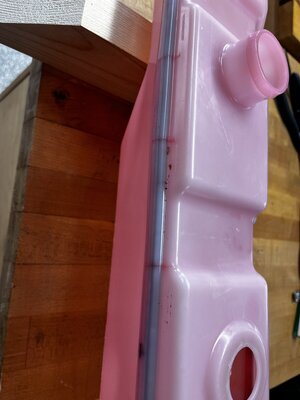
I'm afraid that I may have made the leaking Oil Tank problem worse with a different repair I made last year. The fuel tank bungee straps had dry-rotted and snapped, and I couldn't get access to the eyelets riveted to the hull to install new bungees. So... I instead rigged up some Ratchet Straps to use instead of the bungees (see photo). The Ratchet Straps worked well to retain the Fuel and Oil Tanks, but may have put too much stress and pressure on the Oil Tank, as the oil leaks seemed to get worse after I installed the straps (also evidenced by the cracks in some of the seams - see attached photo). So, I'm going to need to figure a way to revise my earlier strap solution. If anyone has any better ideas on replacing the dry-rotted tank straps, I'd sure appreciate hearing them.

I have two identical machines with leaking tanks, and I don't want to bother trying to reseal the old tanks, so I need a new one for each machine. There are some used pre-1997 seamless Tanks available on Ebay, but I'm concerned about what condition they're in. A company named Whautole makes a one-piece Tank for $125 (Amazon), and the Seadoo OE seemed Tank is also available on Amazon, which sells for $93. Everything I'm reading says even the OE service tanks from Seadoo are prone to leaking at the seam. I'm going to order one of the Whautole tanks and check it out before ordering a second one. I'll let you know how it looks and works.

Thanks again...


Photo 4.jpgPhoto 5.jpg
 
The new OEM ones will start leaking in a few years too.
Let us know how the aftermarket ones are please. Would be nice to buy once and be done.
 
Yep..this statement right here.....So everything done thru that opening is a blind one-hand operation.... this is the life of a Seadoo mechanic. I use a mirror a lot too, a good size one (3"X 4") that I can angle to help me. And it is a bonus if you are left handed, I'm not!

(pipe removal not necessary) As far as the oil line bleeding, it is the same problem, you can get a small wrench on it but you have to do it by feel. it is a lot like bleeding breaks. not hard once you get your bearings. the line is gravity bleed up to the pump, don't take screw off just crack it and wait for the oil to come out the screw, you should see it fill up the filter as you are waiting. On mine it didn't seem like the filter was 100% filled ( by looks). after oil is coming out well, I retighten and "I" wait for a min or so and repeat just to see if there are extra air bubbles , retighten screw and with no spark plugs in and wires grounded just crank over the motor with wide open throttle a couple times, "I" usually wait a couple mins and repeat the cranking. Put it all back together, crank it and wait for the smoke!

Sounds like you have good plan with the leaking tank replacement......let us know how it works.
 
I'm looking for help and/or guidance...
I have two 2001 GTX carbureted 951 relatively low-hour fresh-water machines, and both have oil tanks leaking at the parting line seams. I've been able to use them by not filling the tanks above the seams. This reduces the amount of leakage significantly, but not completely, so it's still a hassle. I cannot find repair facilities willing to work on machines this old. There are on-line forum threads and videos covering oil tank replacement, but I haven't found any that are done with the 951 engine still installed.

I'm a pretty handy and technical guy with plenty of tools, but have only limited experience working on these Jet Skis. The engine is really packed into these machines, and accessing the rear oil tube at the lower rear of the tank appears to be impossible without first removing at least the Exhaust Head Pipe (see attached photo). In removing the Exhaust Head Pipe, access to the lower nut that secures the Head Pipe to the Exhaust Manifold looks to be very difficult without first removing the carburetors. So... I'm beginning to question how deep I want to get into this job.

My questions are:
1. If I get special tool (529-035-505) for accessing the removing the lower flange nut mentioned above, can I remove the Head Pipe without having to remove the carburetors? And if so, is there even access to get the nut hand-started for reinstallation?
2. Once the Exhaust Head Pipe is disconnected, is there enough clearance to actually remove it from the engine compartment? (There doesn't appear to be - see attached photo)
3. Is this job even worth doing, or am I better off to keep using them the same way I've been (by keeping the oil levels below the tank seams, and cleaning the minimal seepage from the hulls occasionally?

Any advice is greatly appreciated!
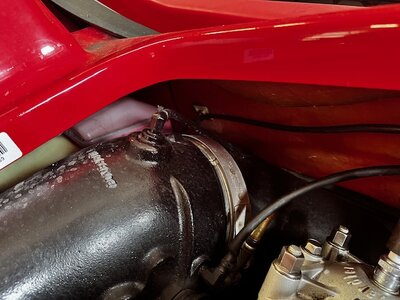
View attachment 64700View attachment 64701
Hey Ken,

I have replaced every oil tank all three of my skis. All have been GTX hulls. This is a rather easy job and more than within your skill level. First get the special tools for the bottom exhaust bolt. Ebay is your friend. While it is possible to get at it with regular wrench, save yourself hours of hassle and get the tool. It will also ensure you can torque down when put back on. FYI if these exhausts have never been removed, they will stick between the head pipe assembly and the exhaust cone. I simply un-torque the bolt on the clamp, use a screwdriver to get the clamp lose and not attached to pipe, and then some manual action to break the seal between assemblies. Sometime I use a rubber mallet to get the really stuck ones. I would just leave the exhaust cone installed as do not need to access the oil tank. Once that is loose, un bolt the exhaust head pipe assembly and get out of ski.

Now that Exhaust is removed, you will be able to reach the oil line from tank to pump. I like to use plastic hose clamps to keep the mess at minimum and unconnect the oil line from oil pump on front of engine. The only electrical connection on the tank is the low oil sensor. unplug. Then oil tank is held in place by 3 rubber bands which can be undone. After that, pull the front hull liner, disconnect the fill hose and pull the tank forward through the hull to the front. To keep the oil leaks to minimum in cleanup, just put down a bunch of rags.

NOTE: Always replace the oil filter too while you are there.

Installation is the reverse.

NOTE: Clean the thread holes for the exhaust head pipe assembly. the recommended method is to use a M10 X 1.5 screw/tap to clean the thread holes and the spray cleaner and air to get out the debris. So for special tools, I would recommend a M10 x 1.5 screw/tap. they are a couple of dollars. It is very important that threads are free of debris.

NOTE: Use new gaskets for exhaust head pipe and manual says Molykote 111. I have heard of other using similar anti-seize compounds but I just use 111. Apply Molykote 111 on threads of Allen Screws. Examine the copper seal on the exhaust cone, If not bent and still straight, I have reused with a good dose of Ultra Cooper Sealant.

So parts needed:
1. special tool (529-035-505)
2. M10 X 1.5 screw Tap
3. Gasket 290931990
4. Maybe Sealing Ring 274000511
5. Molykote 111
6. Oil Filter 275000051

Later.
 
Grast5150 and others,
Thanks for the advice, and detailed instructions. I'm focused on finding a way to replace the Oil Tank without disturbing the Intake and Exhaust systems, because if I screw something up, there is no Plan B. I haven't found anyone that will touch machines of this vintage, much less anyone experienced. I think I've found a way to do it, and the only thing I'll have to compromise on is not replacing the section of tube that runs from the oil filter to the oil pump. I probably could have replaced that too, but I'd have needed a longer arm to reach the oil pump inlet nipple thru the Console opening, and it would have been a blind operation.

Here's the procedure I used:
After sucking the existing Oil from the Tank, I was able to cut the tube that runs from the Oil Tank to the Oil Filter close to the Tank Outlet Nipple with a pair of Sidecutters by slipping a hand between the Exhaust Cone and the Hull. I then used a long screwdriver thru the Console opening to break the Tie Strap that retains the Oil Filter to the bottom of the hull. Then by removing the Air Duct and Rubber Shield from the forward Carburetor, I gained enough clearance to be able to weave the lower portion of that tube (including the Oil Filter) up through the opening between the Engine Block and the Exhaust Head Pipe. I then cut that tube just below the Oil filter, and installed a new Oil Filter into the cut line, along with about a 16" length of new tubing (Tygon F-4040-A with Spring Clamps), which will later connect to the Oil Tank outlet. Then I pushed that entire Tube assembly back down into the hull and pulled it up into its original routing position by reaching thru the Console Opening. Once I slide the new tank roughly into position from the front, I'll use as much of that 16" in additional tube length as I need to allow me to attach it to the nipple on the bottom of the new Tank (with a spring clamp), cutting and discarding the rest, before seating the Tank into its final and proper location.

I've found that I can just barely reach the Oil Pump Bleed Hex fitting through the Console opening, which is how I plan to bleed the air from the system.

So... new seamless Oil Tank is due to arrive tomorrow, which I'll install with new Gromets. If all goes well, I'll verify the same procedure on the second ski over the weekend. If that also goes well, I'll post the entire procedure with some photos.

Thanks again, I'll let you know how it goes.
 
New Oil Tank just arrived a day early.
Now, a really dumb question... on installing the new Grommets. I've seated the Grommets into the tank, and would expect the fittings (Oil Level Sensor and Red 90 degree Elbow) to need to be pressed into the ID of the Grommets. I've tried lubing the Grommet IDs with oil, then Vaseline, but they will require a lot of force to seat them (I'm 66-yrs old with arthritic hands, which might be the problem!). The wall thickness of the new tank is significantly greater than that of the OE Tank was, which may affect the way the fittings seat in the Grommets, but I'm struggling to even get the the barbed fittings started. I don't dare use a rubber mallet for fear of damaging the new Tank (or damaging the Level Sensor). Any suggestions beyond finding a younger, stronger, friend to muscle them in?
 
Please scratch my last note...
I've got the grommet's seated and the fittings installed, so on to the next problem.
The new Tank is installed and hooked up, and about 3/4 full. Now I need to bleed the air out of the Tank Outlet Tube/Oil Filter. I've loosened the Bleed Screw on the Oil Pump about 1 1/2 turns, but there's no oil dripping from the Pump, or flowing from the Tank into the Tube/Filter. Does anyone know how lose the Bleed Screw needs to be? I'm concerned that if I loosen it too much, it will fall out, and access for reinstallation of the Bleed Screw would be a challenge at best. Any suggestions??
 
A lot of times the filter gets air locked. You have to pull the line feeding it from the tank to basically burp it and oil will start flowing.
I have had it happen a lot and is a messy pain in the butt.
 
I disconnected the tube on the outlet side of the Filter, and held the Filter in a position below the Oil level of the Tank and with the outlet nipple pointing upward, which purged out the air, and filled the Filter with Oil. Then I reconnected the tube and opened the Bleed Screw on the Oil Pump one full turn. Oil began dripping from the Bleed Screw, and I let it drip for several minutes before closing it, so I'm assuming that I've gotten the air out of the system and that the pump is primed. At least I hope that's the case.

I've reassembled everything, but won't know if everything is good until I'm able to run it. I'm wondering what I should be looking for when I start it up to confirm that Oil is getting to the cylinders. Is it just a matter of confirming that the tubes running from the Oil Pump to the Cylinders are full of Oil? I suspect that any lack of Oil will result in damage pretty quickly, so I want to confirm proper operation as quickly as possible. Once again, any advice or suggestions on this would be greatly appreciated.

Machine #2
I've pulled the tank from Machine #2, have installed the new one. I'm in the process of making the tubing connections, which has proved to be very challenging with the Exhaust Head Pipe in place. But my goal all along has been to find a way to replace the Oil Tank without having to remove the Head Pipe.

Without all of your suggestions, and willingness to share your expertise and experience, I'd still be looking at it and scratching my head. So THANK YOU!!
 
Don't forget you still have to crank it over without spark plugs in, to get oil from the pump to the cylinders., I posted how up in this thread. The easiest way to know is when you see the smoke. Mine smoked above average at first because I had a extra oil in the cylinders from the bleed process, most likely you will too.
I'm assuming you know how to hook it up to a hose Or if you have a lake or something you can go and do a spark plug test. There is a lot of info on how to read spark plugs here on the forum, that will let you know if you are lean, rich or on the money. If you are lean it may be because of the not getting oil. The other two prove you have oil present.

You didn't have any issues prior to the tank swap out , right?
 
Grim,
Machine #2
I re-bled the lines and followed your cranking procedure to get Oil into the Cylinders. Hooked up the garden hose, started it up and ran it until the smoke cleared. So I think this one's all set.
Machine #1
I'll do the same procedure on this one tomorrow.

They were running great when I pulled them out at the end of the season, so I don't think any adjustments are necessary.
I'm hoping to button this job up tomorrow.

Thanks again for yours, and everyone else's, help.
Ken
 
Awesome news, hopefully machine #1 will be just as easy.
Just a reminder, not sure how knowledgeable you are on these machines. Don't run them too long on the hose, the carbon seal doesn't get any water to keep it cool so it will get hot and could get damaged if ran too long.
 
Back
Top