My oil bypass experience -with pictures

Note: This site contains eBay affiliate links for which SeaDooForum.com may be compensated

robman66

New Member
Well I'm almost done the oil bypass procedure. I figured most of it out. I'm hoping someone can just clarify which two lines get plugged. I can't seem to figure out which one is the line to the crankcase that gets the brass plug installed.
Take a look at the pictures attached and please let me know.

I've got more than 5 pictures, so there will be a couple posts. Thanks.

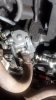
I drained and removed the oil resevoir bottle, to give myself more access to everything. It is much tighter in there than you would think. An 8mm socket is used to remove the bottle. There are 3 bolts to remove.
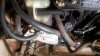
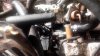
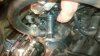
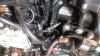
The throttle linkage was very easy to remove. I just used a flat head screwdriver and popped it off. See picture "throttle linkage". The green arrow points to the throttle linkage. The blue arrow points to one of the oil pump bolts that needs to be removed.
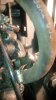
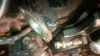
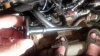
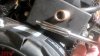
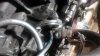
It is necessary to loosen the fuel pump. Not only to be able to get good access to the rear oil pump bolt, but you won't be able to slide the gear shaft out with the fuel pump in place. I've read other instructions that say there are 3 bolts to remove for the fuel pump. I only found two. See picture "fuel pump bolts", I used a long allen key to reach them (I don't recall which size), and used a pair of vice-grips on the allen key to break them loose. See picture "loosen fuel pump", I completely removed the bolt on the right (blue line), and only loosened up the bolt on the left. The red arrow shows the gap created by loosening the fuel pump.
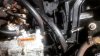
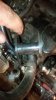
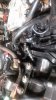
Just note, the rear oil pump bolt is a pain in the a$$ to get to. See picture "bolts". The red arrow indicates the front bolt. The green arrow points to the the location of the rear bolt. Once you break it loose, I just turned an extended socket by hand to get it completely out. You need an 8mm socket.

Continued in next post.
 

Attachments

  • removed resevoir.JPG
    removed resevoir.JPG
    618.1 KB · Views: 551
  • throttle linkage.JPG
    throttle linkage.JPG
    796.5 KB · Views: 558
  • bolts.JPG
    bolts.JPG
    678.9 KB · Views: 564
  • fuel pump bolts.JPG
    fuel pump bolts.JPG
    593.2 KB · Views: 494
  • loosen fuel pump.JPG
    loosen fuel pump.JPG
    760.3 KB · Views: 477
oil bypass - continued

The picture "removed" will show the oil pump removed. The picture "bushing & gearshaft" shows the necessary parts to removed. I just used my fingernail in the groove of the shaft and pulled it out. It slides right out.
The picture "plug" will show the new part that will be installed in place of the gearshaft and bushing.
The O-ring that you have to order (listed in many of the parts lists in previous posts) get put over top of the plug.
The picture "proper location" shows where the o-ring needs to be seated. The picture "improper location" is where I thought the o-ring might go because of the groove in the plug. If you put it here, you will not be able to push the plug all the way in.

Continued in next post.
 

Attachments

  • removed.jpg
    removed.jpg
    564.1 KB · Views: 338
  • plug.jpg
    plug.jpg
    472.4 KB · Views: 330
  • proper location.JPG
    proper location.JPG
    901.4 KB · Views: 320
  • improper location.JPG
    improper location.JPG
    905 KB · Views: 309
  • bushing & gearshaft.jpg
    bushing & gearshaft.jpg
    570.4 KB · Views: 324
oil bypass - continued

I made sure the plug was inserted all the way in, so the flange sits flat. And I installed the 2 new bolts (ordered from boats.net, from parts list previously posted). I tightened them snug, but not enough to compress the plastic plug too much.
See "plug installed".

Now this is where I got a bit confused.

See picture "plug this line". This is a line that went from the bottom of the fuel pump to the oil pump. I'm guessing this is one of the lines that I have to put a bolt in to plug it. As I won't want to disconnect it from the bottom of the fuel pump. Am I correct in assuming this?

And then all of the procedures say there is a 2nd line that has to get plugged. It supposedly goes to the crankcase. And the brass plug that was ordered gets installed. See pictures "which crankcase line gets plugged1&2". Can someone please point out which is the line that gets plugged? Unfortunately this has brought me to a halt.

I've already drained the fuel tank. Drained the upper oil resevoir. (I plan on re-installing, just because it looks dumb with that void on the top of the engine). I will be removing the large oil bottle tonight. (I plan on putting a 2nd battery in this location). I have a new filter to replace the old one, with the water sensor. I will fill with 50:1 fuel/oil mix and install.
I also have a new inline fuel filter to replace the old one with. And a new port side temperature sensor, which I will install tonight as well.
So other than plugging the 2 lines that I am confused about, I just need to fill the gas tank with the 50:1 mix, and I should be good to go. I was going to replace all of the spark plugs, but they aren't in bad shape. So I'm going to clean them well with brake cleaner, check the gaps, and re-install.
I want to disconnect this "throttle guardian" I keep reading about. I lubed up all of the throttle and shifter linkages.
And I am contemplating replacing the gear oil, as the boat was sitting for a while. I know how to do the oil underneath, with the drain and vent plugs. But how do I change the oil in the stator? Or am I confused with the lingo?
I replaced the hydro grate with the 6-time aluminum grate. (I will post pics in another thread).
So I think I should be good to go. Please let me know if I have forgotten anything.

Thanks. Hope the pictures help.
(all pictures taken with new Blackberry Z10)
 

Attachments

  • which crancase line gets plugged2.jpg
    which crancase line gets plugged2.jpg
    650.2 KB · Views: 296
  • plug installed.jpg
    plug installed.jpg
    615.7 KB · Views: 280
  • plug this line.JPG
    plug this line.JPG
    898.4 KB · Views: 277
  • which crancase line gets plugged1.jpg
    which crancase line gets plugged1.jpg
    676.5 KB · Views: 298
Thanks for the pics. I'm going to sticky this, since it comes up all the time.


OK... the hoses you want to plug:

1) Plug the nipple on the bottom of the "Vapor Separator" where the oil was going in to. You can either put a cap over it... or remove the fitting, and put a bolt in the hole.

2) The other nipple is the pressure nipple for the main tank. That one you will want to remove from he block, and put in a plug. The reason is... there is a check valve in it... and if you just cap it... the pressure may pop it off. If you do cap it... just make sure it's a good cap, and well secured.


****EDIT******

Here are the parts needed:


Qty 1 of 43453 Plastic Plug (block off plug)
Qty 1 of 22-73379 Plug (crankcase pressure to main oil tank)
Qty 2 of 10-41506 Screw (for block off plug)
Qty 1 of 25-32509 or 32509 O ring (for block off plug)
 
Last edited by a moderator:
Tony, bear with me as some of this terminology sounds Greek to me.
The vapor separator is the where the fuel filter mounts to? When you say "oil was going to", do you mean from the upper reservoir, or from the main tank, or from the removed oil pump?

The pressure nipple is on the port side of the engine? Just follow one of the lines from the main tank? And this is the one that gets plugged with the brass plug?

Sorry if my questions sound dumb....I just get sort of lost in there with all of the hoses and lines all over the place.

Thanks
Rob
 
Vapor Separator: Aluminum tank, with the high pressure fuel pump in it. And, has the oil injection nipple on the bottom.

Pressure Port: It is on the starboard side of the engine, and is below the starter.

Injection Nipple: It's the fitting on the bottom of the vapor separator, and the hose went from it, to the oil pump. This is the hose that you will need to plug off.

There are no dumb questions when the life of the engine is on the line. :thumbsup:
 
those are the two I was thinking, so maybe I'm not as dumb as I think......well maybe....lol

thanks again Tony.
 
Thank you for posting in detail. I plan to do the same very soon. I am slowly bringing back to life a 2000 Challenger 2000 with the EFI V6. It has sat for several years but to much of my surprise I put a battery in it to see if the motor would spin and before I could turn key in the off position it started! I was shocked but did not want to run it until I drain all the gas and at that point would like to do the bypass.

Where can I order the kit? The post will walk me through and I appreciate you sharing! Anything else you guys can recommend while I am there that would be good to do. Any sticks on pump service?

Thanks again
 
Don't let the thought of the bypass being a hassle keep you from doing the right thing.
Pre-mixing is really no hassle at all.
I take empty plastic water bottles, that are completely dry, and fill them with oil.
Each one holds 500mL of oil. For every 25L of gas that I add, I dump in one bottle of oil. This keeps me at a 50:1 ratio.
I don't need a funnel or anything to pour it in, as it pours in smoothly right from the bottle.
So if I am going to add 75L of gas, I dump in 3 bottles of oil, and then go to the gas station and put in exactly 75L of gas.
This mixes it well. The gas washes in any of the oil that is coating the filler hose, and it gets well mixed on my way to the launch ramp.
And I have the peace of mind knowing that my engine is well lubricated.
It smokes a little at idle, as it should, but as soon as it warms up and I give it a bit of throttle, the smoke disappears.
The water bottle idea is just a handy way to keep it simple.
 
Welllllll.......

It can be a pain. In your case, it's OK, since it sounds like you trailer your boat everywhere. Yes... if you add your oil first... pump fuel... and then drive to the docks... there is a high probability that your oil will get mixed.

BUT... there is a chance that it could be sitting on the bottom of your tank!!! (especially in colder weather)


Personally.... I would do it a little different.

I would take a 2 gallon fuel can with me to the pumps. Then... add your fuel to the main boat tank without "Topping off" the tank. Then... I would add the right amount of oil to the small fuel can, and add a gallon or so of fuel to that. THEN.... shake it hard to mix the oil and fuel together, and pour that into the main tank. At least, this way... you know the oil is already mixed into some fuel. Then... when you pour it into the boat... it will simply disperse. (This is known ans "Master batching" in the chem world)


Now.... were it becomes a TOTAL pain, is if you leave your boat on the water. There really isn't any way to assure that the oil is being mixed into the main tank.


Without a doubt... the early Mercury oil system is questionable... especially when it gets to the 10 year mark. But, if you are doing a rebuild... just replace the drive gear, with the stronger, new style gear, and don't worry. (The rest of the system is good)
 
Tony, yes you are definitely right when you say the advantage I have is that I trailer it everywhere.
I never let my tank go under 1/4 full, so when I add my oil to the remaining gas, it is pretty much master batching. As it should disperse with the newly added fuel. Correct?
If there comes a time that I will have to rebuild the engine, I will definitely consider re-installing the oil injection system. I kept all of the parts for this reason.
That would be a much simpler way, just refuel and go.
I just couldn't justify tearing apart the engine to get to the drive gear.

The water bottle idea works well for measuring though. I don't need a measuring cup, or a funnel (except when filling water bottles from large oil bottle), and no mess. And I always refill in 25L increments. 100L gets 4 bottles of oil. Keeps it simple.
 
Tony, yes you are definitely right when you say the advantage I have is that I trailer it everywhere.
I never let my tank go under 1/4 full, so when I add my oil to the remaining gas, it is pretty much master batching. As it should disperse with the newly added fuel. Correct?

Not necessarily.

Not all oils mix easy. Especally oils meant for injection. It's simple though.... do an experiment with the oil and fuel you burn.


1) Put some fuel into a clear (glass) container. Perferabley more than a gallon.

2) Pour some oil, into the fuel


Do not shake, or mix this in anyway... and see what your oil does. Some oils will go into solution without an issue. Some oils will hit the bottom, and stay there. AND... worst of all.... some oils can be forced into solution (actually a colloid) but when they sit... they fall out. I will assume most TC-w3 oils will not do that. BUT... check the label... there may be a notice that says something like.... "Will not mix with fuel above 1.200 SG." I don't know how it is up in Canada... but we have alcohol in our normal fuel these days. AND, some oils don't like it.
 
Last edited by a moderator:
I will try that experiment to see what happens. I just need to find a glass container large enough.
I am using the Mercury Premium Plus oil. Not cheap, but boating isn't supposed to be cheap...lol.
I go to the same gas station every time. Our gas has ethanol in it, up to 10% I believe. And a gas detergent, which I believe is pretty common all over now.
I only use 87 octane. Should I be using a higher octane fuel?


For the container... you may be able to find a large glass pickle jar, or a small fish tank that someone doesn't want. (both should be free)

But... be aware that when it sits over the winter... the oil may dropout.

Originally, the 240 spec'd 89 Octane fuel. (So that's mid grade) That's what I've been running mine on. I'm sure it will run fine on the 87 (standard) fuel. BUT... there is less room for error. So... timing that's a little high, or a hot humid day... or even if the engine is running hot... Detonation can happen.
 
Last edited by a moderator:
Dr. Honda.
I'm looking todo the bypass on my 01 islandia. I have the parts list you put out. Where can I order those? Thx!
 
Mixture ratio for oil bypass

Please help an aging man!!!! I cannot remember what mixture ratio to use. 50:1 or 42:1
I don't know why I have this mixed up. I think I had a mercury mechanic give me a long dissertation and now I am confused.
Any help would be appreciated. It's been about 6 months sice I have had to fuel
 
People are afraid that their Oil pump or injection system will fail however it's NOT a common issue in just about any 2 stroke machine I've ever ran. Also your oil injection system delivers a variable ratio determined by the RPM the engine is running. If you do the bypass then you are at whatever ratio you mix it throughout the whole RPM range. Plus if you're out boating all day and may want to fill up at the local dock then you need to carry your injection oil with you instead of filling your oil tank up. If your oil injection system is working than I would leave it alone.
 
I hate to add to an old thread, but Steve I have to disagree with respect to these engines!

I'd say 9 of 10 Merc powered Sea Doo Boats of the plastic gear era that come up for sale in my area advertise they have new/rebuilt engines. Of course other factors cause failures, but right now 3 of the 4 advertised are with rebuilt engines, with reference to oil pump failure.

I've been watching what comes up for sale in the last year, and I really think if you're running one of these Mercs on original components you're on borrowed time. My oil pump delete just arrived in the mail and I can't wait to get that thing installed! Now if only it would stop snowing...
 
Steve, the problem is just as you said it...."if it's working, leave it alone". These engines are famous for the gear failure. The plastic used for the oil injection gear gets brittle over time, and then all of sudden it breaks, and the engine is not getting oil. Then you're looking at a costly repair, and most likely the waste of a boating season.
Seadoo released a metal version of the gear, proof that the plastic gear fails.

Yes with premixing the engine is getting the same amount of oil at all RPMs. Who cares? I get a bit more smoke at start up, but once the engine warms up, no smoke.
At least I have the peace of mind knowing that my engine is always getting oil.

With these engines and oil injection system, it isn't a matter of IF, but a matter of WHEN.
 
As an update, I've got about 10 hours on it now with the oil injection removed running 50:1 premix and I'm not looking back. There's a bit more smoke at cold idle, but once it's warmed up there's no difference (maybe a bit more 2-stroke smell).
 
Vapor Separator: Aluminum tank, with the high pressure fuel pump in it. And, has the oil injection nipple on the bottom.

Pressure Port: It is on the starboard side of the engine, and is below the starter.

Injection Nipple: It's the fitting on the bottom of the vapor separator, and the hose went from it, to the oil pump. This is the hose that you will need to plug off.

There are no dumb questions when the life of the engine is on the line. :thumbsup:

Since “there are no dumb questions when the life of the engine is on the line”(love that quote), here’s mine; I just bought a 2004 Jet boat with the Merc 240 EFI. It doesn’t appear to have the shaft drive injection pump but rather an electric style (I think) oil pump. Some sort of externally mounted round pump on lower starboard side of engine. Are these also prone to failure and should I do pre mix on this style oil injection? Thanks much for any input! Losing sleep over this. lol
 
Is there a production year/serial number where they changed to the electronic oil pump? And got rid of the plastic parts in the pump?
 
Back
Top