My 2004 Speedster 200 Project

Note: This site contains eBay affiliate links for which SeaDooForum.com may be compensated
Status
Not open for further replies.
Here is some more stuff I have questions on. I knew the hose from the exhaust fans were beat up and torn and just hanging in the compartment. From the fan i know they go up into the vent hole that sits under the hatch. But the under side of the fan hose is just laying in the engine compartment....I can't find it in the parts diagram...is this normal? Also, anyone ever use a non oem hose for replacement? looks just like dryer vent hose.


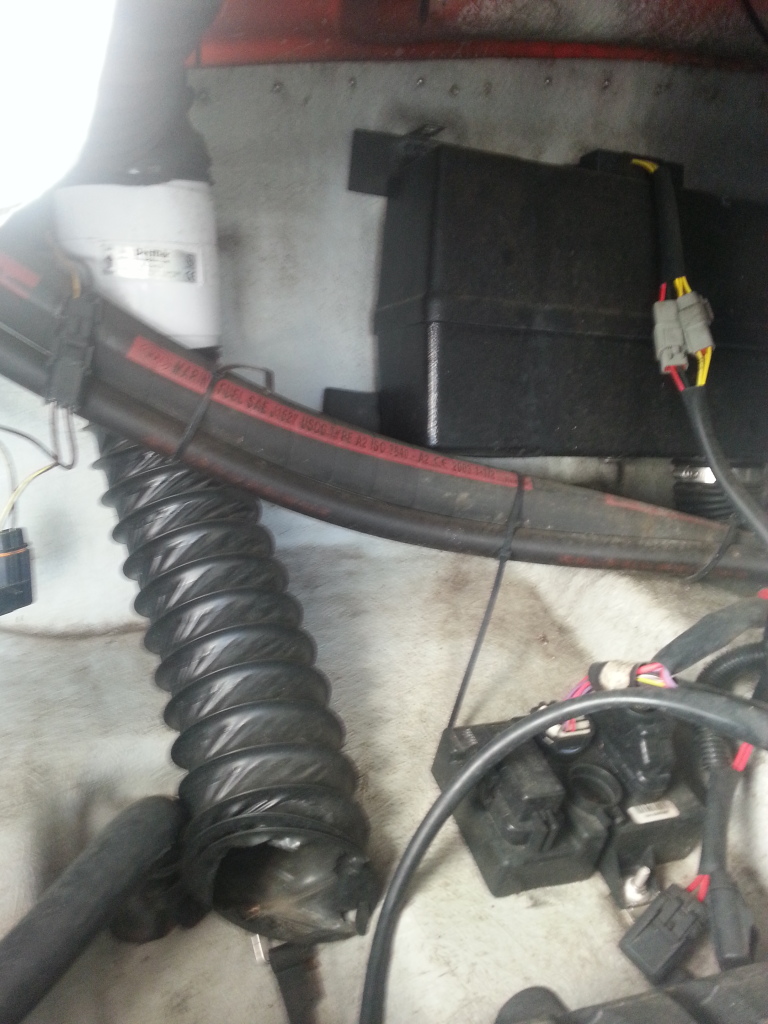
Also i think the air intake doesnt seem right. Im guessing this box should be mounted up to where the intake holes are on the side of the boat...its just flopping around inside. I havent looked at the port side yet to compare...it just didnt seem right to me. Seems like the engine would just be using the air in the engine compartment, which seems like a bad idea.


Last edited by a moderator:
Last post tonight...Just some general stuff and tips. I learned there is a bit of differences between doing the audio system on this boat compared to my previous 98 speedster. Since this boat is bigger it is a bit easier to run wires down the side of the boat, it doesnt seem as cramped inside the hull. I do wish they had a removable storage area under the passenger windshield. That little tray is kinda useless. I would have put the amp there. Also, i was planning on adding a wired remote for the radio somewhere on the rear of the boat by the swim platform, but because the way the rear hatch is made, i dont think its going to be possible. The 98 hatch had an area between it and the swim deck that was part of the solid boat where i could run a wire through....this boat doesnt have that...the whole hatch is just a shell.

One more general thing i noticed...the fiberglass on this boat seems a LOT thinner. On the inside walls and the outter hull. It was thicker on the 98 for sure. Kinda makes me nervous now. I know the 98 had a learning curve and i bashed it into some stuff pretty hard.

I also learned not all wire fish tapes are created equal. I use to have a nice flat one i spent like $30 on from home depot. I couldnt find it because i think i let someone borrow it. So i bought a cheap metal wire type from harbor freight and i also bought a plastic one from harbor freight. Got em both for like 15 bucks. Found out first the plastic is garbage. It comes just wound up in a roll. Well its plastic and wants to stay that shape...its impossible to feed it anywhere. The metal wire was a bit easier but hard to guide like the flat one i use to own.

throw this in the trash.


Also, I tossed out the original radio cover cuz it looked horrible. I bought a Pyle brand one. It came today...it wont work. Its the bubble front type. It doesnt quite cover the factory hole. And if i cold make it work, it wont be able to open, the release on it hits the glove box door. The factory version is like $120. I know ive seen those type aftermarket but cant find em now. Any one seen them anywhere?

Ok thats all for now....gotta go get tweezers. Broke my own #1 safety tip on boat audio systems. Always where long sleeves and gloves...or you will be picking fiberglass out of your skin for a while.
 
Me too! I'd love to have mine at the house instead of at storage

I keep boat my friend's place (since he got enough space to park) and my wife is so happy. LOL She knows that if I'd have it at my place then I'd putting new stuff everyday HAHAHA
 
Well I had a whole hour to spend on it tonight. Managed to finish up most of the wiring. Got speaker wire ran for the 4 inside speakers and the 2 subs.All wires for the amp are ran. Just need to run the speaker wires for the tower speakers. Then I will cut the big holes for the subs That is my next 2 things to do. Got a new water proof cover for the radio. I actually have 2 and neither will work quite right. So im trying to decide to open the hole up some or keep hunting. Here are a few more pics of the wiring.

Here are 2 sets of speaker wire. To make it easy, i use wire with a blue strip for the subs and a black strip for the smaller speakers. The subs will be mounted below the top speaker in that flat spot below the little step. The front speaker by the driver is also with a black stripe, i dont need to know the difference between the front and rear, i plan to run them in parallel on the same channel of the amp.


Passenger side. All wire for the whole project is ran in loom. Keeps it nice and protected.


Here is all the wiring coming into the storage compartment under the cooler. The boats with the factory AMP have it mounted here on the flat red spot under the cooler. I havent looked to see if it fits yet. I am thinking of mounting it towards the front down in the compartment on the wall.


Here is a better pic of where i think am going to mount the amp.


Not much progress, but anything is moving forward. Gonna try to work a bit on it more tomorrow. Waiting on the other stuff I have to add the 2nd battery. I plan to do it all while i have it all apart.
 
It rained everyday this week. I finally got to do some work on the boat today. I brought it to work with me at the firehouse. Luckily its the weekend and its been a slow day. I worked about 6 hours on it. I first worked on the rest of the wiring for the audio system. I mounted all 4 of the Polk mm651um speakers in the Liquid Audio cans, that I bought on ebay.

Each set of 2 speakers are already wired in parallel inside the can. So I had 2 sets of speaker wires to run. I had originally planned to run the speaker wires inside wire loom and then where it passes through the tower, use a rubber grommet. To make it work there, i would have needed to drill a 1 1/2" hole to fit the grommet. I wasnt comfortable drilling a hole that big in the tower tubing. So I just ran each speaker wire inside loom then put a 1/2" wire loom around them both and used it at both holes in the tube. Here are some before pics of both ends of the tower where I planned on making holes.

The down tube from the tower to the front of the boat. This is where the boats with the factory amp and speakers runs the wiring, so I chose the same route.


The area in the middle of the tower front tube where I planned to bring the speaker wires through.


Here it is after I ran the wires. I did find the best way to run them was to use that plastic fish tape that i previously thought was garbage. It worked great.


Here is how it looked after I got em all hooked up.


Last edited by a moderator:
The next part I worked on was the battery switch. I plan on adding a 2nd battery under the rear port side seat. The factory battery switch is a guest brand. The model 2111A is a direct replacement and will allow you to run 2 batteries and be able to select 1,2, both or off.

Here is the factory switch after I unbolted it.


Here is the new switch.


I got all the wiring ran using the left over 4 gauge power and ground cables from the audio system. I ran them inside 1" loom and have them all hooked up ready to go as soon as I get the battery. I also went ahead and added the 12 volt accessory plug. This serves 2 purposes for me, I can use it as a 12 volt source while on the water for blowing up tubes and stuff. I can also charge through it. I only have it hooked to the 2nd battery which will be a deep cycle. I will be able to make sure its charged good before heading to the lake. On my last boat I hooked both batteries to the plug, but after more thinking i realized it basically defeated the battery switch because it was allowing both batteries to run together through it. So for now its only hooked to battery 2. I can always add another for battery 1, but im ok just house charging the deep cycle.


I also fixed the hatch issue. I put in a new latch pin and replaced the spring in the latch assembly. I replaced both struts with the ones i had ordered earlier in the week. They are a direct replacement and I had no issues with them. I still am not happy with the hatch release. I think i just need to work with it more. When I pull the release, i hear the little click where it releases. But the hatch doesnt just pop up like I was use to on the 98. I have to go back and give it a little nudge. Not sure whats normal on these, so I may try messing with it a bit more.
 
Nice work. Running wire is not fun but a necessary evil. You're going to run your amp to the common post on the perko switch, right?
 
Nice work. Running wire is not fun but a necessary evil. You're going to run your amp to the common post on the perko switch, right?

Yep, its already hooked up. The new switch actually has a slightly longer post which helped a bit. The terminals i use on the amp wire is a very thick.
 
Glad to see GUEST 2111A worked. I have same switch sitting in my garage.. weather has been crappy here in GA and would add second battery when the weather gets better. It'd be nice to see your pix before I start this HAHAHA
 
Are you going to add an inboard battery charger? I put one on and just plug the boat up after each trip out. It's a dual bank so both batteries get charged.
 
Are you going to add an inboard battery charger? I put one on and just plug the boat up after each trip out. It's a dual bank so both batteries get charged.


That is what the 12 volt outlet is for. I prefer to keep things simple. I use a die hard battery charger that cost me a whopping $20. It charges through the 12 volt plug.
 
Worked about 3 hours on it today. Pretty much got the whole audio system fabbed up. Cut both holes for the subs. I also opened up the hole for the new head unit splash guard. I took out the nasty old stock one. I had a hard time finding a replacement that was the same. I liked the Jensen unit with the spring loaded door the most. It was about 1/4" too big both directions. So i used a jigsaw and a dremel to open up the hole.

Here is the hole after my trimming.


Here it is with the new splash guard just sitting in it to see how it looks.


Here are the holes for the Polk UM 10" subs. I would have like to build an enclosure somehow, but no way to really do it. If it sounds ike crap, ill get someone who works with fiberglass to enclose the area behind the holes.


Of course I had to stick one in the hole just to see how it looked.


If you notice, you will see that I havent installed anything in the boat yet, just made lots of holes. That is because starting tomorrow, the buffing starts. I am going to strip most of the decals off tomorrow and start prepping for the detail job. I am hoping to get it all buffed out this week and then install the audio system next weekend. My plan is to have it water ready by memorial day. Its going to take at least 20 hours this week to get it all done though. We will see how it goes.
 
Last edited by a moderator:
I have the same dual battery switch and was wondering if you could explain how you wired the 12v outlet in. I would also like to only have it run off the second battery. Also, when you charge the boat what do you set the selector to?

Your project looks great.
 
I have the same dual battery switch and was wondering if you could explain how you wired the 12v outlet in. I would also like to only have it run off the second battery. Also, when you charge the boat what do you set the selector to?

Your project looks great.

Its easy. For the 2nd battery, the positive wire goes from the battery to the #2 post on the back of the switch. The ground from battery 2 just goes to the ground on battery 1. So then for the 12 volt plug I hook the positive lead from the plug to the #2 post on the back of the battery switch. Then the negative lead of the plug goes to the negative post on the #1 battery. The battery switch always stays off unless im out on the boat. Leave it in the off position, that prevents it from back feeding into any boat electronics. For charging it only charges what you have it wired to, in this case i only have it wired to battery #2. You could add a 2nd plug wired to the #1 battery.
 
I dont have one on it. im not sure how it would effect charging back through it. i really dont see a need for a fuse, but thats just my opinion.
 
Status
Not open for further replies.
Back
Top