• This site contains eBay affiliate links for which Sea-Doo Forum may be compensated.

Install of Retractable Ski Pylon on 2006 RXT

Status
Not open for further replies.

AircraftDoc

Active Member
image.jpg

Will be installing. Will have to drill holes. One hour installation is what the book says. After all the tools are laid out.

Please thumb up if you like. :thumbsup:
 
I got my dealer to install two...a year after I got my skis. Wish I'd have fought with the ol'lady and never put one on my ski.
 
why???????

A coupla reasons...

A year or so after we had them installed...I rarely ever used it again...the "tube" novelty faded...painful lessons learned....heh. Now it's camoflage...no "old" man with a tube puller will have a fast ski...heh.

Then I started modding my ski with every spare dime I could slip past the mrs. Biggest hurdle for me was figuring out how to get my fresh air intake "and" exhaust past the new post running down toward my pump in the hull.
 
Good luck with the install... Remember, measure twice, drill once...
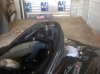
I like mine: Go for Perfection, if your off a little you are still better than good.

I will be taking pics as I go. Right now, weather is not good. And putting the new SC on.

Hole cut in the book is 2 1/4. The insert is only 2". Lot of slop. Might just do a 2 1/8. Will drill two bolt holes on the side of that. Better ED. Edge distance. Measuring carefully. Will see.
 
This is to be used with the directions of your kit that is applicable to your SeaDoo. Different years and models have alternate measurements and directions. I used two carpenters square slide rulers. I used masking tape for ease of marking the hull. Pretty straight forward. Again, many differences with your make and model, but this should give others a good idea on how it is done.

image.jpgimage.jpg

Temp removal for access.

image.jpg

Measured per installation. Pilot drilled so hole saw won't drift.

image.jpg

Drilled hole. Reamed upper hole surface and sanded any high areas.
 

Attachments

  • image.jpg
    image.jpg
    430.9 KB · Views: 78
Last edited by a moderator:
image.jpg

Install upper mount first. Applied black silicone on upper mount and torqued down the two bolts. Then drilled 5/16 bottom holes and fastened.

image.jpg

Measured per year and model for the side brackets. You have to drill 5/16 holes at the end in the hull for the bolts.

image.jpg

Drilled and installed.

image.jpg

Installed. Wet installed the heads, washers and upper mount with a black silicone.

Complete.

Kit # 295-100-457. New updated kit.
 
Last edited by a moderator:
I still get this message:


vBulletin Message
Invalid Attachment specified. If you followed a valid link, please notify the administrator

Did you download the pics thru the forum or something else?
[MENTION=31048]LouDoo[/MENTION]
 
pics work for me... PC and Ipad...

thanks for the sharing... i might suggest to try to polish a little bit with a nice write up... at least thats what i would do...

great job anyway.. look great... if i don't sell my GTX during spring to get my Ducati Monster, i might install the poll...

cheers..!!!
 
Whatever you did to reload, it worked. I can see the pics you posted w/o clearing cookies........now I'm hungry :)
 
pics work for me... PC and Ipad...

thanks for the sharing... i might suggest to try to polish a little bit with a nice write up... at least thats what i would do...

great job anyway.. look great... if i don't sell my GTX during spring to get my Ducati Monster, i might install the poll...

cheers..!!!

Your GTX is a little different and will have a different kit then mine. Don't hesitate to ask the forum or me if you have any questions. And please leave me a thumbs up so I get my SeaDoo Forum wings.
 
Status
Not open for further replies.
Back
Top