Dad/Son Project - "New" 1992 XP

Note: This site contains eBay affiliate links for which SeaDooForum.com may be compensated
Status
Not open for further replies.

gtxnoclue

New Member
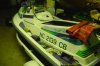
Your awesome advice to get my 96 GTX running again got me motivated (bad rectifier causing it to bog down - for the last 5 years). I even used prior posts to fix my LCD InfoCenter (I can now see the gas level) and replace the buzzer with a unit from Floyd Bell. It's a blast having a working Seadoo again (and working on the unit myself). We forgot what we were missing. I was discussing the situation with a neighbor and mentioned that before your advice allowed me to fix it I was considering "Tearing it apart" and learning about Seadoos with my 12 year old. He proceeded to GIVE me a 92 XP that hasn't been run in a year or two so I could work on it with my son. He said that it did run fine but it's been awhile. Not sure if any winterizing was done but I think it was kept on a lift at his dock for the last year or two (in North Carolina).

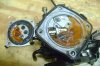
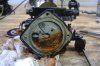
We've thoroughly cleaned the hull and engine compartment. The "hose barbs" that the baler tubes attach to were broken so we were able to temporarily reattach them. We checked compression & if we did it right (both plugs out at the time) both cylinders showed 128 (just found a post and saw that we didn't ground the plug wires or hold the throttle wide open but I assume our test is still valid). We put new plugs in. We put the battery from our 96 GTX in it & it took awhile but it finally did turn over. It idled for a few minutes but whenever we gave it gas - it died. Then it wouldn't turn over at all. I was hoping to list our "Plan of attack" and get some helpful critiques:

Drain the fuel (not sure how to properly dispose of old fuel)
Clean fuel filter
Clean fuel selector switch
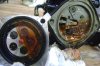
Clean/rebuild the carbs

Is there anything else that I'm missing especially with the symptom of it dying when giving it any gas at all? It has black USCG hose for gas lines (not grey) so I don't plan on replacing them. I assume I shouldn't have to drain or do anything with the oil/oil tank. It does look like there is an unconnected hosebarb fitting on the top of the oil tank (but I didn't see a hose to connect to it. I'll research the tech manual to see if I can find anything.

Thanks in advance for your help!!
 
Sounds like you're on the right track. Drain the old gas out and pull the carb(s) out and rebuild. As you probably already know, gas turns into a varnish when it sits for extended periods of time and wreaks all sorts of havoc on a carb. Replace the plugs...then go from there...it might be all it needs to run. Jet pump oil needs to be changed out. Check the oil injection lines to make sure they're not brittle. Probably couldn't hurt to change the oil filter also.
 
Dad/Son Project

OMG - it took awhile but I was able to remove the carbs (and rotary valve cover) after a busted knuckle, some blood, and new stubby wrenches (pretty much in that order). Prior posts sure were correct & helpful. You called it - the oil lines broke as I was taking the carbs out (or may have been that way). I'll get to those later - that's probably the least of my worries at this point. Take a look at the pictures. The carb filters looked fine but the amount of dirt & debris in the rest of the carb (both of them) surprised me. I expected some varnish looking crud but it almost looked like dirt & water. I actually stripped 2 screws trying to get them out (of course one in each carb). Not sure what I'm going to do there - please advise. I've put some "PB Blaster" on them to try and loosen things up.

Please also let me know what you think the root cause was for the dirt/debris in the carb was from. Is this normal & expected for a unit not run in a year or two? If it's from the gas - I assume no problem once I clean things up. If you think water got in somehow - please point me in the right direction to fix the problem.

Haven't drained the gas, cleaned the fuel filter/switch, changed the jet pump oil, or oil filter yet but will do so after the carb rebuilds.

PS - the "Dad/Son" project is turning out to be 80% Dad & 20% Son. He checks in occasionally so he is learning (along with me) and it's hard to get 2 heads or 4 hands in the engine compartment. It sure did help to keep the rotary valve in place though... It was probably good he wasn't there for the proper use of 4 letter words during the knuckle busting since he is only 12... ; )
 

Attachments

  • DSC09756.jpg
    DSC09756.jpg
    634.1 KB · Views: 79
  • DSC09757.jpg
    DSC09757.jpg
    685.2 KB · Views: 80
  • DSC09758.jpg
    DSC09758.jpg
    641.7 KB · Views: 65
  • DSC09759.jpg
    DSC09759.jpg
    675.2 KB · Views: 66
debris in the carbs honestly is normal if it hasn't been touched in awhile.

make sure that tank is cleaned out well, no gunk, i've had luck swabbing rags to soak of the last of the bad stuff wtih one of those long pickle pickers (steel banded flexible claw)

the carb screws can be replaced assuming you eventually get them out.
 
only seadoo . com has oem mikuni kits that come with replacement allen head screws to replace the phillips that always strip out. you can also get new replacement needle/seat sets with the kits, always been shipped out like the day after I order so i get it within a week.
 
If the heads of the screws are trill there you can use an impact screwdriver like this. http://compare.ebay.com/like/320899231632?var=lv&ltyp=AllFixedPriceItemTypes&var=sbar When you hit it with a hammer it pushes on the screw and turns it at the same time. A must have tool for these carbs in my opinion. If you can get the screws out just get the Mikuni rebuild kits and some new screws and make sure all carb ports are clean. You should be fine. If not you will need some new used carbs.
 
Impact Driver

If the heads of the screws are trill there you can use an impact screwdriver like this. http://compare.ebay.com/like/320899231632?var=lv<yp=AllFixedPriceItemTypes&var=sbar When you hit it with a hammer it pushes on the screw and turns it at the same time. A must have tool for these carbs in my opinion. If you can get the screws out just get the Mikuni rebuild kits and some new screws and make sure all carb ports are clean. You should be fine. If not you will need some new used carbs.
After my first rebuild I thought the impact tool was just a little harsh on the carburetors so on my second build I tried my Ryobi impact driver with a new bit. I have to say in my case it worked extremely well and semed to put much less pressure on the carb body. My $.02.:patriot:
 
Those stripped screws are not too hard to drill the head off of. You can then remove the half moon piece and remove the shaft of the screw with some pliers.
 
if the screw has any shape left in it to grab onto,try valve grinding on the tip of a real good screw driver.it grips really good.
 
Well - I was finally able to remove the 2 screws from the valve assembly. The PB blaster worked on 1 & I had to drill out the other (very carefully). So far so good. Most of the parts look pretty good after cleaning so I am thinking about going the cheap route 1st & buy new screws, gaskets, & oil filter (vs. a complete rebuild kit for 2 carbs). I know to do it right I should buy the complete rebuild kit but now that I know how to remove the carbs it's really not that bad if I have to "Go in again". I really don't want to buy a pop off tester either so I figured if I put the old parts back in as is it should be OK (maybe that's not wise - please let me know what you think). I'll probably order parts from Riva/SeadooWarehouse unless you have alternate advice (Seadoo.com only went back to 1996).

I'll probably see if I can get the oil lines & various hose clamps (vs. crimp type clamps) from an auto parts store. And I'll clean out the tank, fuel selector switch, & fuel filter before reinstalling the carbs.

I've attached some pictures of the ski.

Thanks again for all your help!!
 

Attachments

  • DSC09761.jpg
    DSC09761.jpg
    643.4 KB · Views: 57
  • DSC09762.jpg
    DSC09762.jpg
    528.8 KB · Views: 59
  • DSC09764.jpg
    DSC09764.jpg
    459.2 KB · Views: 52
I found this type of honey-consistency glob in the bottom of the fuel tank on the 89 SP I am working on. It was rather a pain to do, but I removed the oil and fuel tanks and cleaned them out ... I needed to use gasolene to flush out the fuel tank, regular cleaning solvent worked for the oil tank. With the carbs out, spray carb cleaner should work. With the fuel tank out it was much easier to flush it out and recover the screen/filters that were originally on the end of the in-tank pickups before the pick-up lines rotted off.

Fun projects, good luck.

Rod
 
Rod, my SPI's had loads of junk in the bottom of the tank.... thats some nasty stuff, we cleaned it out and replaced all the fuel lines/ cleaned carb.. ran like a beast!:agree:
 
I am no expert, but kinda feel the real experts out here will tell you that the pop-off pressure is critical. There are at least a couple threads out here describing how to make a pop-off pressure tester. If I can get pictures uploaded, I can show what I built.

The small oil lines from the oil pump are recommended by the local experts to use 3/32 tygon fuel line that you can get at your local lawnmower shop ... cost me $2 per foot here and you do not need even a foot for one ski.

Various people out here recommend tie-wraps or stainless hose clamps ... if standard hose clamps are used, I recommend getting them from a marine hardware/supply store, the auto stores mostly use stainless bands and rustable innards. On one of my current projects I am experimenting with using clear fuel/oil lines and stainless aviation safety wire.
http://www.seadooforum.com/showthread.php?48274-89-SP-(5802)-in-Escondido&highlight=5802

I love success stories.

Rod
 
You need to buy two of the genuine Mikuni carb kits and needle and seats. The rubber parts go bad and also the fuel pump parts causing a lack of fuel. Your carbs looked very bad so just do it the correct way. You do not want to do all this work and ruin your engine from running lean. If you can't afford it buy the carb kits and needle/seats from SBT. They are not oem but will probably last a season or two.
 
Hey "Dad"- I feel your pain, although my 8 year old is not quite ready for knucklebustin. He sure volunteers for the test rides though.
I have a 94GTX that I am about 7 days behind you on, and just figured out the valve cover has to come off to get the carbs off, and then they are being shipped to Dr. Honda.
Question- the shorty wrenches, was that mainly to get the starboard side forward bolt out? That rotary valve, that has a shaft sticking out to the right side, correct? What did you do to protect the timing when you pulled it? Any advice you might have on getting the one bolt from the cover would be appreciated.
Thanks, Dig
 
I'm probably the last person to ask advice from - I'm just hoping not to mess things up worse than they were... Regardless - Here's what I've done:

Used the 13mm stubby wrench to get the rotary valve cover bolts loose. Yes - the one on the front side on the bottom was the worst to get to but with patience I was able to get it off. Sounds like you've had success with it now too. That's great news.

As far as the rotary valve. If I looked at it correctly it was a very thin plate (which surprised me) that was on a gear just under the cover. I saw a previous post that said to use a tie wrap so I tried to make sure the plate didn't rotate or fall off the gear (I assumed it was meshed with the gear). I put a tie wrap around the gear so the valve/plate wouldn't slide off. Not sure if that was correct or not so anyone else that wants to chime in - please do so. I just now took a picture in case you're interested.

Was out of town for a short while so am now just getting back to the seadoo. Hope to order the rebuild kits tonight or tomorrow (Yes - the advice about "Doing it right" was well heeded). Plus I was able to find information on making a pop off tester (although I'm not sure what to do since I didn't get original popoff pressures prior to disassembling). I assume I will just ensure that I put the lowest value components in the 1st carb and just make adjustments to have the 2nd carb match the 1st. Will probably spend tonight figuring out where to buy the genuine Mikuni carb kits and needle and seats. Advice would be appreciated - when I looked at Seadoo.com (from a prior reply) it only went back to 1996.

Thanks & good luck on your ski!!
 

Attachments

  • DSC09771.jpg
    DSC09771.jpg
    334.2 KB · Views: 20
Would love some guidance before ordering rebuild parts for my 92 XP carbs. I looked at the link to Parts on this site but couldn't find a rebuild kit. From a prior reply - Seadoo.com only had items >=1996. Since I need new screws for the valve assembly...

I thought the best place to buy a rebuild kit would be OSDParts:
http://osdparts.com/index.php?main_page=product_free_shipping_info&cPath=1&products_id=36
It sounds like for $90 it comes with all the gaskets (including the base gaskets), 2.0 needles & seats (although aftermarket), and the valve assembly screws (although I'm not sure about this). It also comes with the fuel filters. It doesn't come with the pin or arm for the needle valves or the O-rings but it sounds like I can reuse mine.

If I ordered from SBT:
http://www.shopsbt.com/mikuni-jet-ski-carburetor-rebuild-kits/35-160.html
For $70 it comes with the O rings (and it looks like the pin/arm for the needle valves) but doesn't look like it would come with the valve assembly screws (and I couldn't find the screws on their site), base gaskets, or check valves. It was also hard to tell exaclty what it came with based on the picture & no description.

Any help would be appreciated. Thanks!!
 
Word of advice, order an extra pair of those rubber grommets that go on the fuel check valve. They are very easy to poke a hole through when installing them. Well worth the extra $2-3 in case you damage one.

I ordered my last pair of kits from atlanticjetsports.com I like them since they carry all the individual mikuni parts
 
Don't buy the kits from SBT if you plan on keeping the ski, they are not the same quality as the genuine Mikuni ones. You should also replace the small oil lines from the pump to the intake ant the inline oil filter while you have the intake off.
 
Thanks for the advice guys. I am looking at the atlanticjetsports site & it seems to have everything I need (including the screws). Quick question though - their Kit # MK-12-1458 says it:

Fits Mikuni 38/44/46 SBN carburetors including:
•Sea Doo 580/650/720/800

I have a 1992 XP; 5851 which should be a 587 engine. Will this rebuild kit work (says it works for 580 but doesn't reference 587)?

PS - I put on new tygon tubing for the oil lines & will order a new oil filter.

Thanks!!!
 
Status
Not open for further replies.
Back
Top