djredman99
New Member
Changing Crankcase/Counterbalance Oil - 947/951 engine
Hey all.
Recently my 98 GSX Limited took on water because both siphon tubes in the jet nozzle (to the rear of the impeller) had fallen out. My engine took on a lot of water so I followed the shop manual to clear the water out. The manual instructs you to check and change the crankcase oil if it has become fouled by water. It is this procedure that I will demonstrate in this guide, all without removing any parts from the machine. (Unless you consider the seat a part)
Prior to this, I had cleared my cylinders of all water. This is pretty straight forward and there is lots of info available on these boards on how to do this. The not-so-talked about procedure is checking the crankcase oil. the pictures below show you how bad the oil can get if water does get into the crankcase. It isn't the easiest thng to do because of the access to it, but I would not skip checking this out if your 787/947/951 engine takes on a lot of water. (I am not sure what the procedure is for newer model engines)
So first thing is getting the supplies. In addition to your typical tools, you will need:

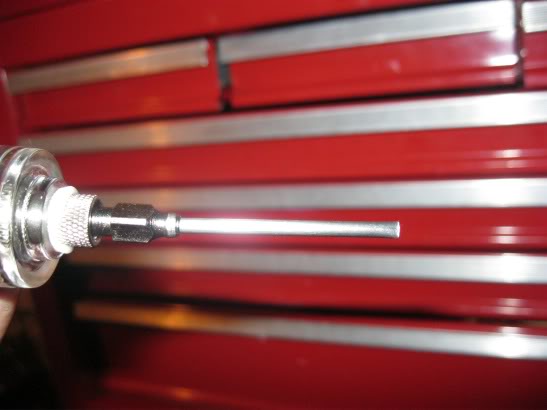
Notice the sharp tip, the hole is located well above that so we will have to cut it down.

NOTE: ** Be sure when you cut it, there is no loose metal pieces that could fall into your crankcase.
I would avoid taking out the spark plugs. Even though it would give yourself more room to work, something small could fall in since you will be working directly above it.
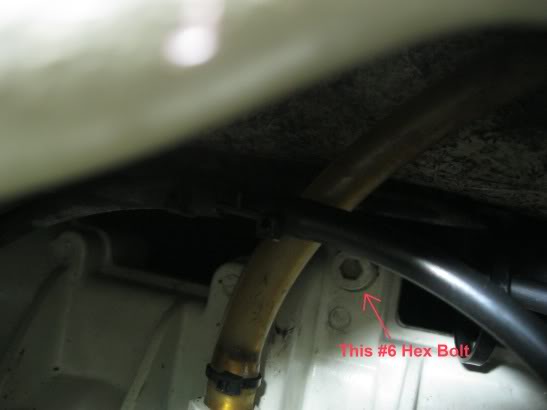
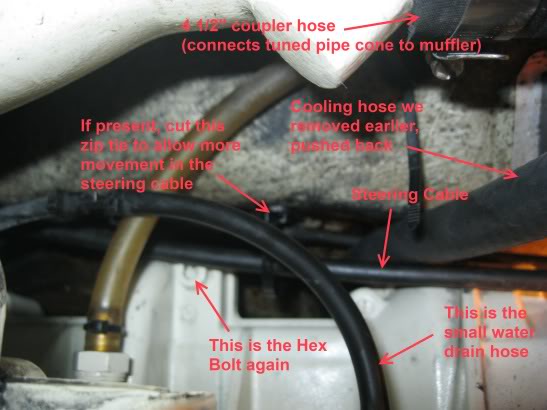
Ok, so now we have to locate the hex nut we want to remove and I removed a few hoses as well to gain better access to the hex nut. You can try at first to leave the hoses attached and remove them only if you find they are limiting you based on the tools you are using. The following image shows their locations.

If you follow both red arrows till they meet, this would be the location of the hex nut (Red dot). The nut faces up and slightly towards the starboard side of the ski. All of the dots here are locations on the opposite side of the engine from this view.
This is the hex nut that we are looking for. Once you find it, you may want to spray some lube on it so that when it is time to get it off, your lube has soaked in a bit and should make it easier to remove it.

So the first thing I did was remove the water return hose, which is one of the main water hoses that runs to the rear of the ski. You just need a screwdriver, remove the clamp and push the hose to the side, out of the way.

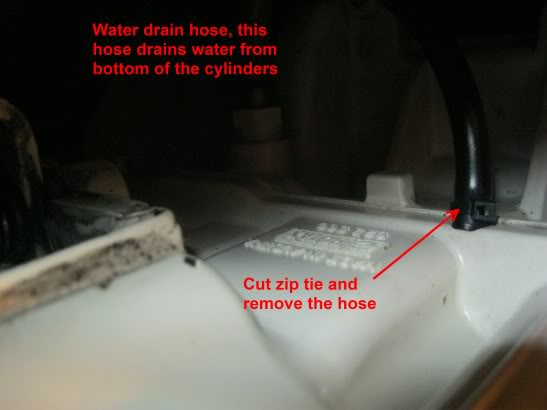
Next, I removed a small, black water line used to remove water from the bottom of the cylinders. It's location is pointed out in one of the photos above. It is typically held on by a small zip tie, cut it and pull the hose.

Close-up view of the small, black water line which drains the lower portion of the cylinders.
Once I got those hoses out of the way, I cut a zip tie that held the steering cable in place so that it had more room to move around. The steering cable laid directly across the top of the hex nut we need to remove (at least in my machine).

Now, its time to remove the hex nut. get your #6 hex wrench (I used an allen wrench) and try to get in there with it. To gain leverage, I used a small metal tube from a bottle jack, and hammered it down so it fit snuggley onto the allen wrench so that there was no play in it.

You may have to get creative here,the hex nut is NOT easy to access, and range of motion is limited. A medium sized extension on a ratchet wrench would probably do the trick as well.
Unless you are already very familiar with this engine, you may have to feel around for awhile to find this bolt. You will not be able to see this bolt directly while the engine is in the ski. You could use a light and a mirror to see it, but you will have to put them down when you are actually trying to get in there.
Once, I got the bolt loose, I continued to remove it by hand. There definitely was a lot of water in my crankcase and built up pressure because once I got the bolt all the way out, the force of water shooting out of the crackcase blasted the bolt out of my hand and it fell directly below the engine. A magnetic extension arm would not pick it up as it was covered with oily water. I raised the front of the waverunner, tried every angle and evenually got it.
Finally, the prize.
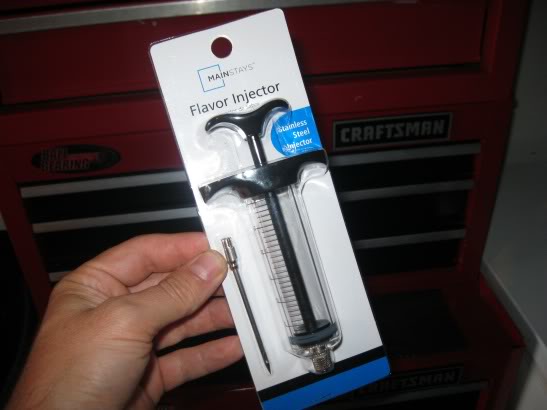
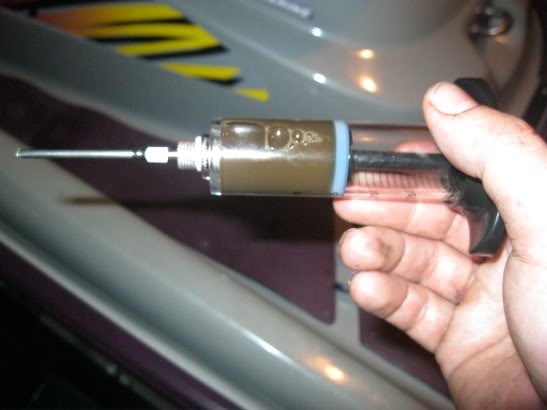
Now that we got the bolt off, use whatever you got to drain/siphon the old oil out. Be careful to not let any foreign object fall into the small hole. the Flavor Injector I bought worked very well. It even had measurement lines on it so I knew exactly how much oil I was putting in. The 947/951 engine needs 40mL of SAE 30 oil.

Definitely water fouled oil.

New oil going in. I did two "injections" this size.
So, once you get your oil in, put the hex bolt back on, re-attach the small black hose, and larger water hose. Attach the spark plug caps, and fire it up.
Total time to do this was just over an hour, but I spent at least 15 minutes trying to get the damn hex bolt out from under the engine.
Good luck.
-djredman99

Hey all.
Recently my 98 GSX Limited took on water because both siphon tubes in the jet nozzle (to the rear of the impeller) had fallen out. My engine took on a lot of water so I followed the shop manual to clear the water out. The manual instructs you to check and change the crankcase oil if it has become fouled by water. It is this procedure that I will demonstrate in this guide, all without removing any parts from the machine. (Unless you consider the seat a part)
Prior to this, I had cleared my cylinders of all water. This is pretty straight forward and there is lots of info available on these boards on how to do this. The not-so-talked about procedure is checking the crankcase oil. the pictures below show you how bad the oil can get if water does get into the crankcase. It isn't the easiest thng to do because of the access to it, but I would not skip checking this out if your 787/947/951 engine takes on a lot of water. (I am not sure what the procedure is for newer model engines)
So first thing is getting the supplies. In addition to your typical tools, you will need:
- SAE 30 Motor Oil
- #6 Hex Wrench
- Means to remove old oil and add new oil
Notice the sharp tip, the hole is located well above that so we will have to cut it down.
NOTE: ** Be sure when you cut it, there is no loose metal pieces that could fall into your crankcase.
I would avoid taking out the spark plugs. Even though it would give yourself more room to work, something small could fall in since you will be working directly above it.
Ok, so now we have to locate the hex nut we want to remove and I removed a few hoses as well to gain better access to the hex nut. You can try at first to leave the hoses attached and remove them only if you find they are limiting you based on the tools you are using. The following image shows their locations.
If you follow both red arrows till they meet, this would be the location of the hex nut (Red dot). The nut faces up and slightly towards the starboard side of the ski. All of the dots here are locations on the opposite side of the engine from this view.
This is the hex nut that we are looking for. Once you find it, you may want to spray some lube on it so that when it is time to get it off, your lube has soaked in a bit and should make it easier to remove it.
So the first thing I did was remove the water return hose, which is one of the main water hoses that runs to the rear of the ski. You just need a screwdriver, remove the clamp and push the hose to the side, out of the way.
Next, I removed a small, black water line used to remove water from the bottom of the cylinders. It's location is pointed out in one of the photos above. It is typically held on by a small zip tie, cut it and pull the hose.
Close-up view of the small, black water line which drains the lower portion of the cylinders.
Once I got those hoses out of the way, I cut a zip tie that held the steering cable in place so that it had more room to move around. The steering cable laid directly across the top of the hex nut we need to remove (at least in my machine).
Now, its time to remove the hex nut. get your #6 hex wrench (I used an allen wrench) and try to get in there with it. To gain leverage, I used a small metal tube from a bottle jack, and hammered it down so it fit snuggley onto the allen wrench so that there was no play in it.
You may have to get creative here,the hex nut is NOT easy to access, and range of motion is limited. A medium sized extension on a ratchet wrench would probably do the trick as well.
Unless you are already very familiar with this engine, you may have to feel around for awhile to find this bolt. You will not be able to see this bolt directly while the engine is in the ski. You could use a light and a mirror to see it, but you will have to put them down when you are actually trying to get in there.
Once, I got the bolt loose, I continued to remove it by hand. There definitely was a lot of water in my crankcase and built up pressure because once I got the bolt all the way out, the force of water shooting out of the crackcase blasted the bolt out of my hand and it fell directly below the engine. A magnetic extension arm would not pick it up as it was covered with oily water. I raised the front of the waverunner, tried every angle and evenually got it.
Finally, the prize.
Now that we got the bolt off, use whatever you got to drain/siphon the old oil out. Be careful to not let any foreign object fall into the small hole. the Flavor Injector I bought worked very well. It even had measurement lines on it so I knew exactly how much oil I was putting in. The 947/951 engine needs 40mL of SAE 30 oil.
Definitely water fouled oil.
New oil going in. I did two "injections" this size.
So, once you get your oil in, put the hex bolt back on, re-attach the small black hose, and larger water hose. Attach the spark plug caps, and fire it up.
Total time to do this was just over an hour, but I spent at least 15 minutes trying to get the damn hex bolt out from under the engine.
Good luck.
-djredman99
Last edited by a moderator:
")