95 XP800 Build

Note: This site contains eBay affiliate links for which SeaDooForum.com may be compensated
Status
Not open for further replies.

riffe723

Active Member
Man this has been a long time coming. I have three current build threads going but I'm waiting for parts on the others so I started cleaning this. 95 XP800.

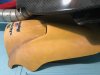
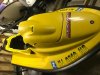
This thing was covered in tree sap BUT I think that saved it! The gelcoat is beautiful after a good scrub.

Soft scrub and a blue scotch brite does an amazing job cleaning and deoxidizing gelcoat from what I have found.

Look closely at the last two pictures. The second to last picture I hadn't touched the bottom pink gelcoat. The last picture is after hitting it with soft scrub and blue scotch brite.

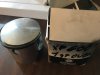
This build is starting as my 95 xp 720 is finishing up. I have the motor parts but haven't put it back together because I'm waiting on all the parts to finish it first.

Check out the pictures. Decals are messed up in two spots. I have not decided if I'm going to peel them and get some replicas from pwcgraphics to make it perfect or clean it up and let it fly. Honestly probably order replicas.

This is just a quick scrub to make it to where I can actually work with it without being nasty. Honestly it really boosted the motivation to get the 720 done.

But without further ado....20190109_174012.jpeg20190111_155657.jpeg20190111_160415.jpeg20190111_160419.jpeg20190111_155701.jpeg20190111_153347.jpeg20190111_153357.jpeg20190111_161821.jpeg20190111_163201.jpeg20190111_163505.jpeg
 
I would hit it with Meguiars Marine High Gloss Polish then wax. The polish is safe for the decals too.
 
All three of my posts are being updated today. Lol got some more done on the xp 800 today. Got it completely apart and washed up inside and out. Got a nice 47* up here in the north country today making for a good day to do so. After washing I went ahead and flipped it over and started wet sanding. After about 3-4 hours of sanding I decided that I was okay with some imperfection on the bottom of the ski as it will mostly always be in the water and the top half of this ski is EXCELLENT. Nevertheless, wet sanding from 400 all the way to 2500 and hit it with some meguiers, then some Lucas spray wax (if you have never used it, the stuff is great!). After getting it all clean I proceeded to complete the bottom of the ski, painting the ride plate, putting on a Solas Scoop Grate (which this is the first one I've ever seen) and finishing it off with some R&D trim tabs that I had in a box of parts. Idk if I will keep the R&D or grab another set of Matt Braley's tabs because they look great. Anyways here's some pictures I took throughout today are posted. I didn't get a picture of the top side all clean but once I turn it back over I'll post one. Nevertheless the top side pictures are before I cleaned it.20190202_142557.jpeg20190202_142605.jpeg20190204_125925.jpeg20190204_132009.jpeg20190204_163830.jpeg
 
Here's the top side pictures. This one was in really nice cosmetic shape honestly. Really needed a good clean and some sandinging on the bottom side. The top side was covered in tree sap when I got it and as far as I'm concerned that saved the gelcoat color. Still working on cleaning out the hull, which is the bad part of this whole ski. Will be working more on that this evening, hopefully finishing that off before I leave tomorrow for work trip.
 
Ended up snagging up a Rossier Pipe. Gotta get a piston kit ordered and get it dropped off at the machine shop. Cleaning has went pretty well. I have probably 2 months to finish this before itll be time to get them wet for the first time this year. Once this project gets my full attention, itll take off pretty quickly. Two other project skis at nickle and diming me towards the end, and consuming my time.
 
Just because I did a little cleaning I'll keep the thread going with the small updates. Here's some from the inside of the hull. It's way better than it was but still not perfect. Going to keep working and see if I cant get it perfect. 20190224_144032.jpeg
 
Still looks good inside. I know how much of a pain that is to clean. I set my wife at it with a paraffin gun set to 6bar :)
 
Got one piece of the goodies list today. Rossier pipe. Needs cleaned up and repainted, and I need the rubber coupler. Anyone know where I can get that coupler?received_2127762170594486.jpeg
 
It will look like this but be sure to measure because 3.5in was just a guess. You want SS clamps. Don't pay too much it should be like 10 bucks for multi ply 100 percent silicone. Be sure to clamp the 2 halves as close together as possible.
 
Nice, I can't wait to start on my 95xp800. Mine's in much worse shape. I have some gel coat work to do, and also need to either fix my hood or source another. Some moron put mirrors on it. Carved a big ass hole to attach them, and they ended up breaking the hood in places. Hoods are so rare and expensive, I might just plastic-weld this one and refinish it. I have every part except the battery. Also need to get my cylinders bored, but that's all coming... looking fwd to seeing more :)
 
What's up IDo, hope your doing well. I couldn't help but notice that I could assist you in those hurdles. Just so you know where I'm at.... I have 2 yellow hoods one for 150 shipped and the minty one for 250 shipped. I have OEM first over 787 pistons for 75 each also.
 

Attachments

  • IMG_0662.jpg
    IMG_0662.jpg
    97.4 KB · Views: 48
  • IMG_0401.jpg
    IMG_0401.jpg
    84.3 KB · Views: 48
  • IMG_0670.jpg
    IMG_0670.jpg
    64.2 KB · Views: 41
More parts coming in! Not going to be home until the 22nd to get started, BUT parts are rolling in and I got my girlfriend to send me some teaser pics and I picked up a couple parts while out here in cali from work and I'll he bringing those back in my luggage.

R&D nozzle
Skat 16/24
Buckshot Head

Getting close to time to start getting this one going. 20190318_194206.jpegreceived_2472417556161874.jpegreceived_2350459951853049.jpeg20190318_194215.jpeg
 
Little bit of paint removal/loosening before I work on some bead blasting tomorrow. This stuff works great. I could probably get away with not bead blasting if I wanted to.

Also take a look at the parts I have lined up for this build. 20190323_212853.jpeg20190323_212856.jpeg20190323_212901.jpeg20190323_212905.jpeg20190323_125020.jpeg
 
Status
Not open for further replies.
Back
Top