2001 GTX DI Engine Removal?

Note: This site contains eBay affiliate links for which SeaDooForum.com may be compensated

DI_Hoss

Premium Member
Premium Member
Howdy! Recovering stand-up pilot, new Sea-Doo owner & new to the forum.

At first glance perusing the forums, I got the wrong ones - (2) 2001 GTX DI's, one running, one not, with newer trailer. But the price was right (so I think today).

I'm sure there are plenty of threads about pulling the motor out of a GTX DI, I just haven't found the correct "search" for it. Does anyone know of a good link describing the sequence of removal?

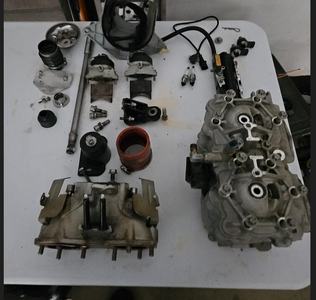
The short of it, the non-running one has 20 lbs of compression in the rear cylinder, 75 lbs front. It has 185 hours on it, rumor is the bottom end is good for 200; thought I'd pull the motor and rebuild it over the winter. Shy of owning a machine shop, my skills are solid enough to do this (have rebuilt a couple of Kawi JS650's and several vehicle engines).

Being an old stand-up owner and knowing what its inner workings look like, my mind was about blown when I saw all the monkey workings in the GTX DI - there's a bit more going on here; I'm sure it will all make sense soon enough.

Anyway, thanks in advance for any guidance and taking the time to read this.

Cheers!
 
I've been restoring Seadoos for the past 5 years and I gotta say the DI is the absolute best 2-stroke performer.... when they are working properly. LOL great on gas, start right up, no hiccups, smooth smooth smooth. Bad Azz engine for certain.

For me the hoses are the biggest pain in the azz by far. How ever you choose to lable them do a good job and take pictures of the lables in place. That will help... some. :D

FIRST thing you do is remove the jet pump and BEFORE that... ON the DRIVE SHAFT remove the retainer "under the stainless mating ring" basically a c-clip. You push the stainless mating ring against the carbon and toward the rear of the ski (THE JET PUMP MUST BE IN PLACE). This will expose the retainer. Next slide the mating ring toward the engine and off the shaft fit. I say this because.... if you don't get that bastard off and the drive shaft removed from the engine you're in for a world of trouble. Shite will get broke. LOL

I leave the Hoses connected to the fuel rail, disconnect what is necessary to move the fuel rail to the front of the ski and out of the way. Find the rave solenoid, make a mental note to be very careful around it. It is very fragile and one bump from the engine will break off a connection.

Next fragile element is the hose at the bottom of the engine that connects to the mag cooler. That cover is plastic and if you force that hose in anyway... it will break the fitting. Don't worry they are repairable. :)

You can remove the exhaust in one piece... I don't know why people do this but it is possible and not very difficult... just DON'T break the rave solenoid jostling the pipe around. :D

A couple of us have lots of pictures but they don't often help. Good for you that you have 2 skis to look it. That helps a lot.

As for the crankshaft, I used to buy WSM but I contacted "Competitive Crankshafts" last year and that would be my preference. Seems like the guys does great work and knows his stuff.

ONE THING about the 951s. You gotta fog those engines when you are done for the day. They suck in a lot of moisture as they cool and are prone to getting water inside the engine as a result. I've found my spark plugs with moisture on them the day after a ride. Good Luck !!
 
Last edited:
Welcome to the Party !

just a quick note, after only a couple of threads it is possible I"m Gene's unknown brother. We be on the same page.

I love these DI's . -- yes there is a lot going on, but you've got some big PRO's already.
First, you bought two skis, you have reference material literally at your finger tips.

Here some key takeaways for me after doing this for about 8 yrs now.
-- Invest in the shop manual, print it, and keep it in a 3 ring binder
-- SBT or other providers that swap engines have removal documents, PRINT THEM IN COLOR.
put those pages in protective plastic bindings, Seperate from the shop manual, you'll refer to it all the time.

https://www.shopsbt.com/pdfs/sd951di.pdf
-- Buy a couple boxes of nitrile or similar gloves. - these hulls get NASTY.
-- I have yet to see anything simple when dealing with Drive Shafts, when I'm removing an engine I remove the pump and the driveshaft, (refer to Gene's points above) I have the alignment tool and I can't say enough good things about having it.
-- Start with compression, if you don't have good compression figure out why. Guessing and throwing parts at these skis will drive you mad and kill your wallet.
-- On rebuilds, GO SLOW. lay parts out on a table, and/or have labels handy.
1694022255874.png
-- buy a magnet extender; you're gonna need it, Pay VERY CLOSE ATTENTION TO STAINLESS STEEL BOLTS DONT DROP THEM
-- I tied a small powerful square magnet on a piece of twine I can literally toss/scoot under the engine, I've recovered countless sockets and allen wrenches and other tools (i got a fiber line camera for xmas it's cool being able to look under the engine or hard to reach spots)
--take pictures of anything you are worried about recreating (like hose layout after pulling the engine)
--save those engine shims and don't skimp on sealants, thread locker(S) and Molycote

OK I could go on, but you mentioned some other important key things.
you got 20lbs compression in the PTO cylinder.. I'll lay $'s to donuts you'll have damaged pistons and that metal has no where to to go but down and into the bottom end and into the crankshaft bearings. - you'll likely be splitting the case..

The exhaust does come out in one piece, it's a bugger the first time you do it, but becomes 2nd nature after a couple time. When putting it back don't tighten down the support braces until you're all in place... thank me later. :) It's like moving an L shaped couch out a door way.. in and around.. and watch those hoses!

as far as skills, if I can do this, anyone can. I'm a document monkey, so between manuals, pictures, forums posts and you tube videos you're very likely to find what you need.

EDIT: I updated the pdf link to the "DI" version, the original link was carb.

-pantz
2001 RXDIs (3 of em)
 
Last edited:
Thanks @etemplet & @pantaloonz - these are the tips I'm looking for.

Since I don't know what happened to it, I fully agree that it gets a new bottom end as well.

Are there any favorite brands of pistons? I was a big Wiesco fan in my stand-ups. Bore sizes - +0.5mm, +1.0mm?

Favorite remanufactured cranks?

I'm surprised that I haven't found more write-ups about pulling this engine - lots of tech stuff though.

Thanks again! As I tear into it, I'll try and add a few posts for follow-up / entertainment.

Cheers!
 
Best pistons for a Di are going to be OEM.
Best crank is have yours rebuilt by Competitive Crankshafts.
 
Welcome to the Party !

just a quick note, after only a couple of threads it is possible I"m Gene's unknown brother. We be on the same page.
<snip>
I love these DI's . -- yes there is a lot going on, but you've got some big PRO's already.
First, you bought two skis, you have reference material literally at your finger tips.


-pantz
2001 RXDIs (3 of em)

Dude I wish you lived close to me. You got some cool ideas. My neighbors know it when something falls under the engine. :D :D I am working on that though... Ha ha. I'm now telling myself how much I enjoy working on these skis.

Can't find anybody to work on DI's in my neighborhood. LOL They all skeerd !! Ha ha.
 
The scariest part is reman'd hardware, very expensive and tough to find trustworthy sources.
The rebuild kits are getting pricier and pricier.
The market is eventually gonna dry up (i think) I better get my spare cranks and stuff rebuilt/refinished now before they qualify as 'antiques'

-Pantz
 
(quite possibly the cleanest pwc i've ever worked on)

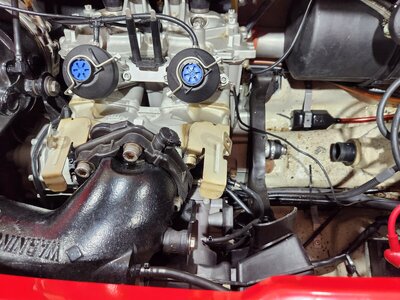
It's not out yet, but I have to admit, the pipe is kicking my arse. I know Bombardier is Canadian, but I swear they must employ people with small hands, not saying child labor, but just sayin' 🤔 😅

@pantaloonz - thanks for the link to the .pdf!

20230906_205032.jpg
 
You are certainly welcome sir!

I had to laugh at your child labor comment, I do wish I could shrink my hands and arms down to doll size!

That hull is clean, and doesnt show oil leakage. that's nice!

One thing I have done is I went to harbor freight and purchased a few sets of cheap allen keys. Using a simple hack saw or metal cut off wheel I've modified them to appropriate lengths for when you remove that exhaust pipe from the manifold. Also, read the removal guide: it blew my mind that the throttle body and air box need to come out before moving the pipe, but it's certainly accurate. There is a NASTY 15mm bolt under the fitting that is NOT accessible without removing the air box and throttle body, doesnt have to come off, just loosened, you'll see why when you take it out. the post it's on is critical though to realign it properly for reinstallation.

I tried making a bit for those allen bolts but there is no room for a drill anyway, so make the best of it with modified tools that won't kill you. I will use an old sparkplug socket as a mini pry bar on the allen wrench, works wonders and prevents you wrecking your hands/fingers trying to issue the required torque to undo.

Also , at least for my DI's I take down the electrical box (not sure exact name) the box that hangs down under the ass end. There are 3 10mm bolts that you remove from where the seat pillar/latch is, with that out of the way, the air box will come out FAR FAR eaiser.
The throttle body can then be removed and CAREFULLY wedged out of the way and on the lower part of the hull.

When you remove the exhaust pipe locate the orange coupler(you can see barely in your photo), spray it with silicone spray (wd40 works too) and use a very small flat head screw driver and wedge it in and around the lip there to free up the collar from the tail pipe. Leave the collar attached to the black exhaust part you want that in position when you reinsert it. I never sepearate the exhaust it will come out (and go in) like a big ol horseshoe.

That pipe also has a water port on the bottom that is very difficult to reach until you get it free, once it's free and you can move it a bit that hose becomes way more attainable.

happy to help.
-pantz
 
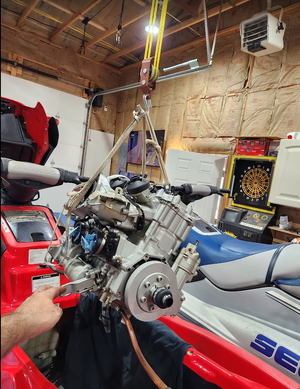
...lift straight out they said... it was more like lift a little, roll a little, lift a little more. I ended up taking off the rear motor mount as well. But it's out :)

When I go to put it back in, where do we source the small non-reversible stainless clamps?

1694186140769.png

I can't thank you all enough for your comments - they all helped so very much!

Have a great weekend...
 
Get a seadoo they said, it'll be fun they said! :)
Yes it's not a straight lift, slow, spin, jiggle, lift, tweak, curse, spin, lift, have a rope slip, curse more, and voila its out!
The Oeticker clamps suck to get off as well. be careful not to damage the fitting/barbs.
As Gene mentioned before be very careful of the bottom water channel cover and the tiny oil return under the air piston head.

I noticed in the picture there is no hose attached (at least not anymore) to the oil line..did you take that off or has this ski maybe gone the route of bypassing the oil pump and using premix? .. based on it's position that would be leaking all over hell if the oil container was full, maybe you drained it out?

That is definitely a clean engine, I'll be interested to see what you uncover.

You have a nice weekend too, my top end replacement got delayed, so my plan to get on the water this weekend got boned... Im a sad panda.

-pantz
 
If you're a purist and going to put oetickers back on (or similar) kits and packs can be found on amazon.
I hate those damn things. Sumtin like this tho: sample ear clamp kit

Now, I'm not telling you to do this: on the tiny hoses I use zip ties, (i've yet to have one pop off) when the sizes get a little bigger I use basic hose clamps.
Definitely not saying do as I do here, but all the fittings have barbs/jags and I usually actually use a heat gun on "low" and warm the ends of my hoses for easy reinstallation and they cool off nicely snug on the fitting :).. then I use a zip tie on em.

I've yet to lose one -- not saying it won't happen but that's me. Certain things you shouldnt zip tie, like the drive shaft boots, and any hose where pressure and gravity is your enemy and if it's big enough for a small hose clamp I give it one.

I'd give you kudos if you replace those all with true oetiker/ears

-pantz
 
I headed all your warnings and took great care when removing the hoses - no barbs were harmed. There was enough slack in all the small lines, so I just cut them off at the barb vs trying to get the crimp off while still in the boat. Brilliant tip about low heat before reinstalling - the thought crossed my mind and that seals it!

For the oil - it still is injected, I clamped the line closed just above the oil filter and removed the line at the outlet of it instead of trying to cut the clamp off at the oil pump. I lost a couple of ounces into the hull, but no biggie.

Does anyone replace the oil filter? Fuel for that matter? Oil would be one sum bugger to get to, and I'm thinking that should be a must do.

One thing I noticed is that the oil is blue - in my mind Sea Doo is orange-ish. I've come across a few threads that say only run Sea Doo brand... My concern is what if the PO used a petroleum base vs the recommended synthetic, and could that be the cause of the top end failure? My other guess is it's the same in both machines.

I need to drain the fuel as it's old and thick and yellow, and am planning on draining the oil too to be on the safe side...
 
I do check the oil filter on rebuilds since it's right there. it does sound like the PO wasnt using the best oil option. Probably behooves you to check it and flush it. with the line pinched as you have it, shouldnt be bad. Inexpesive to replace. - under $10.
- never done fuel filter so I cant comment.

sounds like draining the oil would be smaht. - Thick and Yellow gas huh?. Sounds like me when Im burning keytones. :) Ditching the old and goin with clean stuff sounds like a win to me.

Maybe some more seasoned veterans will weigh in, not sure the best way to get all that all oil out, gravity of course will do most of it.. but how to get all of it out.. makes me scratch my head.

Speaking of warming things up. I "preheat" the orange collar on the exchaust replacement so it's good and malleable while I'm jockeying around that maga horeshoe. It's nice to have a buddy for that part to get a real good fit.

I'm still a dope sometimes, I left the front water line on a warm heat to get the broken water channel bib out of it. Laid the heat gun down and left the hose end like 4 inches away.. COMPLETELY forgot till I heard a pretty loud POP... ever burn microwave popcorn? lol .. basically don't overdo it.

-pantz
 
Looks like you done good. You have to do it on your own but gently to get the full experience. Usually that dang exhaust manifold stud causes problems... I've bent one of those fighting it. :) (Don't do that) Yep... much easier to remove the PTO engine mount bracket.

Oetiker Clamps are the BANE of working on Seadoos for me. I've broken fittings trying to remove that garbage. I'm a zip tie kinda fellow. :) I've reused those little stainless clamps on the oil injection lines. Takes a little rebending and shaping to get them spot on. I don't have a problem using zip ties on those lines and I do on the really small ones. They're not coming off. :)
 
I bought this and it has been a great help draining fuel tanks and transferring fuel. Tranfer Pump

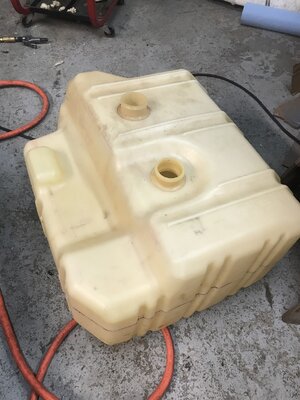
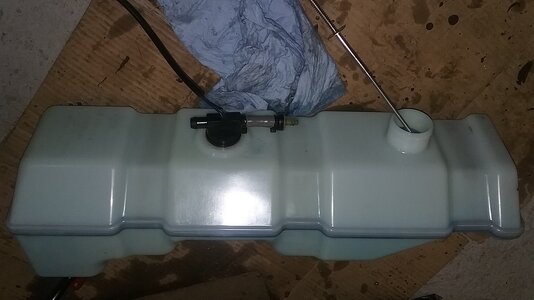
You can remove that fuel tank from the ski and wipe it out or do it in place and that Transfer pump will get almost all of the liquid out. I remove the tank and get every spec of dirt I can see and I clean the tank really pretty. Same with the oil tank.

GTX 2000 951 Fuel Tank (5).JPG

That's my getting the specs out apparatus. :) I don't like dirt in there and if I'm cleaning I want it ALL removed.

Oil Tank2.jpg
 
For hose clamps I still like the factory Oetiker clamps.
If you use worm drive make sure they are 100% stainless and they don't cut into the hoses.

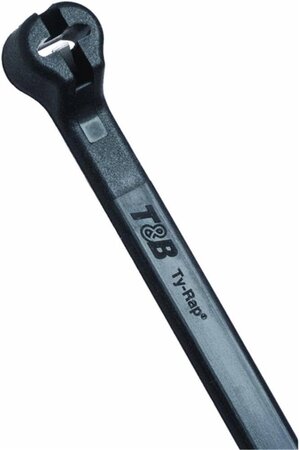
I use the Thomas & Betts zip ties with the stainless locking tabs for all the fuel and oil lines.
51zGEUU0XrL._AC_UF894,1000_QL80_.jpg
 
I am defiantly going to watch this thread. I have a 2001 gtx di that I am going to start on once I get my latest project done. It is nasty. The oil tank got a crack in it and filled the engine compartment.
 
I am defiantly going to watch this thread. I have a 2001 gtx di that I am going to start on once I get my latest project done. It is nasty. The oil tank got a crack in it and filled the engine compartment.
remove the oil tank, point the nose of the ski at th sky and drain all the funk out of the back of the ski. Remove the plugs completely. Then take the ski to the car wash and spend about $5.00 spraying engine degreaser. Then you can get started. Mark Everything. There are a great many hoses that can get quite confusing. Remove the rave solenoid or just be very very very careful working around it. They are not cheap to replace and sometimes not easy to find. Good Luck !
 
that pipe is a pain,,,heavy and awkward,,,so I use a hoist,,,I wrap the pipe with a rope,,,but first balance the pipe in the rope to the drop angle I need before i carefully nestle it,,,I also crazy glue the washer to the 15 mm nut at the rear of the manifold above the carb,,,,so it does not drop off and lay on the manifold,,,
regarding the hose that is on the front if the plastic fitting of the cylinder case cooler,,,I just take a sharp knife,,run a sharp knife over the end parallel to the fitting,,and after just cut that par off,,,if you want to reuuse it,,no chance in breaking the fitting,,that hose gets very hard over time,,,I usually replace it with a new softer one,
 
Last edited:
I headed all your warnings and took great care when removing the hoses - no barbs were harmed. There was enough slack in all the small lines, so I just cut them off at the barb vs trying to get the crimp off while still in the boat. Brilliant tip about low heat before reinstalling - the thought crossed my mind and that seals it!

For the oil - it still is injected, I clamped the line closed just above the oil filter and removed the line at the outlet of it instead of trying to cut the clamp off at the oil pump. I lost a couple of ounces into the hull, but no biggie.

Does anyone replace the oil filter? Fuel for that matter? Oil would be one sum bugger to get to, and I'm thinking that should be a must do.

One thing I noticed is that the oil is blue - in my mind Sea Doo is orange-ish. I've come across a few threads that say only run Sea Doo brand... My concern is what if the PO used a petroleum base vs the recommended synthetic, and could that be the cause of the top end failure? My other guess is it's the same in both machines.

I need to drain the fuel as it's old and thick and yellow, and am planning on draining the oil too to be on the safe side...
I would drain the oil if you are not sure the correct type and change the oil filter. The DI require XPS Full Synthetic oil. These DIs are extreme high performance. Side Note: when you are putting back together, please be sure to do the engine leak down test. This is the only way to know if the oil injection ports are still sealing. This does mean either making or buying exhast block off plates but it worth it. The oil injection ports should not allow crankcase gases to flow back into the oil lines. If they are wore out and allow air to leak into the lines, that is fast way to blow up your top end due to oil starvation. I also suggest to run the oil volume test for oil pump in order to validate the correct amount of oil is being delivered.

Last note: Rebuild the air compressor, cant reach it with engine in hull, so better safe than sorry if the compressor shows any signs of wear. I have never found any specific intervals for when this needs to be done.

later.
 
Oh @Grast5150 , I've been learning a lot, and thanks the for the tips.

Just a few of the finds - somehow the PO cracked the oil tank (I didn't know and lost about 1/2 gal of liquid gold into the hull), and oil/air separator in the oil filler neck ended up in the bottom of the tank. How does one crack a tank, and not at seams?

As for the air compressor - just the head, or new rings as well? That part of the engine appears in excellent shape.

Cheers!
I have purchased and rebuilt 3 GTX DI to this date. Mostly for my family but one for a friend. Every DI I have ever seen has a leaky oil tank. As such, I always assume the oil tank is going to leak. I have seen videos of others only filling the oil tank to about 1/3 to keep the spills to limit. I dislike this and just replace the tank.

Later.
 
Back
Top