1997 XP 787 No Start / gash in hull

Note: This site contains eBay affiliate links for which SeaDooForum.com may be compensated
Status
Not open for further replies.
The actual main jets, the little brass pieces that screw into the carbs to control the fuel flow, are different sizes on each carburetor. The rear cylinder has a slightly larger hole in the jet than the front one.

Sea Doo did a great job when they selected jetting for the carbs from the factory, so if everything is stock, there’s really no reason to stray very far from the factory settings.
 
Okay. Yeah I left everything stock. I just got everything put back together and it still wont start. I'm getting frustrated because I cant find the issue..
 
Did you try with a small squirt of premix in the spark plug holes? If it won’t fire with premix like that I would suspect that it just doesn’t have enough compression...
 
Don’t mix them up. The mag side should have a 142.5, and the pto should be 147.5.

After I read this I went out to my workbench and checked. Right now I have a set of carbs off a 97' XP 787 I'm rebuilding and checking for a local guy. The main jets for both the mag and pto are the same, 142.5. Maybe on some skis they tweaked it and changed the pto jet? I didn't pay attention when I did my 96' GSX and 97' GTX carbs. I assumed they were the same, but next time and no time soon, when I pull the carbs off I'll check because I'm curious to know.
 
I've been checking the shop manual for any clues. Now that you mentioned spark plug gap I found the gap callout on the manual... come to think of it, I never checked the gap on the plugs since I bought them from the dealership. I'll have to check today when I go work on the ski. Maybe that simple thing is my issue!
In other news, I put the first layer of marine tex on yesterday with some fiberglass cloth layered in. I'll take some pictures of that progress tonight! It looks better than I thought it was going to Haha
 

Attachments

  • Screenshot_20190623-134117_OneDrive.jpg
    Screenshot_20190623-134117_OneDrive.jpg
    446.3 KB · Views: 11
After I read this I went out to my workbench and checked. Right now I have a set of carbs off a 97' XP 787 I'm rebuilding and checking for a local guy. The main jets for both the mag and pto are the same, 142.5. Maybe on some skis they tweaked it and changed the pto jet? I didn't pay attention when I did my 96' GSX and 97' GTX carbs. I assumed they were the same, but next time and no time soon, when I pull the carbs off I'll check because I'm curious to know.

Not all 787’s are set up this way, so if the carbs have been swapped at some point that would explain it. The 97XP is unique in having this jetting, although the later SPX’s have offset jetting as well, just different sizes. Check out Seadoosource’s carb reference page for a good reference on stock jet sizes and adjustments.
 
Got a lot of work done this weekend.

Starting with the hole in the hull...
I took a screwdriver and pried off all the loose patch the last person did. Once I got to solid hull, I ground away everything that was damaged or gross looking. What I was left with was this massive hole lol. About 4inches by 1.5 inches. The zip tie was used to pull the wires up from the top so they were out of the way of the grinder and marine tex filler. Cleaned it all with acetone and got to fixing. I put as much marine tex around the hole as would stay but the marine tex wouldnt bridge the hole. I put a patch of fiberglass over the hole and that allowed the next layer of marine tex to bridge the whole area. I did this two more times, covering with marine tex and putting fiberglass over it. The goal was to cover the area, have structural support, and start building up the base to remake the keel with marinetex.
I didnt take any pictures but after this part dried, I sanded it down and added the final layer of marine tex/fiberglass. (Will update with those pics soon.)

After I had the patch how I wanted it I turned my attention to the engine.
I replaced all the old fuel lines, cleaned the fuel filter, and soaked the fuel selector petcock in acetone for a couple hours to clean the gunk out of it. I also plew out the petcock with the air compressor just in case. There was a little bit of grease on the outside of the petcock where it rotates so I put a fingertip worth on it so it would rotate smoothly (it does now). I took the carbs out and replaced the fuel line between those, and checked the thimble filter in those. I should've took a picture of that because both filters in the carbs were perfectly clean!
Turns out i needed to gap my spark plugs (WHAT AN IDIOT!). With no gapping tool, I used the ol redneck rule of thumb that 1 sheet of paper is .1mm thick. NGK says these plugs come at .8mm so to get the .5-.6mm recommended I slid 6 pieces of paper under the electrode and bent it in on the vice. I compared the unbent plug with the bent one. It passed both the eyeball test and the "paper" test. I bent the other plug, installed them both and the Seadoo fired right up!

At this point she should be seaworthy once the marinetex dries!
 

Attachments

  • IMG_4527.jpg
    IMG_4527.jpg
    658.5 KB · Views: 23
  • 20190623_195427.jpg
    20190623_195427.jpg
    5.6 MB · Views: 22
  • 20190623_181604.jpg
    20190623_181604.jpg
    7.4 MB · Views: 23
  • 20190623_181634.jpg
    20190623_181634.jpg
    6.7 MB · Views: 23
  • 20190623_181558.jpg
    20190623_181558.jpg
    7.4 MB · Views: 21
  • 20190623_181643.jpg
    20190623_181643.jpg
    6.7 MB · Views: 19
  • 20190623_181638.jpg
    20190623_181638.jpg
    6.7 MB · Views: 20
  • 20190622_171653.jpg
    20190622_171653.jpg
    6 MB · Views: 16
The next steps will be to look at the VTS, roll on the gel coat, and buff the hull/trim pieces.
An engine mount or something might be broke because it does shake excessively. Ill try and get a video of this soon to get your guys opinions.
 
I got my first SeaDoo on Wednesday this week, and (against my better judgement) I bought it private for cheap. It started strong, ran well and sounded alright when I bought it. Thursday, I did some basic maintenance while it was on the trailer. I greased the mid bearing in the rear, put 2 new spark plugs in (NGK from a SeaDoo dealership), put dielectric grease in the spark plug caps, installed a fully charged new battery, and threw a glug of 2-stroke oil in the gas tank just in case the oil injection doesnt work. I hit start and it fired right up, a little white smoke came out but nothing concerning. I let it run for 20 seconds, shut it off, filled the tank with gas and headed to the lake. Once it was in the water, it turned over but wouldnt start. I tried for 15 minutes to start it, holding the start button for 5-10 seconds with 1 minute break in between, but no success. Defeated and pissed, I drove it home and put it in the shed. I took the spark plugs out and they looked wet like it was getting gas (I shouldve took a picture). I grounded them to the block and they sparked when the motor turned over. But now it wont start out of the water either. Can anybody help me figure out why this wont run? My next diagnostic is to check compression.

The second thing is it has a patch on the bottom that I need to redo. What tools do I need for this? Can someone recommend a good fiberglass repair kit and gelcoat repair kit? Or a good guide to follow?


I hate to say this, but you sound like you could have some engine work needed. People get excited when they get a good deal on a motor, start it on land, runs like a brand new one, then put it in water, and it floods out, won't run. If your in the water, and you start it, then shut it down, will it still turn over, or does it only spin a bit, then stop like it has a dead battery? When you pull the plug, does it spit water from the mag cylinder?

This is why it's so important, not to buy a ski, sitting on land. When you have no water in the water jacket, the engine will run fine. When you put it in water, you have several gaskets that must hold up, for the engine to fun. If you have access to a compression gauge, do a compression test to both cylinders. You should get between 90 to 110 psi. It's not so much the pressure, as it is the difference between the two.

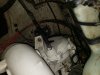
If you look at the cylinder head, lets dive in a bit, when you pull off the top bolts, you'll pull off two covers, bot are cooling jackets. When you do that, you'll see the pistons. You'll be looking for standing water in the piston, or signs that water was standing in it. If you see water in the water jacket, then that means those two plugs, at the lowest part of your cylinder, are plugged. Once you have it apart, blow those out and get them working again. They are what keeps the engine from freezing.

Now, here's the most important part of your inspection. Where that first head lays down on top of your poistons, there are 2 tiny "o" rings that fit on those cylinders, at the very top. They are about 1/16 in diameter, and really small. Take a razor or sharp edge, and put it out. If your careful, you won't break them, and possibly, be cause to re use them again. You can get an upper end gasket kit for about $40 bucks, I recommend it. After you clean those 2 rings out, get a tiny about of grease, just enough to make them sit in place. In the process, you'll also be placing those 2 bigger gaskets back on. Once you have those cylinder gaskets on, then your square gaskets that fit each head, put them on. The most important part is next. When that cylinder head is on, there are 2 red "0" rings that you will put on at the place with your spark plugs are screwed in. Don't screw them in yet, but put the red o rings on the head, where the holes are, because they are a tight water seal.

Seadoo has this design set up so that if you run it dry, it'll be good. If you put it in the water, and it runs like crap, then you know, you got the cooling system screwed up. There are also tests you can do;. You can test the cooling system for up to 5 psi, and do a compression tests on your pistons to make sure those rings seated. just because the motor runs good out of the water, DOES NOT MEAN IT WILL RUN GOOD ON THE WATER.

I have an entire instruction set up on doing these tests. I take a laymans term to iit, and it you ereally want to do this, and make sure you get to ride, don't take SHORT CUTS!!!!!
 
Seadoosnipe... Compression read 135 in both cylinders. So I'm still in the boat that says I dont need to rebuild... yet
 
Got a lot of work done this weekend.

Starting with the hole in the hull...
I took a screwdriver and pried off all the loose patch the last person did. Once I got to solid hull, I ground away everything that was damaged or gross looking. What I was left with was this massive hole lol. About 4inches by 1.5 inches. The zip tie was used to pull the wires up from the top so they were out of the way of the grinder and marine tex filler. Cleaned it all with acetone and got to fixing. I put as much marine tex around the hole as would stay but the marine tex wouldnt bridge the hole. I put a patch of fiberglass over the hole and that allowed the next layer of marine tex to bridge the whole area. I did this two more times, covering with marine tex and putting fiberglass over it. The goal was to cover the area, have structural support, and start building up the base to remake the keel with marinetex.
I didnt take any pictures but after this part dried, I sanded it down and added the final layer of marine tex/fiberglass. (Will update with those pics soon.)

After I had the patch how I wanted it I turned my attention to the engine.
I replaced all the old fuel lines, cleaned the fuel filter, and soaked the fuel selector petcock in acetone for a couple hours to clean the gunk out of it. I also plew out the petcock with the air compressor just in case. There was a little bit of grease on the outside of the petcock where it rotates so I put a fingertip worth on it so it would rotate smoothly (it does now). I took the carbs out and replaced the fuel line between those, and checked the thimble filter in those. I should've took a picture of that because both filters in the carbs were perfectly clean!
Turns out i needed to gap my spark plugs (WHAT AN IDIOT!). With no gapping tool, I used the ol redneck rule of thumb that 1 sheet of paper is .1mm thick. NGK says these plugs come at .8mm so to get the .5-.6mm recommended I slid 6 pieces of paper under the electrode and bent it in on the vice. I compared the unbent plug with the bent one. It passed both the eyeball test and the "paper" test. I bent the other plug, installed them both and the Seadoo fired right up!

At this point she should be seaworthy once the marinetex dries!

This ski looks like it needs a lot of work to the keel area than just some patch work. The gelcoat looks like it's almost worn completely away underneath. After the season is over, as a winter project, I'd flip it and do the entire bottom.
 
This ski looks like it needs a lot of work to the keel area than just some patch work. The gelcoat looks like it's almost worn completely away underneath. After the season is over, as a winter project, I'd flip it and do the entire bottom.

Gel-coat is on order. It might be a rainy day project this summer or Ill wait until winter.
 
You need to replace that fuel selector. Acetone will ruin the rubber inside and I am sure it already is from age. Please replace it now instead of chasing fuel issues all summer.
 
You need to replace that fuel selector. Acetone will ruin the rubber inside and I am sure it already is from age. Please replace it now instead of chasing fuel issues all summer.
I thought there shouldn't be any rubber inside? It should just be a swivel ball with a 90 degree bend in it to route fuel from each line to the middle "fuel out" line. I've taken apart hose valves before and sometimes they have a gasket on the top but thats it.
@mikidymac what would recommended i used to clean it out?
 
I don’t even attemp to clean them anymore. They’re cheap enough, and cause enough problems, that I just replace them with new...
 
I don’t even attemp to clean them anymore. They’re cheap enough, and cause enough problems, that I just replace them with new...
Can you link me to where I can get one? My local dealer doesnt have any that they know for sure fit, and I dont want to get one that isnt the right size. Nobody carries the OEM part number any more.
 
I thought there shouldn't be any rubber inside? It should just be a swivel ball with a 90 degree bend in it to route fuel from each line to the middle "fuel out" line. I've taken apart hose valves before and sometimes they have a gasket on the top but thats it.
@mikidymac what would recommended i used to clean it out?

I third on the replacement, it's a barrel spinning inside a rubber piece. They go bad after a while and leak air into the lines leaning it out and causing run problems. You can get them for under $25.
 
Can you link me to where I can get one? My local dealer doesnt have any that they know for sure fit, and I dont want to get one that isnt the right size. Nobody carries the OEM part number any more.

OSD Marine has them. Purchased mine on ebay because he was out of stock at the time.
 
Yes, I never recommend cleaning and reusing them.
The 1997 XP uses 5/16" fuel supply hose. I have had good luck with the WSM brand ones #006-604.
 
Is it just me or does it look like my ski has the oil injection cable removed?
 

Attachments

  • 20190625_112648.jpg
    20190625_112648.jpg
    3.8 MB · Views: 19
  • 20190625_112656.jpg
    20190625_112656.jpg
    3.7 MB · Views: 19
I would probably go back to oil injection. The Sea Doo pumps very rarely fail, and you will use much less oil with the system working as intended.
 
Status
Not open for further replies.
Back
Top