Wont run

Note: This site contains eBay affiliate links for which SeaDooForum.com may be compensated
The kit came from a place called jet ski junk, it did not come with a new needle and seat .

It contained everything else, rubbers , gaskets, springs etc.

I tested the pop off pressure with the new kit fitted just realized now once I built it I did not put wd40 in it

Will get some today, pop off is supposed to be 36 to 40 psi
Makes sense now
 
See attached pictures
That's not a Genuine Mikuni Diaphragm. Cheap knock-off.

Not saving any money buying cheap kits. Bite the bullet and do it right once. Buy the Genuine Mikuni Kits and the Carbs will work right.

The Mikuni's have a Red Anodized Center Button.
 
Is Jetski Junk out of New Zealand? They charged you $125NZD or $80 USD per Fake Kit?

Can get Authentic Genuine Kits for $50 USD each at Blowsion plus the Postage...

Blowsion. Mikuni Carburetor Rebuild Kit Super BN

MIKUNI CARB KIT FOR 38/40 I SBN [MK-BN38/44SPR] - $49.99
Hey guys , I asked for the genuine one , I also don't belive in buying aftermarket stuff in general.

Anyway I bought a genuine one from another supplier and the needle and seat

Will fit it off later this week and see from there

Thanks for the guidance so far on all of this appreciate it !!!

Yeah they based in New Zealand , don't have the luxury of various places to buy them lol
 
You definitely got junk from Jetski Junk.
Just a update my new genuine kit arrived lol , fitted it and with some adjusting finally got pop off at about 36psi

And reseats at about 32 psi

The other carb test is sitting at about 4 psi .

What is the next step from here fit it back ?
Do I need to prime the fuel into carb or will that happen when I fit it and crank it

Thanks
 
I like to leave the return line off but all other hoses attached.
Blow a little air into the fuel tank to make some pressure and as soon as fuel comes out of the return nipple of the carb put the return hose back on. This will fill both carbs and the fuel system with fuel and it should fire up right away.
Hi Mikidymac did as u said cranked it won't start lol , I give up don't know what to do now , can it be an electronic issue?

Checked for spark on the plugs ,sparking fine
 
Have you tried pouring a very small amount of pre mix down the carb throats and immediately trying to start? That will rule out a fuel delivery issue.
Might want to check compression if that doesn’t work, it is possible running it lean before the rebuild damaged the pistons.
 
Hi

Yes found your thread will review it later off my PC,

So u saving the air test for pulse nipple should not be done at all ? Any other air tests to do other than pop off on the carb?

I placed another order for the seat and needle

I will check the diaphragm out for damage
4A81F96E-7059-4D5E-A9F4-2701F26B9324.jpegas long as you followed the directions and only pressurized to 4 pounds I would highly doubt youdamaged the diaphragm as this is an expert from seadoo service manual for the diaphragm test, Did you end up doing a compression test?
 
at the end of the carb rebuild thread that you followed it says to pressurize to 10 pounds and see if it holds.
 
View attachment 62343as long as you followed the directions and only pressurized to 4 pounds I would highly doubt youdamaged the diaphragm as this is an expert from seadoo service manual for the diaphragm test, Did you end up doing a compression test?
So the first kit I bought I pumped the pulse to 10 ponds which was wrong you guys said 4 and because you guys said I should get a genuine kit I did

The new kit I popped at about 36 psi and reseated about 25 psi

I then did the pulse test and pumped to about 4 psi I belive it held

This is when I put it back on the ski ,followed Mikidymac thread by leaving return hose off, blew some air into tank
Once I saw fuel I connected it back on

Tried starting it cranked but no show , poured some mix down the carb no show.

I checked spark on plugs looked good , checked compression sitting 145 psi per cylinder.

So I don't know, is there by any chance something electronically stopping it from starting a faulty sensor which and how do I check.

Still getting 1 beep when I put the key in so to me it sounds like the electronics is ok
 
Just to be clear, the 4 pounds was to be in the pulse nipple, which we aren’t going to concern ourselves with anymore. The 10 pounds was in the inlet nipple. It is important that it passes the 10 pound test in the inlet and passes the pop off test. When you say “ it held I believe” I just question if your taking your time, following the carb rebuild thread, cleaning up mating surfaces nicely. Do you have any pictures during your carb rebuild which could help identify any possible mistakes? One I can think of possibly happening is putting a hole in the grommets that hold Mylar discs on, I know they are a real bugger even when using the Allen wrench.With it running prior to the carb rebuild I would be heavily leaning towards it still be a problem with the carbs unless something else got damaged in the meantime. As for any electrical, I would be of next to no help at all with electrical. I don’t think any of my beepers work on my machines. I think it’s supposed to be 2 beeps but not sure. If you are unsure that you assembled the fuel lines correctly I can take a picture on my 2002 GTI,
 
Just to be clear, the 4 pounds was to be in the pulse nipple, which we aren’t going to concern ourselves with anymore. The 10 pounds was in the inlet nipple. It is important that it passes the 10 pound test in the inlet and passes the pop off test. When you say “ it held I believe” I just question if your taking your time, following the carb rebuild thread, cleaning up mating surfaces nicely. Do you have any pictures during your carb rebuild which could help identify any possible mistakes? One I can think of possibly happening is putting a hole in the grommets that hold Mylar discs on, I know they are a real bugger even when using the Allen wrench.With it running prior to the carb rebuild I would be heavily leaning towards it still be a problem with the carbs unless something else got damaged in the meantime. As for any electrical, I would be of next to no help at all with electrical. I don’t think any of my beepers work on my machines. I think it’s supposed to be 2 beeps but not sure. If you are unsure that you assembled the fuel lines correctly I can take a picture on my 2002 GTI,
Going to be honest here I have watched about 10 videos from different sources

As I built mine up the final time I followed Mikidymac pictures .

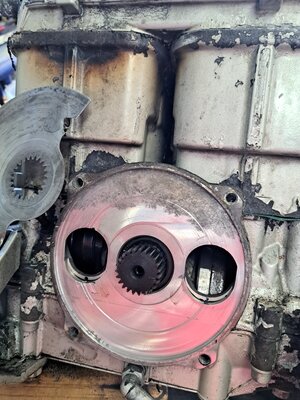
I can tell you now I took my time prior to building it , I took off all the old stuff , some of the gaskets were so old I used a Stanley knife to removes pieces of it , I finally used a wire disk brush on my drill to remove all grit and in-between nooks and cranys .

Then used an old tooth brush some petrol and scrubbed it out

I then used about half a can of carb cleaner to clear out all passage ways etc , then a blower to finalize the clean

Trust me I took a few hours on this I did a good job , I will break it down and send photos.

As for those mylar disks , I took my time taking it out , I used a ear bud and some wd 40 on the rubber to get it to seal , this worked well no holes were made lol

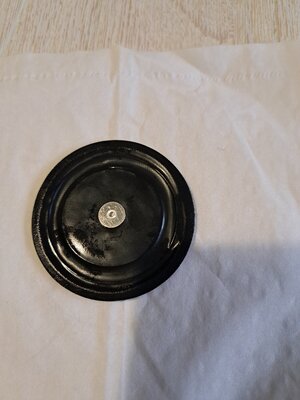
When I say I belive it was 20 psi I am going according to my gauge I could be a couple psi out meaning 1 or 2 which is hard to read on my gauge I will send a photo of it.

Run the the 10 pound inlet test plz I have not done this one

Only did the pop off which I blocked the out let nipple.

I did the pulse test one too , did this by taking a tube from inlet to outlet and then my pump on to the pulse one
 
I wish I could help but my knowledge is very limited, hopefully you can get it figured out with some help on here. The fact that it ran before leads me to believe it’s still fuel related and maybe somewhere something wasn’t installed correctly
 
I wish I could help but my knowledge is very limited, hopefully you can get it figured out with some help on here. The fact that it ran before leads me to believe it’s still fuel related and maybe somewhere something wasn’t installed correctly
Hi all so turns out the rotary valve was damaged , see attached .

Concern now need to open motor to see where the damaged piece of the valve is and see what damage it has done.

As it is there is sucfs on the face of the motor been told I need to have this machined to get rid of the ridges.

Also told I need to make sure what I take off the motor side I need to take of on the piece that fits to motor same amount

My question does anyone know how much one can take off?

Does anyone have a link to rebuild or dismantle the bottom end of the 717 rotrax motor

The top part is straight forward

Thanks
 

Attachments

  • 20230612_155259.jpg
    20230612_155259.jpg
    453.8 KB · Views: 7
Those cases are shot. You will need to get a clean set of used cases.
Hi Mikidymac ,that's the problem I can't find a used pair,NZ is small we don't have ski for days .

Hence they said machine it plan is to take a little off as possible question is what is the allowed amount one can skim off no point if it's 0.2mm as a maximum as an example but they need to take 0.34mm off to have a clean surface do u know the tolerance amount
 
They will have to take it down to have a clean surface.
Then machine the cover to get the rotary valve clearance within spec.
There is no set amount to machine the cases.
 
They will have to take it down to have a clean surface.
Then machine the cover to get the rotary valve clearance within spec.
There is no set amount to machine the cases.
Thanks I was wanting to know the spec clearance do u know it ?
 
Back
Top