please help... installing counterbalance end plate

Note: This site contains eBay affiliate links for which SeaDooForum.com may be compensated
Status
Not open for further replies.

despower

Active Member
Hey everyone,

This post is regarding my Sportster LE DI.

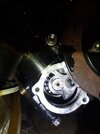
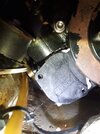
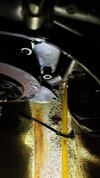
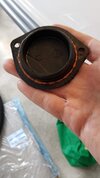
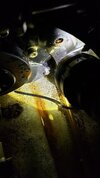
I am hoping someone has a hint for this. I can't get the counterbalance end plate back on for my air compressor overhaul. I have everything else in the compressor put back together but this. I have tried a few things... wedging it in with a pry bar and banging it in with a hammer and rubber mallet... no luck. As you can see from the photos, the PTO cover partially covers the end plate and there is a groove in the plate where the plate slides in. The two photos show the plate off and the plate partially on.

I know it would be easy with the PTO cover off, but that means removing a whole bunch of other stuff that will require many hours more work.

If removing the PTO cover is the only way to get this back on, then some guidance on what to do next would be appreciated.

Des
 

Attachments

  • 20210902_201928.jpg
    20210902_201928.jpg
    185.2 KB · Views: 8
  • 20210902_202147.jpg
    20210902_202147.jpg
    255.7 KB · Views: 8
It looks like the allen bolt is in the way. Try turning over the engine to get the bolt towards the outside.
 
The Allen bolt shouldn't be in the way... It's sufficiently recessed relative to the cap.

As to something not being right, it was a struggle to get the cap off in the first place. I'm baffled as to what to do next, except remove the PTO cover to expose the entire face of the counterbalance opening.
 
Here's an update.

I tried a few things. As my daughter says, don't judge me, I was desperate.

Tried tapering the bottom edge of the cap - shouldn't be necessary and didn't work.

Tried removing the PTO cover bolts to see if it would give me any play to slide the end plate behind it - didn't work, PTO cover didn't budge, and I am guessing it shouldn't unless you remove the drive shaft.

The first picture shows the problem... the plate just doesn't fall right into place.

Finally figured I would bend the plate in a vice where the plate slides in behind the PTO cover. When I did that, the cover started to slide into place, but I was immediately worried that the plate wouldn't be flush to the engine underneath the PTO cover. So, I added a very small bead of high temp RTV near the o-ring, middle picture. The cover then slid into place and a couple of small whacks with a mallet made it seat properly. Bolts on - third picture - and now ready to test the compressor.

I'll update the air compressor overhaul thread later. Waiting for my battery to recharge as it's been a few weeks since I had the machine running properly.
 

Attachments

  • 20210904_123252.jpg
    20210904_123252.jpg
    241 KB · Views: 5
  • 20210904_123058.jpg
    20210904_123058.jpg
    123.7 KB · Views: 5
  • 20210904_130017.jpg
    20210904_130017.jpg
    206.8 KB · Views: 6
I can tell you that, i lift the motor on the right side and put a small piece of wood between the bracket and the top of the motor mount,,,makes it way easier.,,i still don't understand removing the pto cover,,which requires a heavy maul tap to dislodge it out if the motor,,,i'm still missing something in your procedure,,,wish i knew?
 
Removing the PTO cover was mentioned in the thread on the PWC compressor overhaul. Makes no sense to me either because it seems like a lot of extra work. My procedure is obviously flawed.

I've had my boat for 12 years and I still consider myself to be a newbie on these repairs. I'm just mechanically stunned and will follow whatever advice I read.

So, to make sure I understand you tip... you unbolt the motor from the mount and rotate it while still connected to the drive shaft? That would be super convenient for accessing the lower part of the engine. I have large bags under my eyes from being upside down for extended periods of time.
 
Status
Not open for further replies.
Back
Top