Well Spim now re-reading your post a few more times I get the gist of your post--- SBT won't rebuild and ship an engine with 1.5's--got it, but they do sell them--is where I was coming from. Tomato-Tomatoe :blush:


-
This site contains eBay affiliate links for which Sea-Doo Forum may be compensated.
You are using an out of date browser. It may not display this or other websites correctly.
You should upgrade or use an alternative browser.
You should upgrade or use an alternative browser.
RESTO My 97 XP Mini Resto Project
- Thread starter CReynoldsMIZ
- Start date
- Status
- Not open for further replies.
Spimothy Leary
Well-Known Member
sorry, let me rephrase... I don't think SBT does 1.5 on top end exchange or on a complete engine....
i've ordered engines, and top end kits, more than once... always .5, every time...
they may sell 1.5 pistons, but I don't think if sbt puts it together that they do 1.5..
make sense ?
now.. maybe its possible if you send them a stock sleeved cyl, they keep the sleeve and bore it to .5.. so i'm not sure they re sleeve every cyl, just that they definitely have to re sleeve the ones I send them... and it doesn't cost more.
Last edited by a moderator:
Spimothy Leary
Well-Known Member
Well Spim now re-reading your post a few more times I get the gist of your post--- SBT won't rebuild and ship an engine with 1.5's--got it, but they do sell them--is where I was coming from. Tomato-Tomatoe :blush:
RIGHT.. at least that's how I understand it... maybe they sell the 1.5's to pmc
")
my only point was that it's PMC that's doing this... and I don't think its a good idea either .....
CReynoldsMIZ
Well-Known Member
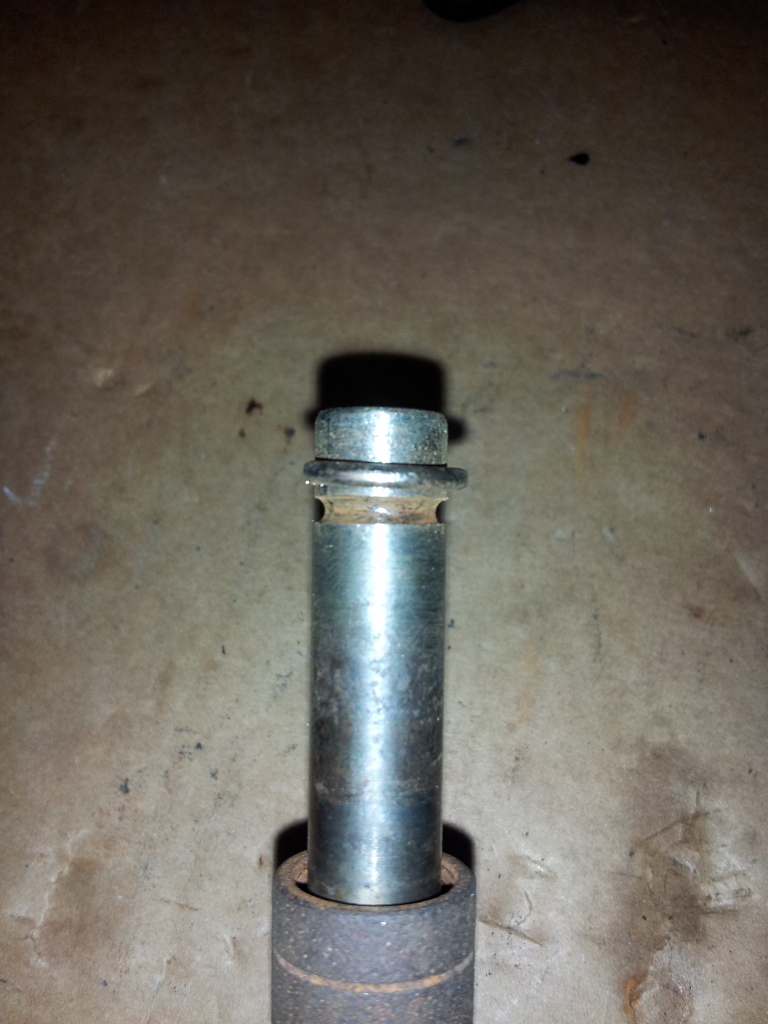
ive been searching around, and I dont think that pmc is in business anymore. Well, yeah, i guess i will just live with what i got, and if it ever blows, (hopefully some years down the road) then i will just rebuild the engine myself. Got some more work done today... first off, I cleaned up the pto side rave slot, it was really gummy with carbon. Next I tried to get the file down in the mag side rave slot, but it was too long and was hitting the exhaust, so i will have to probably heat up the file and bend it a little tomorrow so i can fit it down there and just shave a little bit of metal off where the rave and the slot hit, it really isnt that bad, and would probably be fine if I left it, but i want it smooth as butter, it probably isnt as bad as i made it out to be yesterday I think. Then I thought I would get to the starter, so I ripped off the airbox and carbs, as they have to come out anyways to change oil lines, and grey fuel lines, and clean the carbs themselves. I realized I actually like this hull alot more than my gsx, probably because there seems to be so much more room to work in it than the GSX. Anyways, got down the the starter, pulled it off and looked like this....
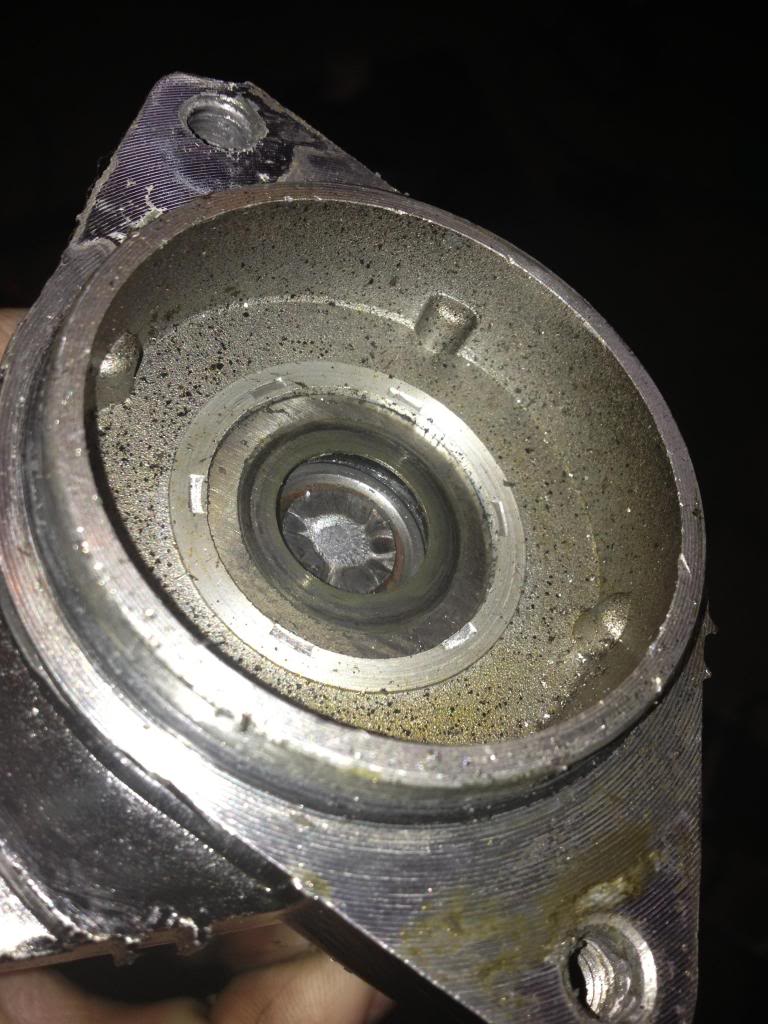
I guess that about settles the "spinning starter" mystery. Racerxxx, you know how your thread is called "Clapped Out"?, I think I need to rename this one "Snapped Off" because that seems to be a common point on this ski. Oh well, I have a spare starter that i messed up, do you guys know if I can swap out the guts of them? The one I have I know is good, i removed it and replaced it with a used oem, only to figure out that the solenoid was the problem, and of course I snapped it off when i removed it, I think i tried ripping it out and forgot there was another bolt in there If I could swap out where it mounts, that would be the cats meow, because im pretty sure they are the same starters, just one is good, and the other not!
I guess that about settles the "spinning starter" mystery. Racerxxx, you know how your thread is called "Clapped Out"?, I think I need to rename this one "Snapped Off" because that seems to be a common point on this ski. Oh well, I have a spare starter that i messed up, do you guys know if I can swap out the guts of them? The one I have I know is good, i removed it and replaced it with a used oem, only to figure out that the solenoid was the problem, and of course I snapped it off when i removed it, I think i tried ripping it out and forgot there was another bolt in there
If I could swap out where it mounts, that would be the cats meow, because im pretty sure they are the same starters, just one is good, and the other not!
CReynoldsMIZ
Well-Known Member
Which one are you talking about. The one that is together is the good one, I was hoping to use its guts in the other housing but idk how to do that
CReynoldsMIZ
Well-Known Member
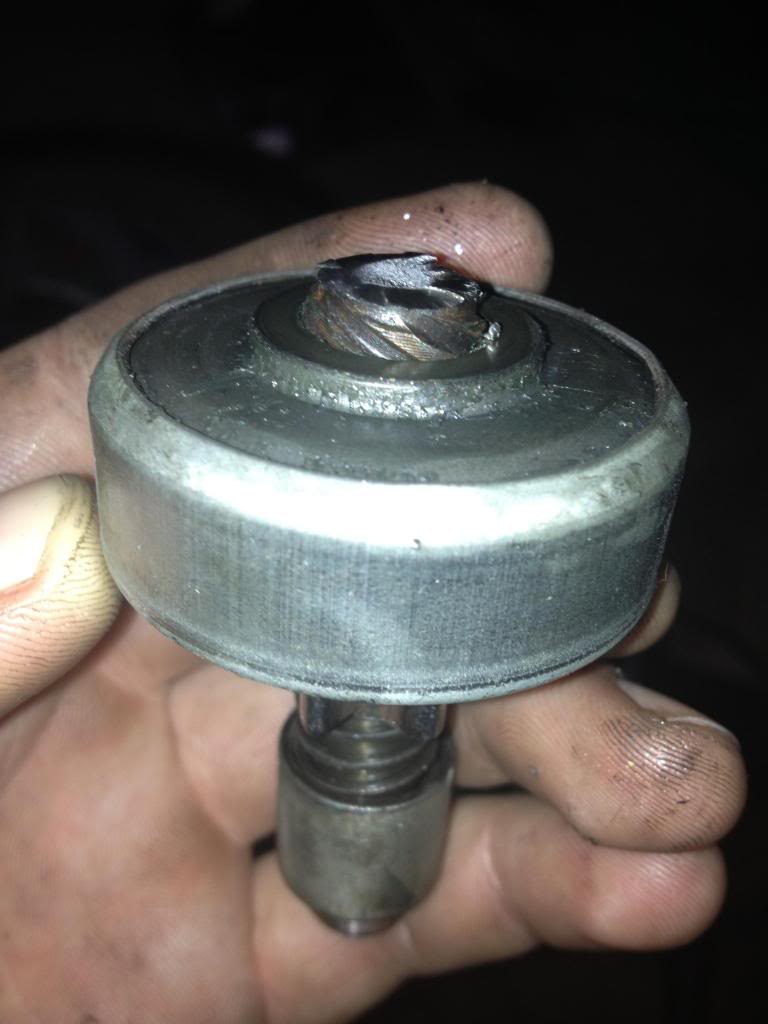
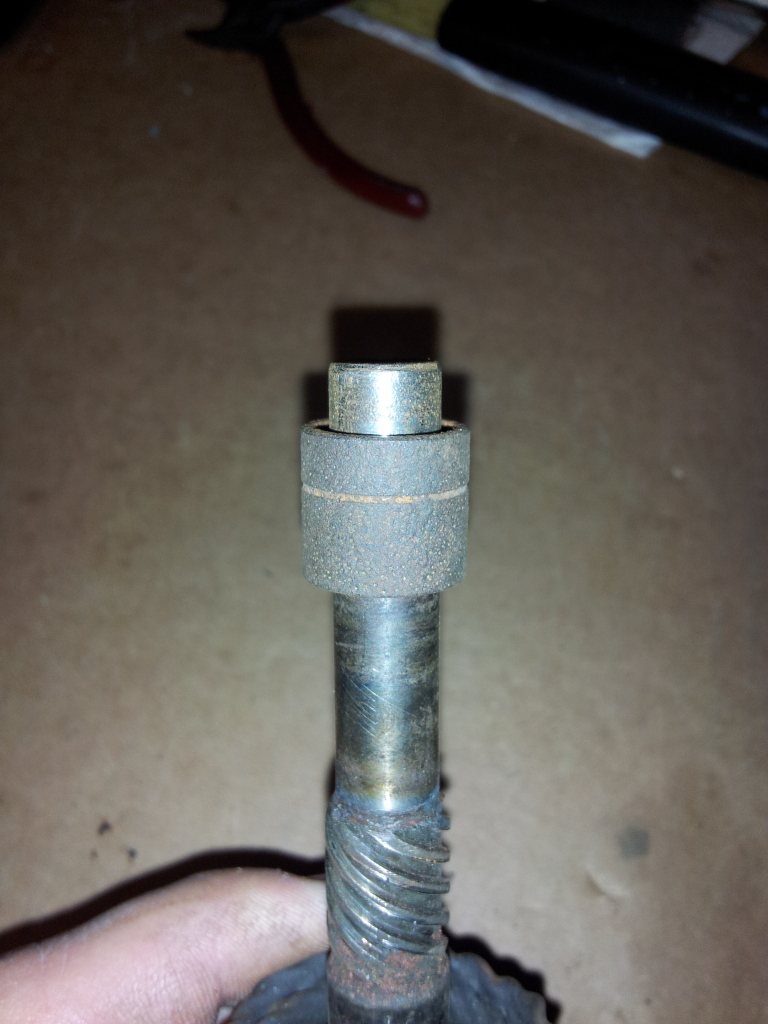
So yeah they are both the same. Does anyone know how to disassemble the thing? I really need to know how to get the gear side away from the mounting part
CReynoldsMIZ
Well-Known Member
Okay, yeah I found that ring. It's just being a stubborn b**** and doesn't want to come off
CReynoldsMIZ
Well-Known Member
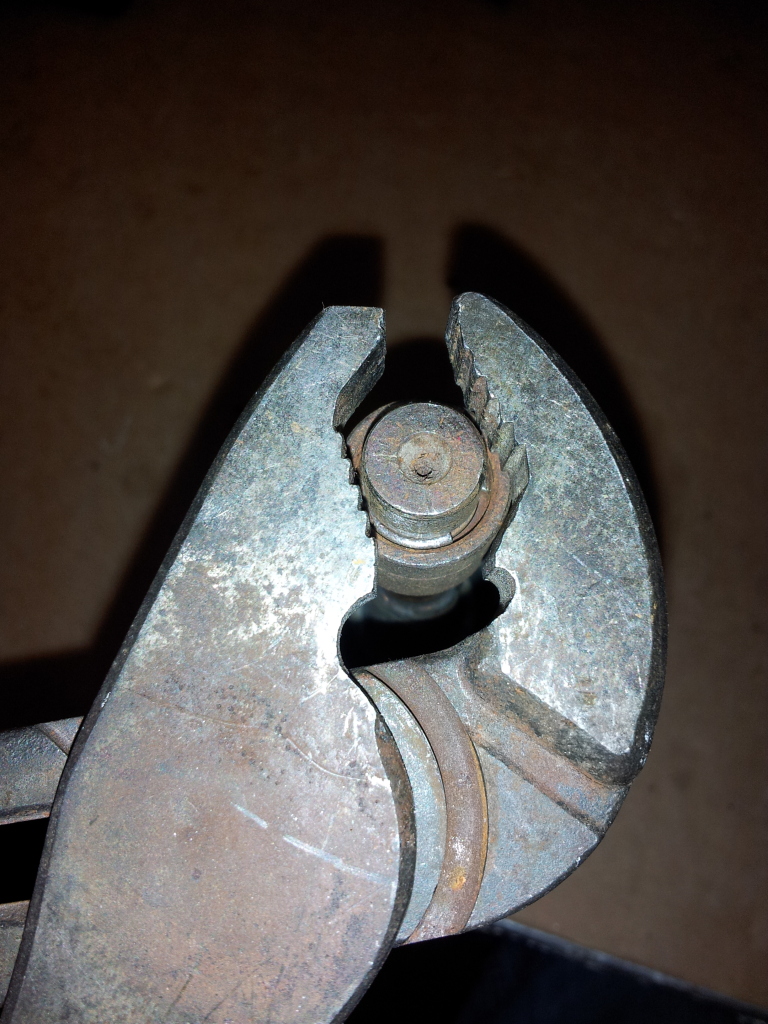
Yeah, i cant even get a tiny pocket knife blade into that groove, in no way could i get 2 screwdrivers. I even tried my smallest screwdriver but no bueno, not sure where to go from here. Almost need like a small dental pick or something...
You need to "twist" one end of the clip out of the groove. Then I wedge a screw driver between the clip to keep it from popping back in and just work it off the shaft. They are a bugger, just don't try and force it off the shaft, you'll flare the c ring and it will be stretched. It's hard to explain, but you need three hands it seems like.
skewba98z28
Active Member
That clip is a mother!!! The only way to get it is use force and try not to stab yourself!
CReynoldsMIZ
Well-Known Member
yeah, it really is a mother. I am going to try and flare out a pair of needlenose pliers i think so i can get some leverage so i can get a screwdriver under there. Bout to take it to a starter/ alternator shop if i cant get it goin soon.
CReynoldsMIZ
Well-Known Member
racer, got any updates on the xp or the hx??? I think everybody here forgot about that hx you got...
racer, got any updates on the xp or the hx??? I think everybody here forgot about that hx you got...
Yep just waiting. I want to finish a few things on the XP yet before posting an update
 . Then I need to dig in on the HX.
skewba98z28
Active Member
yeah, it really is a mother. I am going to try and flare out a pair of needlenose pliers i think so i can get some leverage so i can get a screwdriver under there. Bout to take it to a starter/ alternator shop if i cant get it goin soon.
I destroyed the c clip on the one I rebuilt. Luckily the kit I got included a new one. Check ebay for the kits.
Looks like i'm going to get a 96 GTX tomorrow. Hopefully it wasn't babied like your 97 XP

CReynoldsMIZ
Well-Known Member
Hahahahaha, yea hopefully not. Oh we'll, she'll be a pretty penny soon enough! Oh yeah, I can't break it, I'm not buying new parts for it, just swapping
All right, here's a little help--maybe. WEAR YOUR SAFETY GLASSES!!!!!!!!!!!!!
Push the cap towards the bendix to uncover the C ring, you may need to use a pair of pliers and a mallet to break any corrosion. Once that is down you need to keep it down as far as it will go. You could use a piece of picture hanging wire to hold it back and tied it off to one of the holes in the starter possibly. Pay attention to the groove in the outside of the cap, that tells you which way the cap should go back on.

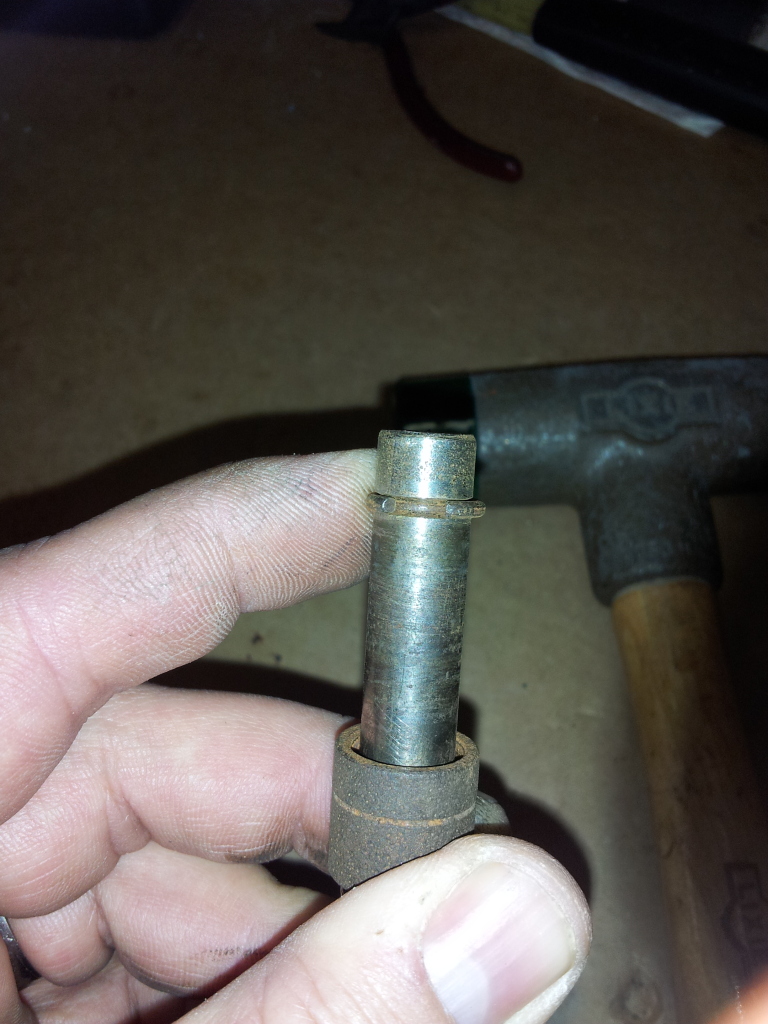
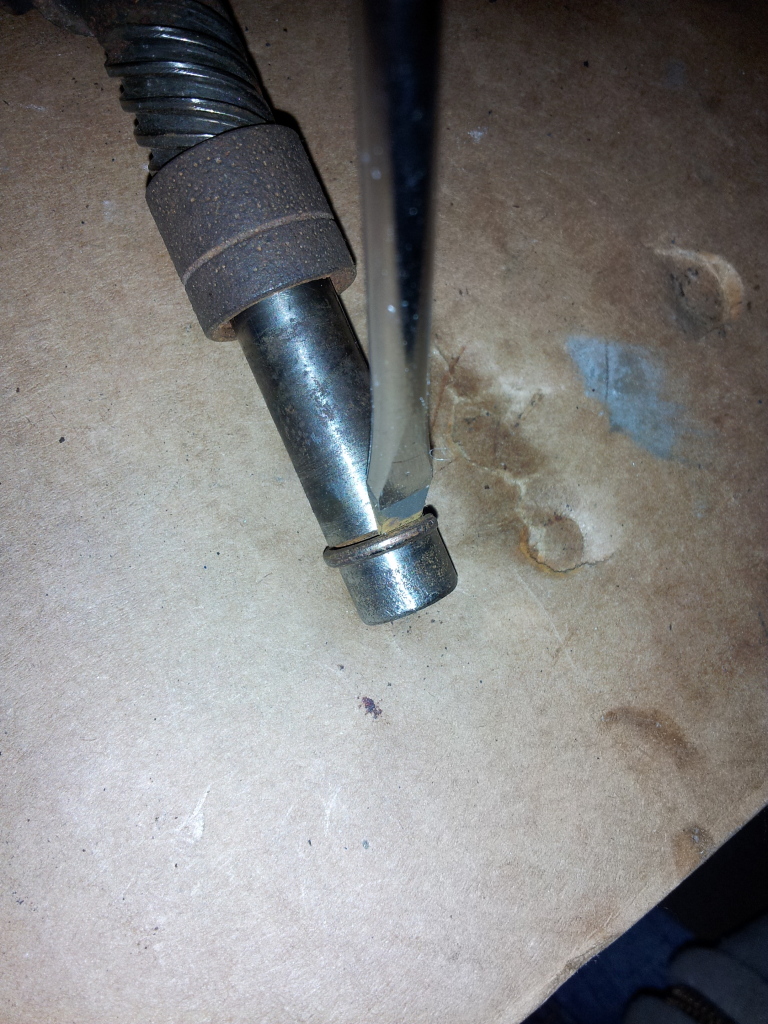
With that down you can now use a smaller but strong screwdriver to pop the clip from one of the sides towards the end of the clip. You want one end to walk up the and out of the groove.
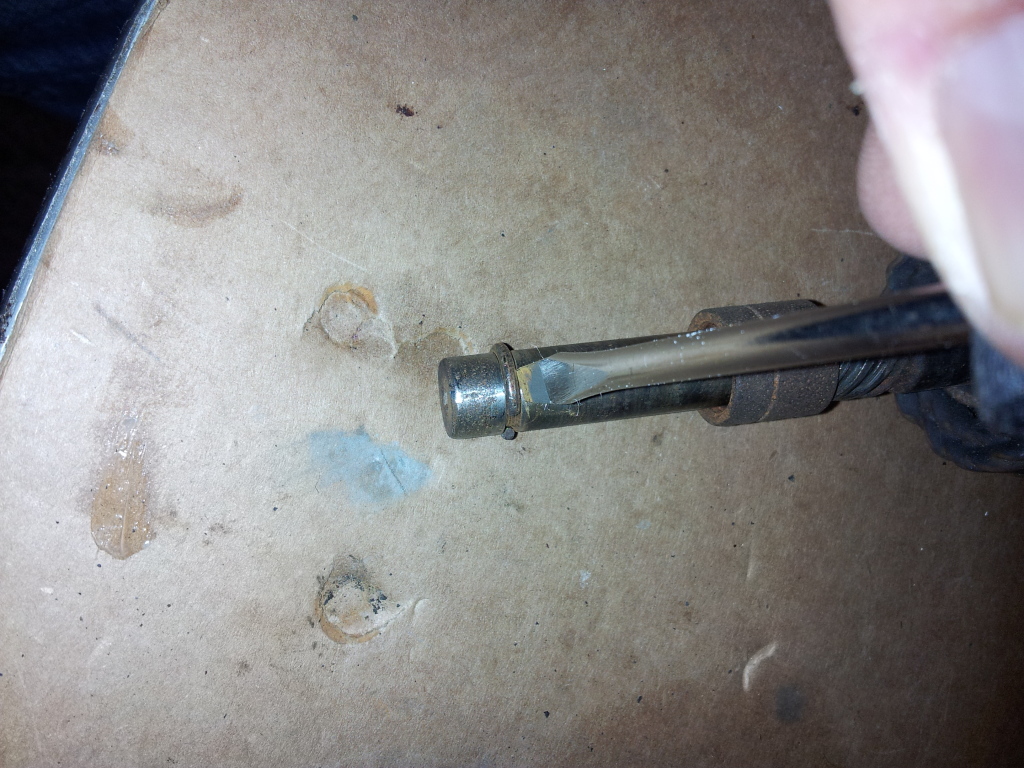
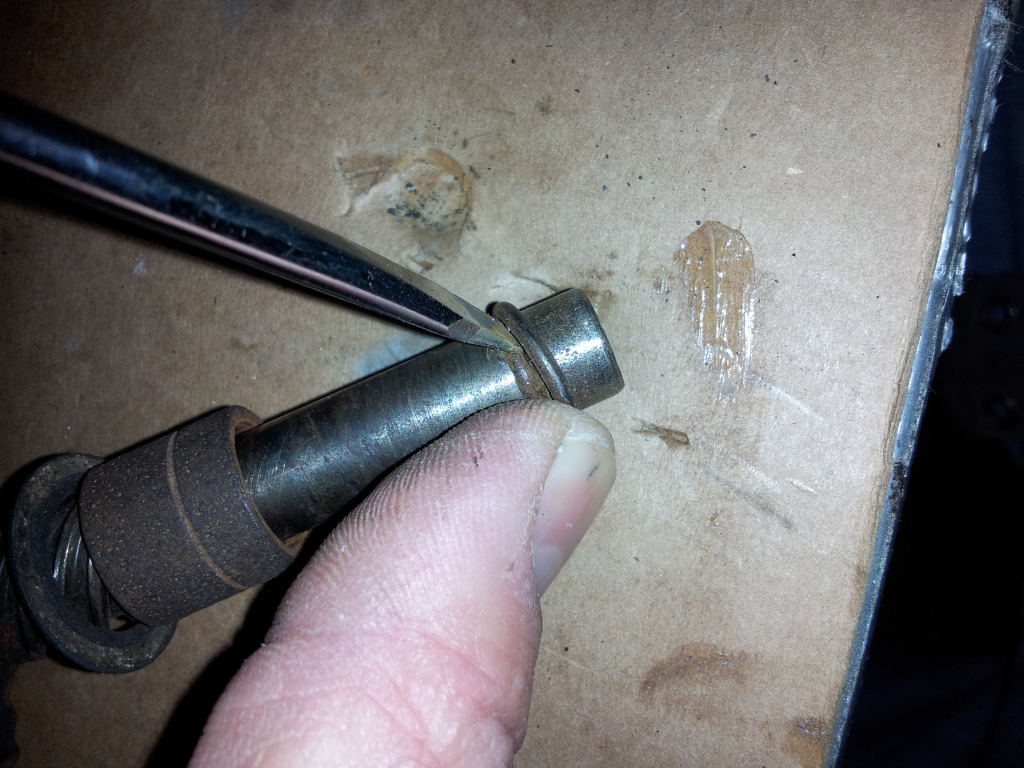
You should be able to get the clip to stay--SHOULD.
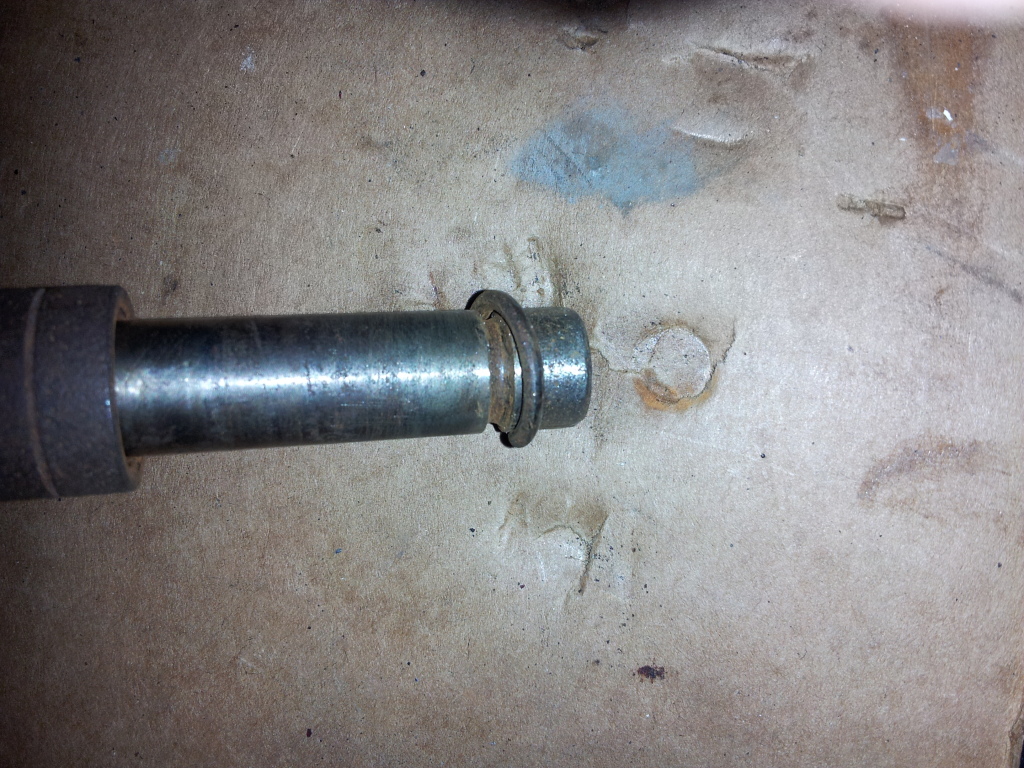
Now is where the second screwdriver comes in. You need to hold it tight against the popped end of the c ring and use the other screw driver to walk the clip from the groove. Twist the screw driver in the groove all the while working it towards the end of the shaft.
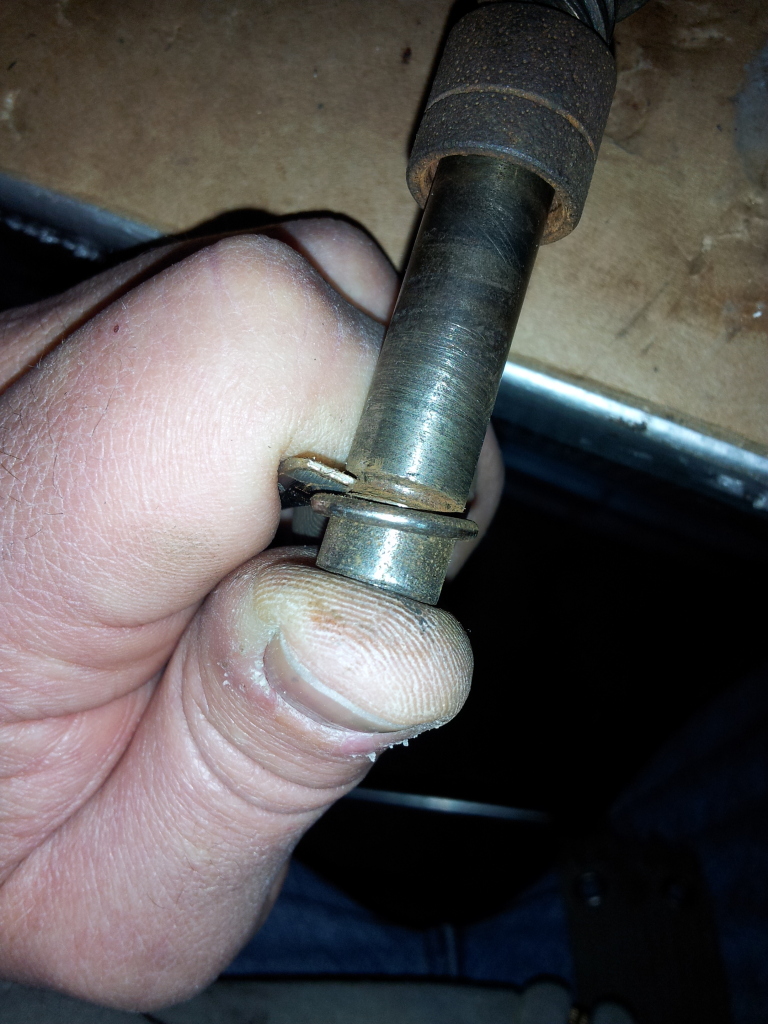
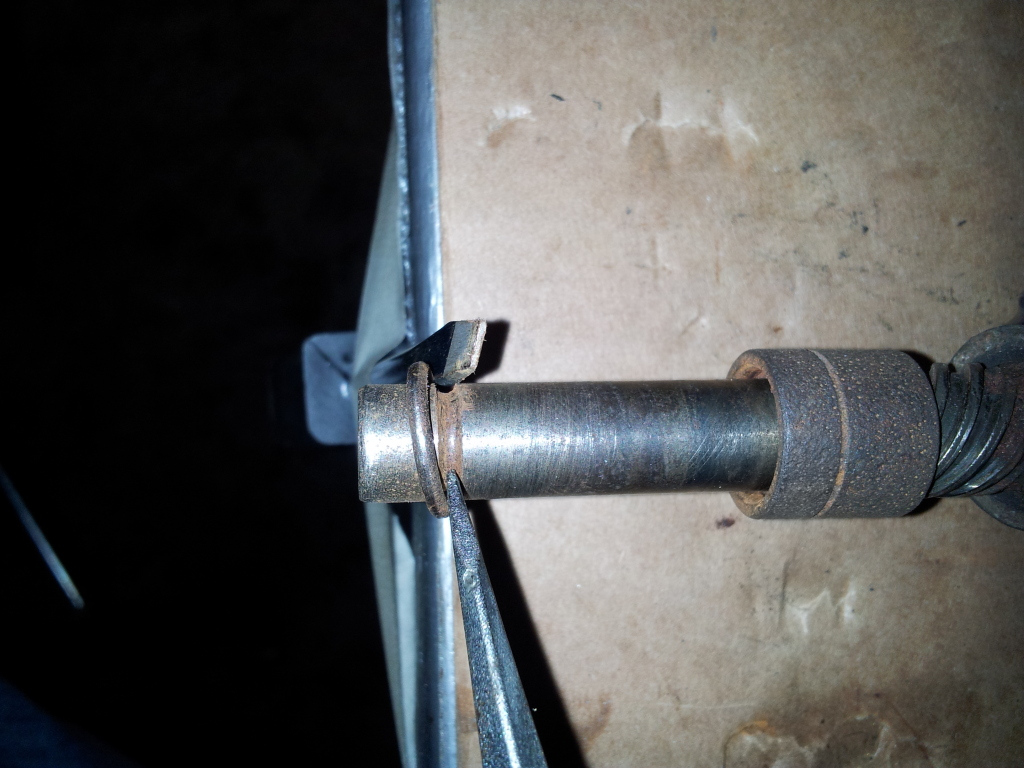
Once the ring is out of the groove your almost home, just don't look at it wrong it might slip back into the groove.
Next IF you can find something to slide under the clip and slightly grip the shaft. The use a rubber mallet or hard plastic--DO NOT USE A METAL HAMMER, you'll chooch the shaft up.
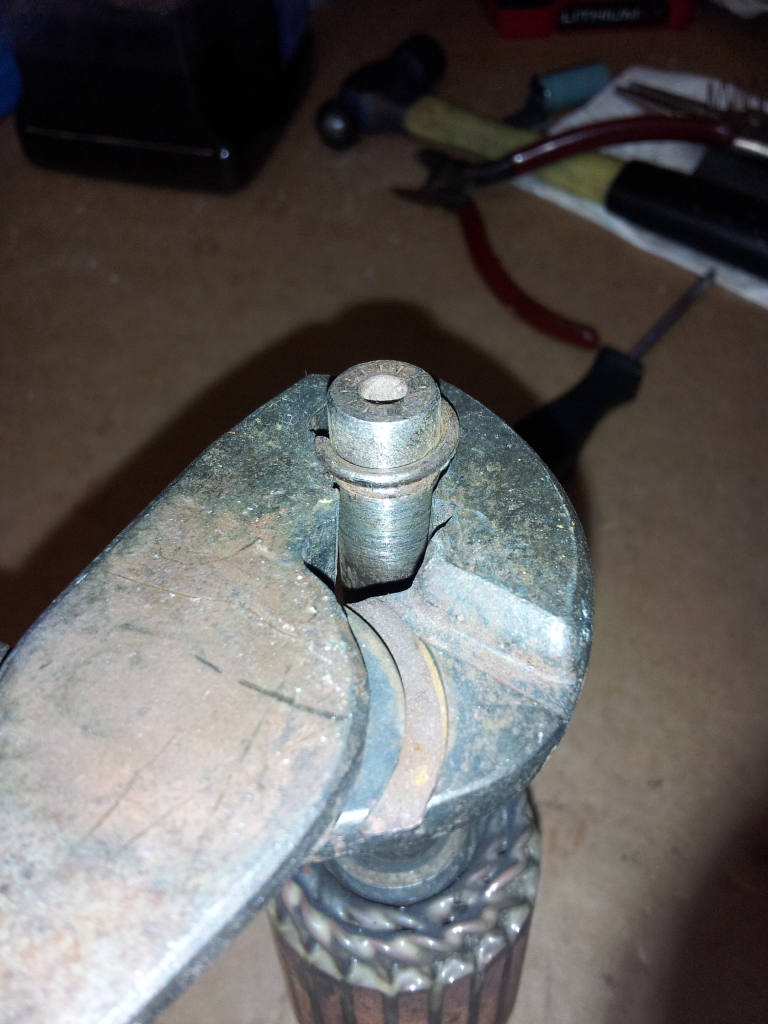
Then once your CLOSE to the end put the towel over it and give the shaft one last good hit. The clip will pop and the towel will keep your clip from flying away and hiding in the depths of your garage never to be found again!


Now your done, the rest is up to you!
Push the cap towards the bendix to uncover the C ring, you may need to use a pair of pliers and a mallet to break any corrosion. Once that is down you need to keep it down as far as it will go. You could use a piece of picture hanging wire to hold it back and tied it off to one of the holes in the starter possibly. Pay attention to the groove in the outside of the cap, that tells you which way the cap should go back on.
With that down you can now use a smaller but strong screwdriver to pop the clip from one of the sides towards the end of the clip. You want one end to walk up the and out of the groove.
You should be able to get the clip to stay--SHOULD.
Now is where the second screwdriver comes in. You need to hold it tight against the popped end of the c ring and use the other screw driver to walk the clip from the groove. Twist the screw driver in the groove all the while working it towards the end of the shaft.
Once the ring is out of the groove your almost home, just don't look at it wrong it might slip back into the groove.
Next IF you can find something to slide under the clip and slightly grip the shaft. The use a rubber mallet or hard plastic--DO NOT USE A METAL HAMMER, you'll chooch the shaft up.
Then once your CLOSE to the end put the towel over it and give the shaft one last good hit. The clip will pop and the towel will keep your clip from flying away and hiding in the depths of your garage never to be found again!
Now your done, the rest is up to you!
Someone told me to put two pliers back to back but I never figured that one and if you dont have a replacement Cclip Racer has it right. I always just cut into it with a cutoff wheel and replace it. WAYYY to many close calls stabbing myself with screwdrivers.
BRP used to paint rebuilt starters black but you can see the denso sticker under the paint. Ive only seen a couple denso starters broken like that.
BRP used to paint rebuilt starters black but you can see the denso sticker under the paint. Ive only seen a couple denso starters broken like that.
CReynoldsMIZ
Well-Known Member
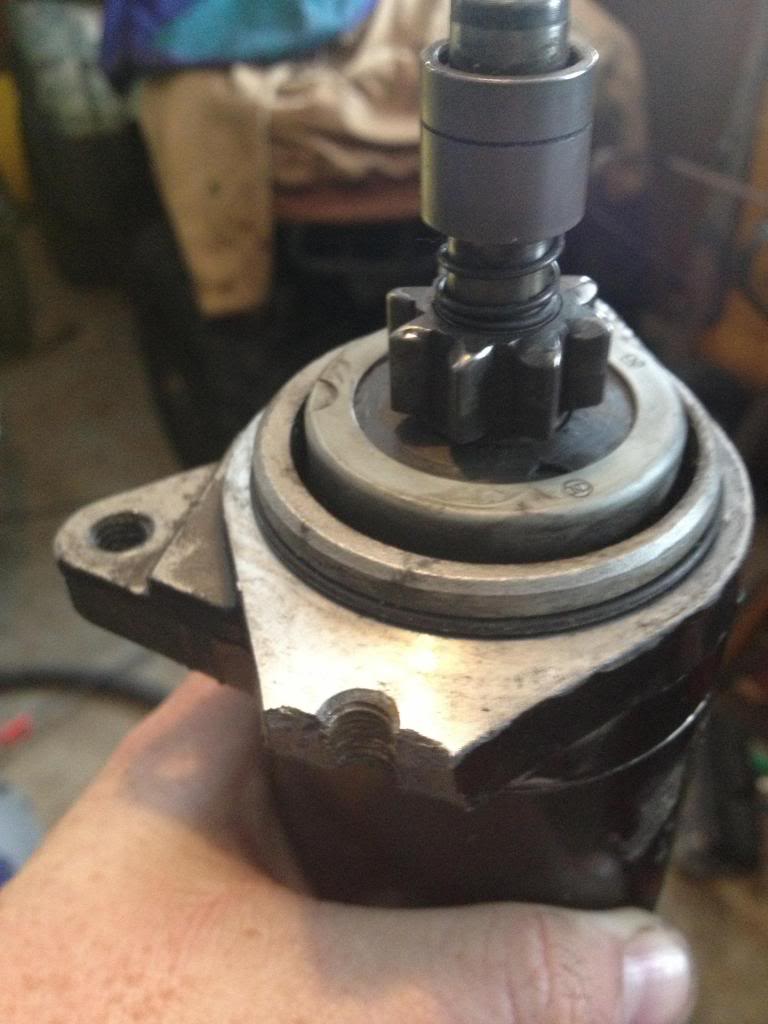
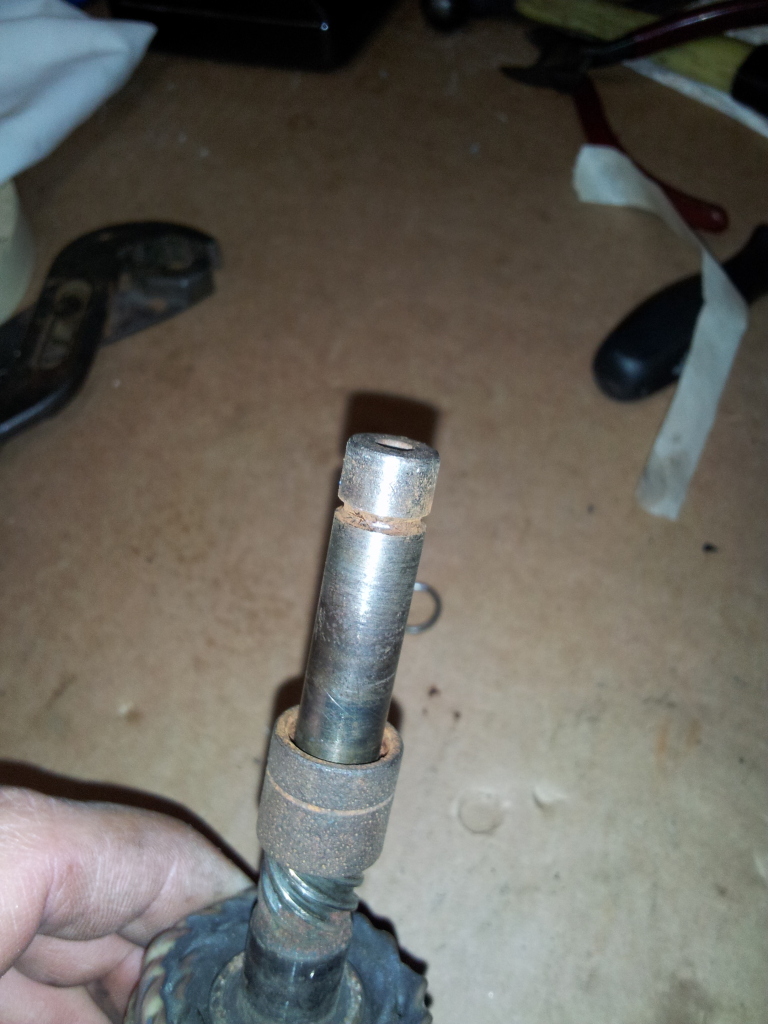
Wow. Hey Dan, thanks for doing that writeup? Was that just for me? I feel so special lol. It was quite a bit more annoying for me because I had that spring pushing the collar up against the clip. For anyone who attempts to remove this clip to reuse it, the thing you really need the most is patience. It is so frustrating getting that clip to stay up, and it probably took me me an hour or so to get it off, and lost my cool a few times, invented a few new words, and I think i stabbed my workbench probably a dozen times with my screwdriver in a fit of rage. FINALLY THOUGH, I got it off, and put the new housing back on. I had some problems with the brushes getting crossed together, and making the starter run backwards, but after some help from my buddy's dad we got the starter kicking over like new, and boy does it have some force. I have my first day off in a while on Monday, and hope to get the starter back on and make sure the ski turns over real nice. Then, it will be grey fuel line replacements, probably ordering a new head, and cleaning out the carbs. I have cleaned carbs from my GSX, but they didnt have the accelerator pump. Is there any thing i need to look for with these pumps?? Will be ordering new gaskets soon as well
That was all for you my man! As far as the collar, that is why I suggested using picture frame hanging wire. You can get it at Home Depot for chump change and it will be like a third hand. You could tie it off to one of the holes the pull the collar down, wrap the wire around the shaft over top of the collar, then back to another point and tie off. I ALWAYS figure out a way to do everything solo. Now lets tackle the rest of this gem!
Hey, make sure you bolt up the rear mount. I always tighten the two main mounting bolts first, then the back. If it doesn't line up you need to find out why, the back bolt SHOULD be able to be put in AFTER everything is tight. If not do not loosen up the front two and let the starter have slop then tighten all three bolts--there is something out of alignment. Perhaps the back cap is off a tad.

Hey, make sure you bolt up the rear mount. I always tighten the two main mounting bolts first, then the back. If it doesn't line up you need to find out why, the back bolt SHOULD be able to be put in AFTER everything is tight. If not do not loosen up the front two and let the starter have slop then tighten all three bolts--there is something out of alignment. Perhaps the back cap is off a tad.
Last edited by a moderator:
CReynoldsMIZ
Well-Known Member
Okay then Racer...how about a tool to take off about 20 of those ridiculous seadoo oem fuel clamps. I am already dreading that job...haha
Last edited by a moderator:
Small flat blade screw driver in from the side and twist, you can see the pawls pop. They're easy street, then get the correct Lisle tool to re use them. I just put them back on the XP in certain locations on the carbs--I didn't want hose clamps messing up the paint, they were just too close in some areas. I think I used hose clamps in specific locations so I could separate the carbs individually if I ever need to.
Re-read my previous post, I added some extra at the end.
http://www.lislecorp.com/divisions/products/?product=163&division=1&category=4

Re-read my previous post, I added some extra at the end.
http://www.lislecorp.com/divisions/products/?product=163&division=1&category=4
- Status
- Not open for further replies.
Similar threads
- Replies
- 2
- Views
- 204
- Replies
- 2
- Views
- 84
- Replies
- 9
- Views
- 295
Share: