


-
This site contains eBay affiliate links for which Sea-Doo Forum may be compensated.
You are using an out of date browser. It may not display this or other websites correctly.
You should upgrade or use an alternative browser.
You should upgrade or use an alternative browser.
96 GTX SBT Replacement help
- Thread starter JDawg965
- Start date
- Status
- Not open for further replies.

Cliff787
Active Member
That's okay if you can't recall the P/O pressure. You can do more tests when the Mikuni parts come in and you install them. Remember to do 3 pop off tests to get an average pressure for each carb.
I would just use the new needle/seats that are coming in the kits.
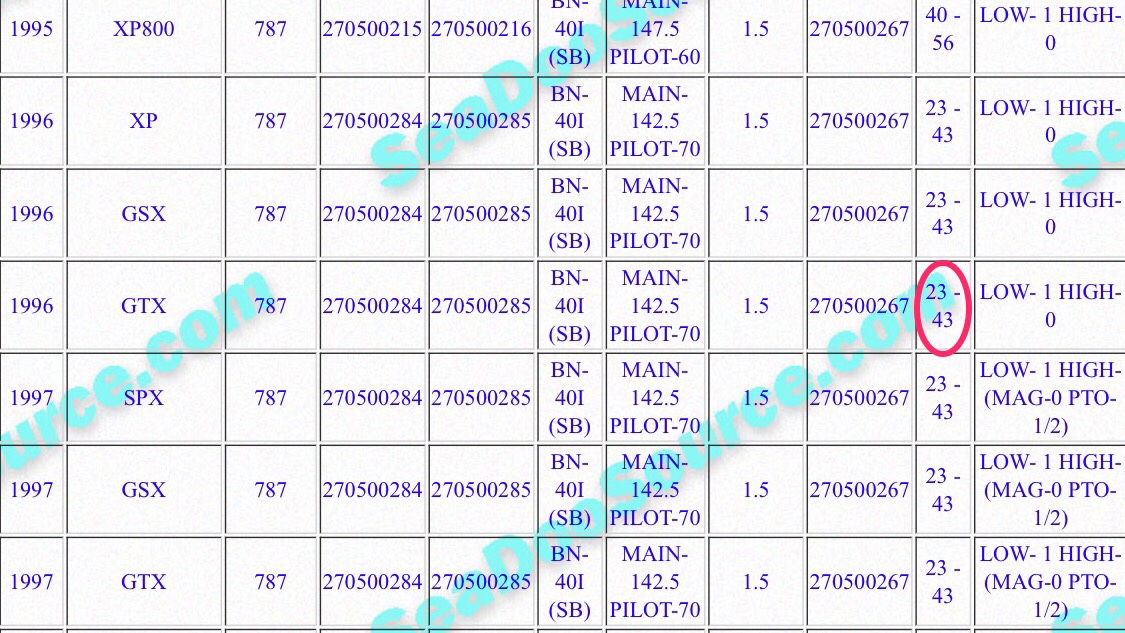
The tip with the rubber on it is the Viton tip(needle). The tip is coated for sealing purposes. That needle lifts up when the P/O pressure has been exceeded under the Valve where the needle sits in and allows fuel to flow. The spring is the "gate keeper" as it only allows fuel to flow as the fuel pressure builds under the valve. Once the P/O pressure exceeds the spring tension. That's when the fuel starts to flow. That is why Valve size(1.5 for yours), P/O, jets(142.5 Main & 70 Pilot), spring(in grams) and the carbs' passage ways like the Bypass holes all need to be squeaky clean and functioning properly so that the motor can draw fuel to feed the engine.
These machines can be a pain and will sometimes make you pull your hair out!
But you're a pro mechanic and have the skill set to work this out. You might feel a little unfamiliar at times. But folks on here have a lot of knowledge and know how from first hand experience working on them and will guide you to getting this ski going!
...and you've already said it. Everything will be ready for next season to ride the crap out of this ski and to have lots of fun and great memories as your smiling ear to ear with the wind and water in your hair!
But also recall this was a "project" ski. You know that projects take time to work on and to get up to speed.
So hang in there!
I would just use the new needle/seats that are coming in the kits.
The tip with the rubber on it is the Viton tip(needle). The tip is coated for sealing purposes. That needle lifts up when the P/O pressure has been exceeded under the Valve where the needle sits in and allows fuel to flow. The spring is the "gate keeper" as it only allows fuel to flow as the fuel pressure builds under the valve. Once the P/O pressure exceeds the spring tension. That's when the fuel starts to flow. That is why Valve size(1.5 for yours), P/O, jets(142.5 Main & 70 Pilot), spring(in grams) and the carbs' passage ways like the Bypass holes all need to be squeaky clean and functioning properly so that the motor can draw fuel to feed the engine.
These machines can be a pain and will sometimes make you pull your hair out!
But you're a pro mechanic and have the skill set to work this out. You might feel a little unfamiliar at times. But folks on here have a lot of knowledge and know how from first hand experience working on them and will guide you to getting this ski going!
...and you've already said it. Everything will be ready for next season to ride the crap out of this ski and to have lots of fun and great memories as your smiling ear to ear with the wind and water in your hair!
But also recall this was a "project" ski. You know that projects take time to work on and to get up to speed.
So hang in there!
Ok the parts should be here tomorrow or Wednesday I think tomorrow.....!!!!! Now do I paint these carbs when I am finished to help with corrosion and what not? And if so do I need to use special paint???
And with the factory air box should I replace that with one of those dual filter systems or factory is just as good?
And with the factory air box should I replace that with one of those dual filter systems or factory is just as good?
pwgsx
Well-Known Member
Just leave the carbs alone and dont paint them. If you have access to a ultrasonic cleaner, give them a dip when they are a part as this will help with cleaning the internal passages and holes. Make sure the 3 small holes in the carb throat are clear. These become clogged and your ski wont run. After re-installing the carbs, run the fuel line directly to a bottle of pre-mix gas. This will cut out the tank and selector so you know you have direct flow to the carbs. You can splice in a small clear fuel filter to make sure your carbs are actually pulling fuel.
Ok got my carb kits today. Had the carbs already cleaned in my washer and dried out started putting the mag carb back together and they didn't send me the rubber o ring gasket and another rubber gasket????? Everything else seems to be in the kit but I was kind of disappointed about that... I should be doing my pop off test soon had to stop to get the kids to calm down... then I'll be back at it!
Once you get them back together, test pop off and then put the diaphragm and cover back on plug the return port and pump 10 psi into the inlet hose fitting. This will make sure you have no gasket leaks and the diaphragm isn't holding the needle open causing the engine to flood when not running.
Oh ok got ya, I will do this hopefully in a couple hours when I am done work then, I just have to re install and see what happens but again I am nervous that it still won't run.... that's the only thing that has me bothered... but I guess we will see... there did seem to be questionable pieces in the old carbs that looked a little gummed up so I hope this was the issue... I'll find out
- Status
- Not open for further replies.
Similar threads
- Replies
- 0
- Views
- 139
- Replies
- 2
- Views
- 173