• This site contains eBay affiliate links for which Sea-Doo Forum may be compensated.

2001GTX RFI overhaul opinion

Waterboy_75

New Member
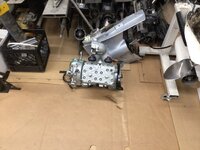
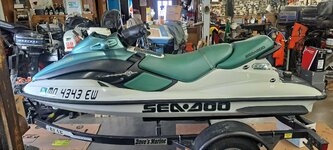
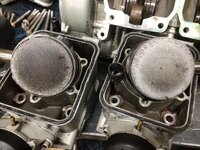
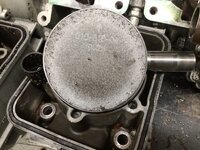
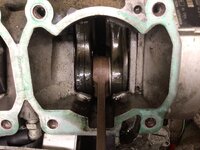
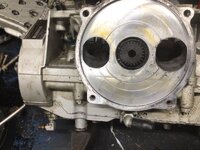
Recently bought a used 01 gtx RFI for the kids to play around on when we take the big boat out. Anyway, I bought it from a guy as a non running ski(ie cheep).He stated it just quit and now wouldn’t crank, no beep with kill lanyard, no dash.I brought it home and checked it over. It ended up being 2 blown fuses and the dash shows 147hrs. I cleaned the fuel and oil tanks, checked the compression and found #1 cly full of oil. After cleaning it out the compression was (145 mag end, 150 pto side) so I decided to take it to the water and let it run easy on the trailer before running it hard. I let it run for about 10min easy and it sounded perfect, idled well so I gave it one or two quick burst to about 5k. On the last one it acted like it bogged for a split second and then quit…like locked up,quit. I called it a night and decided to look at it the next morning. Plugs show no sign of water, I was able to get it to roll it over so I could scope both cyls and they look good and now it cranks again, but it was definitely locked up. I didn’t recheck comp as when I cranked it #1 blew oil again so I am assuming the rotary valve cranks seals let go. I verified by draining the oil and pressurizing the rev chamber and in less than 30 seconds will go from 5 to 0. So it looks like a lower end rebuild is in order and I will probably do the top end as well just to do it. I can see on the tops of the pistons they are .25mm so it’s been done once, but the paint isn’t cracked on any of the bottom end so it’s probably original. Anyway, is this something people attach themselves, or do most send them off? I’m not scared of it, just questioning myself as it is a little different than what I’m use to and I’m sure I will have to buy a few more tools, which I’m not against. I just want as reliable of motor as is possible.
For context, I have been in the marine industry for 30+ years, a Mercury certified tech and evinrude master, but we have stayed away from pwc’s as we have never been able to keep up with the work on regular boats. So I’m very familiar with 2-s engine and have rebuilt 100’s of them.


Thanks!
 
you have much much more experience then I, but are you asking if you can rebuild the crank yourself? Usually the answer is no, but if you have the tools, 50 ton press, whatever jigs you would need for proper spacing, the knowledge and skill to true the crank I see no reason you couldn’t buy most just send them out or buy an aftermarket
 
Really just a general question as to overhauls and the crank was probably the biggest. In outboards, there are some parts that ppl think are hard, but in reality really aren’t, ie cracked rod cap alignment, taper pins, anaerobic sealers, ect and then things ppl don’t even think about that trip them up. I got it out last night, so if I can get a few evenings away from kids sports this week I’m going to tear it down and make the call from there.

Thanks for the reply!
 
The crankshaft and balancer shaft should be rebuilt.
For the crank if you want to do it yourself you will need a strong press, V-Blocks, Seadoo Specific bearing distance gauge (discontinued) and dial indicator to make sure it it true. It is a lot of work and some pretty specific skill so it is much easier to get a reman crank.
Skilz, press, v-blocks, determination and measuring equipment I’m good on, it’s the seadoo specific tools that I’m short on. Is there any consensus on the better places to buy from and who to stay away from? I’ve read enough to know it seems really hit and miss and I will probably go this way instead of diy.
Thanks for the reply!
 
Competitive Crankshafts is the best in the business.
WSM get pretty good reviews.
I would stay away from SBT and Hot Rods.
 
Last edited:
I don't think you'll have any trouble rebuilding the engine. You have help here to answer any questions. I have 2 RFIs. One the engine is ready to install and the other I have the parts and need to put it together but... I don't have a hull to put it in right now.

RFI Engine Rebuild 6-23 Damaged Rotary Gear (1).JPG

RFI Engine Rebuild 6-23 Damaged Rotary Gear (4).JPG


RFI Engine Rebuild 6-23 Damaged Rotary Gear (3).JPG

RFI Engine rebuild 6-23 Black Purple (1).JPG
 
lol, got a pretty clean ol hull, just lacking 2 seals! I really thought about doing a patch for the last month of riding season but thought better of it, even found a post about it. Cap the return and really thicken the oil in the rotary drive. I just couldn’t talk myself into it. Better to hopefully fix it right now and save headaches later.
 

Attachments

  • att.dhzIM5K0MJb1Q77inzzhEd3p2Vg1hwlqYarDLQ5MlGs.jpeg
    att.dhzIM5K0MJb1Q77inzzhEd3p2Vg1hwlqYarDLQ5MlGs.jpeg
    161.8 KB · Views: 8
lol, got a pretty clean ol hull, just lacking 2 seals! I really thought about doing a patch for the last month of riding season but thought better of it, even found a post about it. Cap the return and really thicken the oil in the rotary drive. I just couldn’t talk myself into it. Better to hopefully fix it right now and save headaches later.
Don't let them leaking seals cause you to work on a perfectly good engine. All you do is put one of these in the line feeding the rotary valve chamber. When you are finished riding for the weekend... close the valve. I have skis working great for years simply doing this. One ski takes about 10 days of sitting before it will hydro lock with oil. Note: it doesn't take much oil to cause this problem. As long as the ski runs good I would not pull a perfectly good engine. I think my wife's ski ran better than mine year over year because it got more oil.. :)


A $10 solution to big $$ problems.

Plastic Valve Rotary Valve oil line.jpg
 
So much for compression as gospel. LOL. I would have never guessed just how messed up this engine was as it had 145/150psi on compression and sounded normal to a very new SD guy, but very experienced 2 stroke mech. Rings aren’t broke, but by the marks on the piston tops, it’s been eating crank pieces for awhile, the pto, big end, rod bearing is missing 1 thrust washer or has ate it. I would venture a guess as this may have caused the seals to fail letting the mag side cyl fill with oil in less than a day. Cyls look good but I will let the machine shop make that determination as it’s already .25mm over. I will get it the rest of the way down tomorrow so I can get the crank sent off for rebuilding. Any opinions on when to sleeve versus just punching it out? I know they go way bigger than the .25 it is, but then your cutting raves, ect…also, pistons…stock, wsm, others?

BTW, the pto was a MFK!!?%r ! Just about gave up. Homemade tool and a 6ft cheater just about didn’t get it done.
Thanks!
 

Attachments

  • IMG_3629.jpeg
    IMG_3629.jpeg
    1.2 MB · Views: 8
  • IMG_3630.jpeg
    IMG_3630.jpeg
    1.4 MB · Views: 8
  • IMG_3632.jpeg
    IMG_3632.jpeg
    1.1 MB · Views: 8
Last edited:
That thing was running extremely lean. And since it has been rebuilt before I would have the fuel injectors tested and cleaned.
You are perfectly fine going to 1.0 before a resleeve. I would plan on going 0.50 over based on what the machine shop finds. I prefer OEM or Pro-X pistons but WSM are good too. Have the machine shop clearance the RAVE valves.

I would also change both in-tank fuel filters and verify the oil system si serviced and working with the correct oil.
 
I planned on sending my injectors to the guy who does all our injectors. I give him enough tech service advise he will run the, thru and test the for nothing. With that said, I see loads of injectors for $50-60 for the pair. I assume they must be china injectors as it doesn’t look like Bosch still makes these. Anyone have any luck with these, or just clean the oem’s like I had planned?
 
Rotary valve wear. Looks like a lot more than I would like to see. Going to go thru the book and see what it says, but I thought I’d ask here as well. I have see “rebuilds” for the cover, but what about the block side. These look worse than they are, but are more than a few thousandths.
 

Attachments

  • image.jpg
    image.jpg
    1.1 MB · Views: 5
  • image.jpg
    image.jpg
    1.2 MB · Views: 5
I've machined about 5 or 6 of the rotary valve covers. I had to take a lot of metal of some of them to get it to clean up. If the groove extends from port to port, you have a leak path and gasses will cross over. Even without the groove there can be a great deal of wear. People might be surprised at how much easier the engines start and idle with when this section is brought back to spec.

In this picture I am in the process of machining the surface after which the amount of metal removed must be removed from the gasket contact surface as well. The proper thickness must be maintained.

Rotary Valve Cover Lathe Machine (2).JPG
 
I’m honestly surprised nobody in the aftermarket has made a fix. It wouldn’t take much to make it a better setup, ie, flat sst or even alum wear surface that fits into the block that’s x dimension, the remove the same x dimension from the cover without machining the seating surface to keep the same clearance. Probably to involved and not enough demand to warrant it,

Worst case, if I can’t find a reasonable case is I will try preheating the assembled block(minus crank) and add aluminum back to it and then mill it back to the undamaged dimension. The hardest part will be getting the block squared up and true in the mill. This pics really do look worse than it really is. Wish my depth gauges had a finer point to get an exact measurement, but mine is just to big to get a meaningful dimension.
 
Last edited:
Remember the valve itself is stainless so the cases and cover are wear items being the softer metal. Yours obviously ate something.
Even worse for wearing aluminum were the aftermarket "performance" carbon fiber valves.
 
I’m honestly surprised nobody in the aftermarket has made a fix. It wouldn’t take much to make it a better setup, ie, flat sst or even alum wear surface that fits into the block that’s x dimension, the remove the same x dimension from the cover without machining the seating surface to keep the same clearance. Probably to involved and not enough demand to warrant it,

Worst case, if I can’t find a reasonable case is I will try preheating the assembled block(minus crank) and add aluminum back to it and then mill it back to the undamaged dimension. The hardest part will be getting the block squared up and true in the mill. This pics really do look worse than it really is. Wish my depth gauges had a finer point to get an exact measurement, but mine is just to big to get a meaningful dimension.
I've taken engines apart that were much worse than yours and still running very well with much much issues. These conditions make the ski more difficult to start. Keep this in mind, even with a groove, if the groove doesn't go all the way it isn't as critical.

Probably be able to find cases for $150. I have a 787 engine I just pulled out of a ski that is pretty good condition. I was shocked but... it isn't a RFI so no help there. Ebay is where I get most of my parts. I'm not afraid to buy used. Lots of good people out there and I've bought from many of them.
 
Trying to get my must haves list together. It looks like most of the bearings(balance shaft, ect) are NLA from seadoo, and seadoo parts house along with the seals not available individually. The bearings I know I can get from our bearing supplier, but what do most of you guys do on the seals(rotary valve upper,balance shaft, crank end seals, ect)? I’m sure I can source them as well, it’s just a pain measuring and crossing each seal if I can’t read the #’s. It also looks like most of the gasket kits don’t include seals.
 
Back
Top