2001 RX Reboot Project – MPEM related question

Note: This site contains eBay affiliate links for which SeaDooForum.com may be compensated
Replace your seal complete They don't come apart. Yours is garbage.

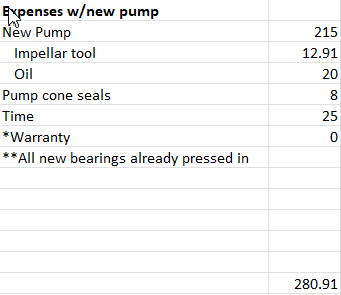
So I sat down and figured out the price of a new pump vs time and expense of replacing that one double-seal without damaging anything else without an arbor press and/or special tool.

Bonus of a new pump would be it would come with a warranty and all the bearings would already be pressed in. But obviously I'm not going to throw away the old pump simply one piece is fudged.

The way I figured the situation IF I found I had to fully rebuild the pump vs new, my costs would be:

1684766098895.png

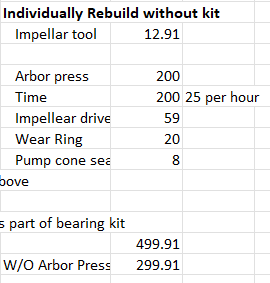
Above also includes wear ring preinstalled. Was not happy with the quality of one I purchased anyway.

1684766187145.png
Full rebuild (as recommended by others):

1684766234605.png

So it would still be cheaper for me to buy a brand new pump, fill with oil and go. Do I think I should have to do this with less than 40 hours on a new pump even though it sat for 7 years, no. But I've already put so much work and $$ into this that to stop now would negate all the work I've done.

Worst case scenario, I have a spare pump.
 
Replace your seal complete They don't come apart. Yours is garbage.
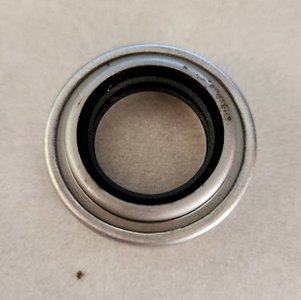
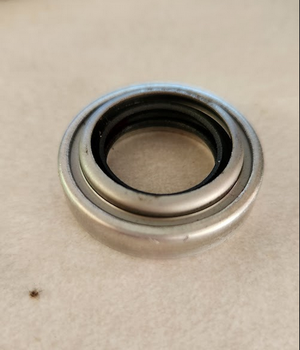
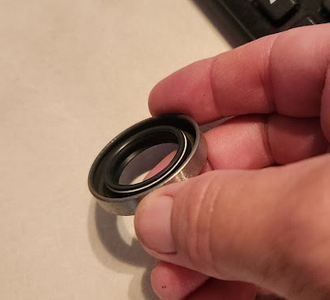
The one I was sent by a seller on ebay does not look like the picture despite being listed with the proper part number. It was also not new since it did not come in any OEM packaging. I can also tell someone tried to clean off some type of glue/sealant and the rubber o-ring inside is completely hardened and feels brittle.

I asked to return it and the seller immediately just gave me a refund and doesn't want it back.

This is how it arrived and what it looks like from both sides:

1684767037599.png

1684767102625.png

1684767133997.png

Doesn't quite look new to me nor like the one pictured two posts above either.
 
Last edited:
After being installed they can't be removed without being torn up. As long as it is stainless steel and the correct size it will probably work. Nice double lip seal.
 
After being installed they can't be removed without being torn up. As long as it is stainless steel and the correct size it will probably work. Nice double lip seal.
If you press them out with the proper tool, they are supposed to come straight out (as shown in the manual). I bought a new pump but perhaps an after the fact fix the pump I have will happen after I get at least my ski project done.
 
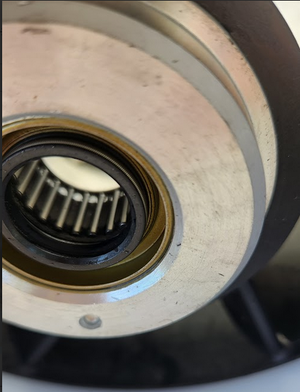
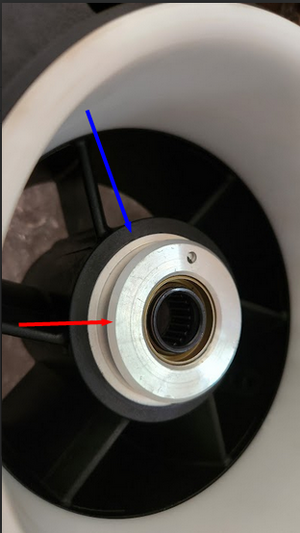
I don't know if you guys are screwing with me, or there is another version of the 155mm pump that is different from yours. I bought a brand new 155mm pump. I placed it side by side the pump in question that some say was missing pieces of the double-lip seal. Here is the brand spanking new one:

1684940533538.png
Same pic with details:

1684940485096.png

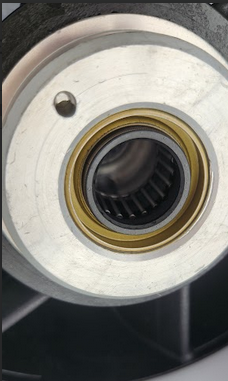
Close up of the spring facing outward toward impeller & exposed on new pump:

1684940640940.png

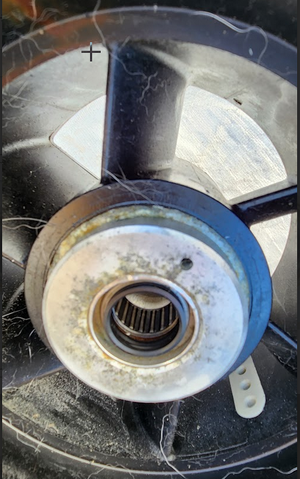
Old one (ignore the dog hair):

1684940807774.png

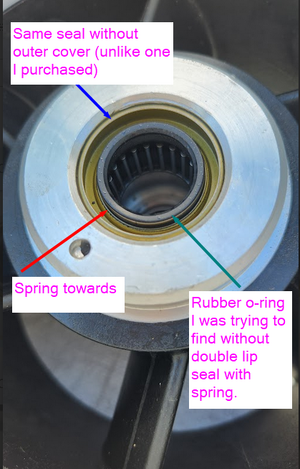
So the double-lip seal is different. There is no outer metal piece on the outer edge of the double-seal, and there are no partial pieces left behind other than the fact that the little stupid spring shown above broke and is missing.

Double-lip seal comparable angle (on the one I purchased):

1684940974187.png

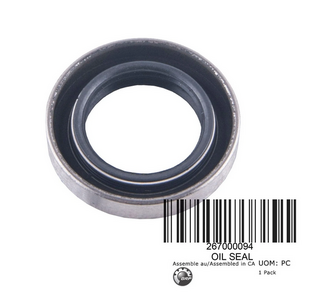
So, there is apparently a second version of the double-lip seal which does not have the metal piece over the rubber and ring listed as PN 267000094-- which likely makes it a serviceable item (without having to press it out) if you can find the spring I.e., if you can reinstall the rubber boot and place spring over the back of it to retain it, it's serviceable because the rubber piece can be removed. If you needed to you could probably even put a bit of ultra black on it to hold it in place.

This is actually the picture of the double-lip seal with the PN from the same angle shown:

1684941258809.png

So the one I purchased was in fact either a different (older version) or I was sold the wrong one. By purchasing this seal and removing the little spring, I could have easily inserted it in my old pump and been on my way.

So, I will install new pump, re-purchase the part from another seller, and have a spare pump or turn around and sell it.
 
Last edited:
The one with the metal cover is a shielded seal, it is there to prevent things like sea grass and rope from damaging the seal if it gets wrapped around the pump shaft and works it's way under the impeller.

The ones on your pump are not shielded.

I don't know if or when there was a part update and if the shielded seal was dropped by Seadoo or if maybe aftermarket ones just don't come with them?

I don't even understand how someone could get rope in between the impeller and there. That thing is torqued on. Perhaps some micro fishing line.

With that external piece of metal protecting the seal, the metal would stick out further than the rubber. Then that would make the impeller stick out further possibly a bit past the wear ring, causing the impeller to make contact with the mounted parts behind it. My impeller when properly torqued sits right at the edge of the wear ring.
 
No, the impeller does not bottom out on the seal.

That spring just keeps tension on the molded seal lip, it doesn't hold anything on.

You could be correct that the shielded seal is of an older design and has been changed.
 
No, the impeller does not bottom out on the seal.

That spring just keeps tension on the molded seal lip, it doesn't hold anything on.

You could be correct that the shielded seal is of an older design and has been changed.

How would rope or seaweed get in there?

The impellar slides over the impeller shaft and is torqued to a very minimal spec to move around the outer lip and metal so it can spin:

1684945547720.png

1684945615185.png

If you're going to suck up seaweek it would be from the impeller side, but it would be protected by the impeller overlap, thereby shielding the entire area from rope or other debris unless the impeller is not tightened all the way down creating excess clearance.

1684945792113.png

If you're getting a rope in there, it seems there may be a breach in your impeller to seal.

So I am not quite convinced the purpose of that metal over the rubber is actually to prevent rope or seacrud damage nor that it wouldn't prevent the impeller from mounting flush against these surfaces as necessary.
 
Last edited:
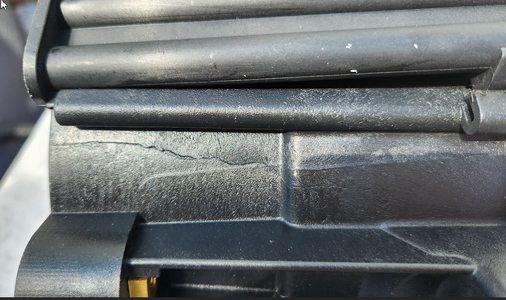
Received the new pump and in taking pictures replying to posters on this forum, realized the housing had several cracks in the plastic molding. Seller claims these were direct from WSM and may just be cosmetic. I don't care if they're cosmetic or not. Looks like weakpoints to me for a part that is under pressure at all times:

1684946861055.png

1684946903973.png

1684946942801.png


So now the new pump is going back.

Looking at the front near where the impeller mounts, it also looks like an impeller may have been mounted at some point. I just can't catch a break!

1684968787273.png

Do some companies really think let's just throw this on ebay -- no one will notice when they receive it?
 
Last edited:
So, back from Puerto Rico. Finished with the AC install, now back to this seadoo project and where I left off on the pump.

Received two of the 267000094 from a different vendor. These look the same as what existed. The side that faces outward:

1685562714323.png

1685562749267.png

The side that faces inward:

1685562792123.png

Note, no metal on either side protecting the rubber area.

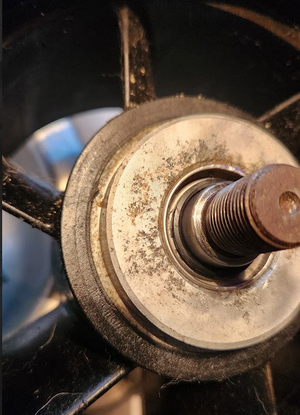
So I removed the spring from this one. and installed it on the one on my jetpump. I pulled on the o-ring to see if it would come out. It did not.

I then inserted the impeller shaft, and tried pulling on it again, and double-checked, and it appears to be seated properly. So I've decided to go with that rather than press out and in a new seal.

1685563009639.png

I will check the pump cone oil after a few hours.
 

Attachments

  • 1685562842450.png
    1685562842450.png
    88.1 KB · Views: 1
What would be the purpose of applying Loctite 454 (instant rubber adhesive) to the neoprene seal on the jetpump? Seems they want to permanently attach the rubber seal to the jetpump? The rubber seal fits on there snug and secure. I don't want to have to cut it off and end up with non even surfaces when I rebuild the pump again.
 
454 is just superglue, I agree, no benefit.
That's what I kinda thought too when I looked at the description of 454. Might be good to keep the impeller boot in place for install, or even the rubber bumper that goes into the drive shaft. Actually, I think I'm going to use it on the drive shaft. I hate getting the whole thing back together, and then you find the rubber bumper on the ground. Grrr. I'll just use some plastic/rubber friendly loctite or perhaps even some ultra black.

With all the to do with the pump and whether or not that double-lip seal on the impeller side HAD to be removed and replaced or it wouldn't seal right, I wanted to make sure it wasn't leaking if and if so exactly from where. Finding a leak with a pressure test and squirt bottle is a PIA for surfaces you can't get to once the impeller is installed.

So, before installing the pump cone, I filled up the impeller shaft with oil from the cone side, watched it burp to see if it leaked out of the impeller side. It didn't. I actually think doing so would be a good way to ensure proper lubrication to the bearings buried in there upon start up. I also applied oil to all of the bearings inbetween before torquing down the impeller. Wiped away any oil residue on the lip of the impeller shaft oil seal side, applied loctite 518 to the cone and rubber o-ring. Installed the pump cone with anti-rattle pusher. Tightened down to specs. Filled pump cone incrementally, let it sit for 20 minutes, came back, etc.

When it was full I used the impeller removal tool to insert in vice and spin it around a bunch. Noticed oil leaking from pump cone seal and filler area (barely). Tightened those down a bit more. I'm always concerned about spinning the filler screw too far in. Did that once before...duh. Spun it some more. Let it sit overnight on an open box (impeller side down) so if it did leak, I could tell if it were leaking from either side and where. No leaks.

The wear ring is a bit off spec. The day before when I first installed the wear ring (freezer trick) and impeller, it turned without catching. After it sat, and warmed back up, the impeller has one area of slight contact on the wear ring. That should go away after a few high RPM spins. Me turning it by hand was even working.
Just pressure test the pump. Should be done after every time you take it apart.
 
Ok, now I'm just getting more and more pissed. The upper left side bolt (looking at the pump) decided to just break when installing the pump. How do these things come out?

Disregard...after removing inside nut, they actually pull out quite easily. Part number is 250300010

1686327205685.png

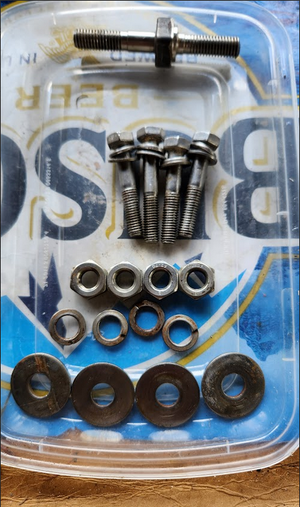
23.99 plus shipping for one or used on ebay ... 4 + washers, bolts, etc. for free 4 day shipping 24.00. I'm gonna go with ebay since not all 4 can be bad and I get spare parts.
 
Last edited:
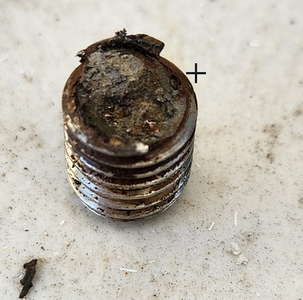
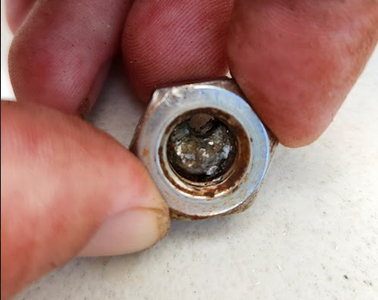
Parts cleaned up a bit & picture of stud break (I also cleaned up the other mounting studs yesterday waiting for the new parts to arrive):

1686744369685.png

1686744405708.png


1686744468605.png

I find it odd because it wasn't going on difficultly, I wasn't cranking on it, and then just snapped.
 
Florida has been blazing hot. Too hot to touch metal parts and tools during the day even under cover.

Got the new jetpump stud reinstalled. Cleaned up the others. Connected the jetpump itself a couple of days ago. Then of course the venturi, nozzle, reverse, VTS, steering cables.

Cleaned, primed and painted the upper tuned pipe with high temp paint. Cleaned up the lower -- all the paint was good.

Someone on here said to leave the upper and lower pipes connected. But I lack the ability to manuever parts like that bending over the hull and such. So when I removed it, I disconnected the upper from the lower and left the lower attached.

I found a video which showed leaving the clamp on the lower tuned pipe, inserting the copper gasket, applying copper gasket maker, and then pulling the clamp up and over the pipes. For some reason my copper gasket had a weird rounded v in it, but the gasket itself sits within the lip of the lower tuned pipe, so I'm not sure why.

Regardless, I found installing the upper tuned pipe was not that difficult if I left the mounting brackets threaded but loose, aligned the pipe with the double-thred into the manifold, attached at least two bolts to the mounting points on the manifold, applied the copper gasket maker to both sides of the copper gasket to hold it in place in the lower tuned pipe, allow it to tack and then tighten the clamp on the lower tuned pipe. I installed the nut and washer on the double-threaded stud just enough, but now that I think about it I should have just left it off because if you wrap your arms around the pipe from the other side you have just enough room to thread it on, but I was more worried about it being able to hold the exhaust at the right angle. Just make sure to ensure the thick washer going on the double-threaded stud does not slide onto the manifold side when aligning.

With that said, the allen bolts on the upper pipe are a PIA. So I took I have been fabricating allens to use within sockets of the same size by sacrificing my set of t-handle allens. I just cut them off to a shorter length so I can get the torque I need.

The upper pipe had an allen bolt in it that I could never get out as it seemed too long. Looking at it t from the spark plug side, it would be the upper right bolt. The next bolt on the bottom right is the double threaded stud that needs the special tool. The stud that I could never remove is being a real pain in the ass going back in. Doesn't want to go the last inch or so. I'm wondering if that's because the manifold I bought had crud build up in the screw holes. I'm thinking about backing out the stud as far as I can and shooting some deep creep down in there. EDIT: Got it out today, reemed hole with a small wire wheel on my dremmel, and it went back in much easier. Must have had crud build up somewhere. Which you would think it wouldn't because it's a brand new remanned engine, so unless the holes were filled with paint, perhaps they didn't clean them up. Not to self next time I get new engine, clean bolt holes with wire wheel before install ***

All of the newer bolts I bought as a set with the rubber splash cover seem to be going in just fine.
 
Last edited:
All back together for the most part. Have not put the rubber splash cover over the manifold / tuned pipe connect yet as I would like to make sure it's not leaking first. Just need to reconnect the air tubes, add gas, figure out the extra oil I need to add to the gas...and look up my spark plug gap.
 
Ok, so everything is back together for the most part (air tubes). Engine turns over, but I'm not pulling gas.

The fuel filter filled up to about 1/4 then stopped. No more after that.

I thought perhaps the switch was in the wrong place but I've swapped it to all 3 positions (don't have stickers anymore) and tried starting and the fuel filter just doesn't fill. So I added another 5 gallons hoping something wasn't registering in the fuel baffle. I believe this is a siphon system, but I used to be able to replace my filter without having to worry about dumping fuel in there before trying to start.

I'm thinking fuel selector switch (although I can hear it tick when turned). There is no gas smell in the entire hull. No gas on plugs. Battery was at 12.7. Is the fuel baffle that send fuel electric in a non-DI ski?

This is not a DI ski. I rebuilt the carbs.

I'm pissed. Got it all back together and now this bullshit.
 
One thing great about skis and mechanical equipment in general, they tell the truth always. If I were trouble shooting the system for the first time I'd place a clamp on the "ON" and "RES" lines very close to the baffle (less than 4 inches). I'd disconnect the inlet line on the carbs and pull a vacuum on the fuel system. This will test the water separator, the fuel selector, and the connections. A common problem is the water separator gasket area. I pull the system down to about 10psi vacuum if I can get it but whatever I get it should HOLD that vacuum. While under vacuum, switch the fuel selector to all 3 positions and watch the vacuum. If I see a vacuum loss, next I pressure up the system to about 8 pounds and get out the soap bubbles and check what I can. Remove both clamps on the on/res lines and pressure up the fuel valve in the "OFF" position. Open "RES" you should hear the air flow into the fuel tank indicating an open line. Go back to the "OFF" position and repeat for the "ON" side. If all this checks out I go to the fuel pump.

For the fuel pump I don't pull the carbs. I get a clear hose and insert it to the pulse line. I activate the fuel pump with my cheeks. Suck and Blow. :D You should hear and feel the little diaphragm's resistance (be gentle it doesn't take much). You can connect a clear fuel line to the carb inlet and put the fuel line in a container of fuel. Just you actuating the little diaphragm should quickly and easily draw the fuel up the line and into the carbs. When you stop, the fuel should "not flow" backwards away from the carbs. Clear tubing allows you to check this.

Next you can blow back gently into the pulse line hose to make sure it is clear. There can be liquid in the diaphragm that will affect the capacity of the pump. I don't pull the carbs till last.

Sorry for the length. If I didn't get it all correct you can see what I'm trying to accomplish.

NOTE: There is also the fuel vent than can cause problems but I don't think it would do that just starting up. You can remove the fuel cap if necessary.

You'll find the problem. IT CAN'T HIDE for long. :D Good Luck !!
 
Check also that your return line is clear. Remove the return line and verify flow from the carbs.
 
One thing great about skis and mechanical equipment in general, they tell the truth always. If I were trouble shooting the system for the first time I'd place a clamp on the "ON" and "RES" lines very close to the baffle (less than 4 inches). I'd disconnect the inlet line on the carbs and pull a vacuum on the fuel system. This will test the water separator, the fuel selector, and the connections. A common problem is the water separator gasket area. I pull the system down to about 10psi vacuum if I can get it but whatever I get it should HOLD that vacuum. While under vacuum, switch the fuel selector to all 3 positions and watch the vacuum. If I see a vacuum loss, next I pressure up the system to about 8 pounds and get out the soap bubbles and check what I can. Remove both clamps on the on/res lines and pressure up the fuel valve in the "OFF" position. Open "RES" you should hear the air flow into the fuel tank indicating an open line. Go back to the "OFF" position and repeat for the "ON" side. If all this checks out I go to the fuel pump.

For the fuel pump I don't pull the carbs. I get a clear hose and insert it to the pulse line. I activate the fuel pump with my cheeks. Suck and Blow. :D You should hear and feel the little diaphragm's resistance (be gentle it doesn't take much). You can connect a clear fuel line to the carb inlet and put the fuel line in a container of fuel. Just you actuating the little diaphragm should quickly and easily draw the fuel up the line and into the carbs. When you stop, the fuel should "not flow" backwards away from the carbs. Clear tubing allows you to check this.

Next you can blow back gently into the pulse line hose to make sure it is clear. There can be liquid in the diaphragm that will affect the capacity of the pump. I don't pull the carbs till last.

Sorry for the length. If I didn't get it all correct you can see what I'm trying to accomplish.

NOTE: There is also the fuel vent than can cause problems but I don't think it would do that just starting up. You can remove the fuel cap if necessary.

You'll find the problem. IT CAN'T HIDE for long. :D Good Luck !!
The more I thought about it, fuel isn't going to get to the carbs if it's not getting to the fuel filter itself. Although initially the fuel filter did partially fill, I thought let's start at the source.

Although you would think fuel would come straight from the baffle to the fuel filter, then up to the petcock, so gunk is caught at the fuel filter, it doesn't appear so. The two smaller lines run from the baffle (one for reserve, one for on).

1687543384785.png

A fuel line leads from the baffle to the top of the petcock, and one at the bottom (on, res). Then a shorter line goes from the bottom petcock into the in port on the fuel filter assembly. The outgoing line from the fuel filter (back one) then runs over to the carbs. 3/8" inside diameter.

1687543586373.png

So, I woke up early this morning and disconnected fuel filter. I was able to blow freely through both ports.

Moved on to the lines leading to the fuel petcock.

Found them to be blocked off at the top line and top line at the petcock (I now know this is the reserve):

1687543743031.png

1687543826951.png

So today became go find fuel hose, but my local parts store O'Reilly wanted $9.98 per foot for fuel hose, and I'm not about to pay that when I can get it online for $1.08 a foot. I ordered 10 feet from Amazon.

So now I have to go google how to get this petcock off. EDIT: I remembered from doing it before when I replaced the whole thing.

The good news is that since the fuel filter wasn't enough gas to reach the out port the out wasn't getting any gas and short fuel line from the petcock and the line leading back to the carbs was clear of any and all debris, bendable. I may still just replace it.
 
Last edited:
Back
Top