RESTO 1997 Sea Doo GTX complete re gelcoat and rebuild

Note: This site contains eBay affiliate links for which SeaDooForum.com may be compensated
Status
Not open for further replies.

GGuillot

Well-Known Member
Hello all,

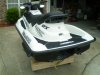
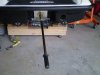
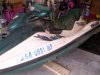
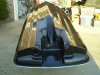
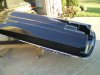
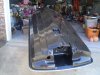
I picked up this 1997 GTX in rough shape back a few months ago. It was supposedly running a year or two ago. From what I can tell it took on some water in the motor then it was stored in a barn minus a trailer. I'm in the stages of redoing the 20 yr old gelcoat. On the bottom, minor wear or gouging down to the fiberglass near the front and heavy scratches across the hull. I decided to change from hunter green to black on the bottom, retaining white on top. Currently I've completed the bottom and have started on the top side.

I used FGCI brushable gelcoat, prepped the surface with 80 - 100 grit sanding. Die grinded out and used marine tex epoxy to fill in the gouging near the front. Sanded it in with the gelcoat then used acetone to prep. Used 3M products to compound, glaze and wax.

A couple pics to show the progress so far.
 

Attachments

  • P1010192.JPG
    P1010192.JPG
    160.7 KB · Views: 234
  • P1010188.JPG
    P1010188.JPG
    80.5 KB · Views: 239
  • P1010194.JPG
    P1010194.JPG
    149.9 KB · Views: 242
  • P1010199.JPG
    P1010199.JPG
    167 KB · Views: 247
Last edited by a moderator:
That looks great!!! One of these days I need to fix up my GTX, it is really starting to show its age.
 
Making some progress lately, but it's been pretty cold to get out there on the driveway and do some wet sanding to finish the topside. So good time to tear into the engine and found out why it was locked up. Full of water and rust, a total mess. The balance shaft had a bad seal and bearings, so I swapped for one at SBT. It was a crappy rebuild, pistons were over bore, .50mm but someone didn't trim the RAVE valves and they made contact causing failure and making a big hole on oneP1080006.JPGP1080008.JPG.
 
Wow, I am very impressed with how the gel coat turned out. I am planning to do this to an XP in the spring. Is this brushable gel coat different from the average stuff you find? When you brush it, does it leave the brush strokes visible, or does it pull itself smooth? I've used regular gel-coat and gone through hell sanding those brush lines out.
 
It's the brushable gelcoat by FGCI. It's still a hell of a lot of work to sand out the brush/roll roughness. It took me forever to get it completely smooth before the compound/polish effort. I was putting it on too thin at first, it would show the green underneath by the time I was getting it smooth. It needed a minimum of applying 3-4 coats in most areas. It's very time consuming, if I'd have painted I'd been done a long time ago, but I want the durability of gelcoat. Though I've never used the regular stuff, I'm not sure the brushable gelcoat offers a huge advantage. But since I was brushing and rolling I went with it. I'll be putting some pics up soon of the top side, I'm still sanding and I'm in a delay, it's been a little cold here lately in Alabama.
 
I know your pain brother! I too have sanded through when sanding out the brush texture. At least you were working on a top-surface though. My first run-in with this was working on the bottom of my boat, covering the graft seam of my 4tec conversion. I grafted two different hulls together and gelcoated over the seam. I used a heavy ass air-powered jitter bug to do the sanding. Holding that damn brick up against the hull, with gel-coat water dripping on your face was like torture. You get so fatigued doing that! I've decided that when do my ski, I will just spray it. I plan to modify my harbor freight paint gun and use it. Hopefully I can get it on smoother and cut my sanding time down some.
 
I wasn't sure how spraying it would go, as you know the stuff gels up pretty quick, I learned only mix about a pint at a time, which in my experience was about 10 minutes to get it applied. The stuff is brutal when it cures, forget expensive brushes, they're trashed afterward, it seems it would ruin a paint gun after the first application, plus there's the over spray issue. I used the little 4" rollers and cheap disposable plastic pans. To me the prep and applying gelcoat wasn't so bad, same for the compound and polishing, it's the finish work of sanding it smooth to 1500 - 2000 grit that totally bites. And yeah, you must like the abuse, no way I'd do any of it looking up holding a sander. It's easy to see why very few people like to do this kind of work, and if they do it's expensive.
 
Hmm, I'll have to keep that quick setup time in mind when I use the gun. I have a nice Devilbiss gun to do my actual painting now, so the HF gun just sits anyway. No way I'll ruin another paint job with it lol. It's too crude to use for painting cars, where perfection is a must. Gelcoat will get lots of post work anyway, so this should be just fine. Only thing is I think I need a larger tip. I believe 1.8 is the biggest I have for that, and I believe gelcoat calls for a 2.3 or something. I wonder if HF sells tips separately. Doubt they sell parts for their tools. I believe they use the "buy a new one if it breaks" business plan. Perhaps I'll just drill it out.... If the gun gets ruined, oh well. It's served its purpose.
 
Update: Engine rebuild is coming along nicely, ordered a couple bearings for the rotary valve shaft this week. Also, should be getting the cylinders back from FullBore.com that is doing the resleeve to standard bore 82mm by the end of the week. Media blasted everything for the engine minus the exhaust pics so far.

Time to get back on the dreaded sanding gelcoat, recently die grinded and filled with marine tex over 80 rivet holes in mat area, patched a gouge on the nose and a couple other imperfections that showed up. The original gelcoat was still yellow even after extensive sanding. I sanded all the roughness out in the mat area, it took a few coats to get a good application to cover it and leave enough to sand smooth. Few pics just before, the after pics coming soon once I get it smooth and compounded/polished.
 

Attachments

  • P1010195.JPG
    P1010195.JPG
    154.5 KB · Views: 134
  • P1010204.JPG
    P1010204.JPG
    160.7 KB · Views: 130
  • P1010200.JPG
    P1010200.JPG
    163.8 KB · Views: 131
  • P1010196.JPG
    P1010196.JPG
    153.1 KB · Views: 129
Last edited:
Looks great!

I was going to do the same but I ended up just using Epoxy Appliance Paint for my hull. Gel-Coating is definitely the best, but it's an absolutely brutal job to do!

Just a question, is it cheaper to rebuild an engine yourself rather than using a rebuild/exchange service?
 
It is about the same price to do it yourself with OEM parts that are better quality than the reman engines but no warranty. You can save a little by using cheaper aftermarket parts but if I’m going to keep it, only oem parts for me.
 
Making some progress here lately, after many tedious months of sanding the new gelcoat top and bottom is finally complete. The white is so bright in the sun it's blinding, smooth and shiny. It's difficult at times to see where it still needs attention. The tactic I used was to wash down with Purple Power, a slight pink will show up to help identify places that still need fine sanding.P5060209.JPGP5060212.JPGP5060210.JPG
 
More progress lately, put the rub rails on, mats, decals, recovered the seat, painted the hood, and a bunch of other cosmetic stuff. Now, I can turn my attention to the engine and everything internal.
P6160225.JPG
 

Attachments

  • P6160222.JPG
    P6160222.JPG
    158.3 KB · Views: 106
  • P6160227.JPG
    P6160227.JPG
    158.6 KB · Views: 104
  • P6160233.JPG
    P6160233.JPG
    157.8 KB · Views: 102
  • P6160223.JPG
    P6160223.JPG
    165.4 KB · Views: 106
  • P6160233.JPG
    P6160233.JPG
    157.8 KB · Views: 106
  • P6160230.JPG
    P6160230.JPG
    154.3 KB · Views: 102
  • P6160232.JPG
    P6160232.JPG
    157.2 KB · Views: 101
Engine went in last weekend, made a lot of progress since then, trying to have some patience and maintain attention to detail. Aligned the engine with the alignment tool, it was off and I made the adjustment loosing the rear mounts and shifting it slightly.P7010238.JPG
 

Attachments

  • P7010239.JPG
    P7010239.JPG
    159.1 KB · Views: 83
  • P7010243.JPG
    P7010243.JPG
    159.1 KB · Views: 81
Your almost done! When I did mine I didn’t know I had an intermittent mpem problem. I did search /clean every connection for 15 hours before buying the expensive mpem ! Now it run like a champ!
 
Almost done, got some power on it last weekend, looks like it had 191.8 hours on it before I got it out of a barn last year. Tried out the Candoo Pro I picked up to have for the GTX and GSX and programmed a new lanyard, very easy to use. I ran all the new lines, only have fuel supply and return to connect when I install the carbs. Quite a bit of lines to run, every size is used 3/32, 1/4, 5/16, 3/8, and 1/2. I installed my little auto Rule bilge, better pic coming how I route the water out, it goes through the grab handle with a 3/8 lines.

Solenoid is bad when I checked it, ordered a new one. Carbs were a mess, been taking my time going through them and rebuilding them with genuine kits, needles, seats and the 80 gram blk spring. Should be able to pressure test and check the pop off this weekend. One of the throttle shafts and plate was bent, I gave up trying to get the plate seating like the other carb, ordered that replacement kit for $25. Had to order a screw set for the carbs (much better in SS) and had to drill out many rusted stuck screws.

Adjusted the steering and reverse bucket, filled the cone with synthetic 75-90w oil. It had the oring holding the SS ring against the carbon ring, decided to ditch it and ordered and installed the C clip. Double checking and primed the oil injection pump, ran it on a drill at 3K to prime the lines to the RV plate. I had it installed but I removed the RV cover to double check mounting the carbs and syncing them. I hope the RV clearance is good, I had .006 removed from the lip/groove and I'm still coming in at about .017 according to my measurements. I'm concerned, needs to be within .010 - .014, but I figured it ran before, and it seems now much tighter and should at least start. Checking it with RV out vs. in, I'm actually too tight, (.009) if someone can explain please respond.

I'm there, about another week or two and I'm water testing.
 

Attachments

  • P7180246.JPG
    P7180246.JPG
    151.4 KB · Views: 70
  • P7180247.JPG
    P7180247.JPG
    161.3 KB · Views: 76
Last edited:
UPDATE:

Well, moment of truth came through recently, got it started last week, and I took it out a couple times this past weekend. First day out it quit on me leaving the dock then I realized I forgot to turn the gas on!!! Had a passenger each day, after a being little easy on it and back to the dock a couple times we went out for over an hour, varying throttle, but it responded powerfully. Mid range is a little rough between 3000 - 4500 if you go gradual up or coming back down. I hear that's normal on the 787. Still breaking in, but second day after 2/3 a tank almost burned, right before going back to the dock, at a brief WOT we hit 56mph, according to peak mph recall. Must be from that new gel coat on the bottom I spent many months getting glass perfect.

Had the auto bilge on, just encase, but we seemed to stay dry in the hull both days. We loaded the rear storage bin up as an ice chest for drinks, for which we needed, it was sunny and very hot, 92-93 on the water, low 80's in the lake.

Overall, very pleased, may need to do some fine tuning after a couple tanks and break in, but very little, no problem starting and it never quit on us after running for hours over the weekend.
 
Status
Not open for further replies.
Back
Top