Agee with Buckeye.. I also bypassed and used the block off plug that I purchased using his info... He is the procedure I followed as well as repost of part numbers. The block off plug is a cover plate as well as long shaft to fill the void.
Here is a brief summary of bypass ( sorry no pics as it was hot and i was dripping wet just to get this done today:
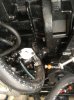
1) Remove oil pump - 2 screws and a connector arm to throttle
2) Loosen 3 bolts on fuel pump as shaft and busing will not come out. ( pump does not have to come off, just loosen and you may want to do this as step one as it makes the rear screw in oil pump easier to get to )
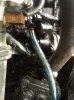
3) Plug off two oil lines ( i used 2 bolts and wire ties ,holing up well with no leaks)
4) remove shaft / gear bushing.
5) Install plug and o ring, secure in place with 2 screws.
6) remove and plug crankcase hose / also install plug in engine block where crankcase hose was..
7) (optional) I replaced the fuel filter , filled with 50:1)
8) purge non 50:1 fuel out of system ( lines and fuel rail , just to be on the safe side , just removed fuel line after pump and turned the key on and off several times till has plenty of mix out of the line.
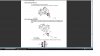
Here are the part numbers... ( same as used in another thread by buckeye_paul --- Thanks)
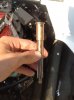
Qty 1 of 43453 Plastic Plug (block off "plug" cover plate with "shaft" to fill the void left by removing shaft)
Qty 1 of 22-73379 Plug (crankcase pressure to main oil tank)
Qty 2 of 10-41506 Screw (for block off plug)
Qty 1 of 25-32509 or 32509 O ring (for block off plug)
Have gone thru about 4 tanks of fuel and could not be happier with decision..
Mike