• This site contains eBay affiliate links for which Sea-Doo Forum may be compensated.

How did I loose a second ring ????????

Status
Not open for further replies.

Mekanix

Premium Member
Premium Member
Ever have one of those voices in the back of your head saying there's something up but you don't know what ?

Had that feeling yesterday for no reason :P
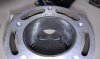
Today I decided to clean my raves just for the hell of it and noticed that the PTO side looked great through the slot.

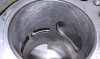
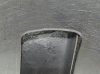
But the Mag side wasn't so good. There is no second ring!! Just a small chunk of ring embedded in the piston and a few nicks on the top.

I pulled the head off and it actually looks really good. Some very small nicks in the head, maybe 5-6, and the top ring is still completely intact. Daam thing still had 150 psi the last time I ran it.

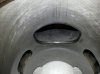
I think it might be the rave that touched the ring but it has excessive clearance.
I think maybe like 1mm of gap between them and the cylinder bore wall.

So I'm pulling the engine apart and installing another 1 or two pistons and rings.
There is absolutely no scratches that I can feel in the bore so it only needs hone and new piston.

There is maybe 72 hours so far on this engine and I have no idea when this would have happened because there was no feeling at all of power loss or rpm loss.

Should I just do one side or buy a top end kit and do both at the same time.
I'm going to need all new gaskets anyways and the kit has that.

What about break-in time? 1 vs 2 pistons.
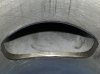
Here's the carnage.

53D0B97F.jpg53D0B865.jpg53D0B8CE.jpg20140724_211409.jpg20140724_211438.jpg20140724_211358.jpg


This is the PTO side. looks good.


20140724_211418.jpg
 
Last edited by a moderator:
Holy crap! Was this a rebuilt motor or a new top end? If it was bored over did you trim the raves? They need a certain amount of clearance cold to account for the expansion when they're hot.
 
This was my first seadoo build from the ground up. All my work acording to the manual.

Raves had almost twice the clearance needed. Nearly 1 mm
 
Last edited by a moderator:
Hmm sometimes stuff happens, did the ring hang up on the exhaust port? Piston facing the correct way?
 
Facing the right way, not a mark on the exhaust port top and bottom.

I'm wondering if I'm going to find a missing locating pin or the other half of the ring.

Hopping that nothing made it to the bottom end.

It should cost 240 for a top end kit that I could have by tuesday. Or 100 for just a piston, but chances are all my gaskets will break :P
 
Last edited by a moderator:
:lol:

Yeah wsm...

Just sucks. Because I just started trusting the thing :p
Its just time and money to fix and I'm thankfull for catching it now but daam how and why ??? :confused:
 
Last edited by a moderator:
Like you said, maybe one of the pins broke and the ring rotated, or maybe the ports aren't chamfered quite enough?

Could be a ring just shattered, or ring end gap was insufficient?

Sure is a large exhaust port, and it overlaps with the intakes, too.

Was the ring land damaged mostly above or below the ring, my purely wild guess is the land above took the hit when the ring snagged on the bottom lip of the exhaust port?
 
I had a Parts guy tell me 1 in 10,000 new parts are bad right out of the box! So, why is it my turn to be Mr 10,000 so often?
 
I looked at the pictures last night, & really wasn't sure what to say. I agree that something must have interfered. If it was an overheat of some sort you would have some scoring on the cylinder walls. I only see marks in front of the port. Could be the bore wasn't cleaned up around the ports, or maybe something slid down into the exhaust port during assembly? Did you check the end gaps of the rings in multiple locations? Maybe your bore isn't consistent & the rings are getting a tighter squeeze near the ports. Pull it apart carefully & measure everything...... twice ;)
 
This engine was torn down following the 1st heat cycle and it was determined the port chamfering was inadequate. This conclusion was made based on the vertical stripes in the crosshatch of the cylinder liner.

The 2nd photo is the same cylinder before the 1st heat cycle, during assembly.

And some detail on how one participant prefers to chamfer his ports:
http://www.ccspecialtytool.com/2-stroke-porting-and-polishing-tips-tj
 

Attachments

  • IMAG1619_zps13ae1a34.jpg
    IMAG1619_zps13ae1a34.jpg
    86 KB · Views: 37
  • IMAG1411_zps3a59373f.jpg
    IMAG1411_zps3a59373f.jpg
    70.5 KB · Views: 33
Last edited by a moderator:
Pulled it completely apart.
Both pins are still in the piston.
1/4 of the bottom ring was all that was left.
The top ring was just fin.
The ring wasn't upside down.

Looks like the ring contacted the top of the exhaust port and chunked after that.

I got all the bits that went into the base and flushed out the bearings on the mag side by taking the mag cover and flywheel housing off. I found one small chunk that made it through the oil port.
Then I flushed out anything shiny in the bearing race with contact cleaner.
Then spent an hour with a bore scope and a mirror looking for anymore debris and found nothing :)
I think the bottom end is alright now, I don't think I'll have to pull the bottom end apart.

I think you guys are right about the chamfering.

My first time and I didn't know what I was aiming for and fell short.

There was lines above and below the exhaust port and one more port. It did last quite a while though and although there are marked on the cylinder, I cant feel anything at all so the cylinder is good.

Just a hone and it should be serviceable.
How much should I chamfer the port?
I think this time all I did was take the dege off and make a 1mm lip.
I started messing with a bad cylinder and I like the look of 2mm into the port and 2-3mm down the bore and then smoothed out. looks like a smooth slide into and out of the port. Just not sure if I went too much before doing that on my good cylinders.

Going to replace both pistons with a top end kit. I'll pull the head after the first heat cycle to see if there is any new marks

Also noticed my raves are really in bad shape. The center is about 4 mm away from the piston ring. But the edge of the rave is about .5mm so I'm getting new ones.


Next I'll check the ring gap.
 
Last edited by a moderator:
Gordon Jennings used to advise radiusing the port edges, and stressed there should be no burrs remaining. He said radiusing was best b/c this leaves more oil on the ring and less wiping it off by the port edges. If done right, the rings will last an eternity, much longer than the piston.

Gordon jennings I think would tear strips of crocus cluth and radius using that although he never mentioned using anything but files he heated dull red and bent in a soft jaw vice as opposed to a die grinder, he thought die grinders were too risky. I dunno, some guys claim to use a dingleball hone inside the port but I think that would leave burrs?

I suppose the important thing is the rings don't hang up in the port, obviously burrs around the edges are no-bueno.
 
Ok, I took that advice and radiused every port but moreso on the ones where the marks were like the exhaust.

Just strips of 400 grit paper at close to parallel with the cylinder wall and into the port. Basically I went until I could not feel anything that would catch my finger over each port.

Here's the result. Its that too much or too little ? I'm still learning and trying to err on the over cautious side
 

Attachments

  • 20140728_002537.jpg
    20140728_002537.jpg
    638.1 KB · Views: 26
  • 20140728_002637.jpg
    20140728_002637.jpg
    388.3 KB · Views: 24
  • 20140728_002713.jpg
    20140728_002713.jpg
    514.7 KB · Views: 24
Last edited by a moderator:
On the bottom ring, which direction should the marks go?
Up ir down.
I think the top ring has it on the bottom. So the second ring should also go down right ?
 
What about wsm rings ? I think they are the oposite ?
Im getting conflicting info on the searches.
 
Hhhmmm, I'll try to help research. I have only used OEM, but I did install a WSM kit on a 580 a while back. I thought the kit came with install instructions, but my memory is fuzzy.
 
Top ring only goes in one way and numbers are down.
Bottom ring I think can be flipped either way and still fit.
 
Last edited by a moderator:
Its odd to me that the stamping goes down, But I can't say for sure. Its worth making sure right now.

Its pretty much standard in the industry to have marks face up. No marks go either way.

Can you post picts? do they have beveled edges?
 
Yeah odd to me too.
Im away from it right now. Id look at it for a bevel next time im looking at it.

I think the last time I had them both facing the same direction which was down on the first rebuild.
 
Status
Not open for further replies.
Back
Top