Getting Old, '97 Seadoos Back in the Water

Note: This site contains eBay affiliate links for which SeaDooForum.com may be compensated
Status
Not open for further replies.
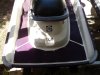
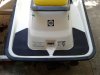
I have two 1997 Seadoos, one SPX and one GSX, and a bunch of questions. For now, I would like to know if it's possible to "recondition" the non-skid pads on the "decks" (not sure what the right word is) of the Seadoos. Both sets of pads are dry, hard but they still have some pliability. The purple pads "exfoliate" purple dust when you scrub them with a brush and Dawn dish detergent.

What I'd like to to is put a heavy layer of "something" on these pads and see if they don't soak it up and gain some pliability back. I've been looking at eBay for parts for these things and even used parts are astronomical, so if these pads aren't serviceable, I was thinking about just doing without them, or gluing some outdoor carpet instead (UGLY!). Another idea I had was to find some heavy rubber like what they use to protect the flooring in gymnasiums from the impact of heavy steal weights. Maybe 3/16" or 1/4" heavy rubber could be cut to fit.

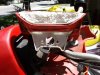
There are some small plastic fasteners that appear to hold the pads down. Are they available. I assume if the pads were to be changed-out, I'd have to drill those fasteners out. Also I wonder what's under those fasteners. Is it a possible point of entry for water, and does it need to be waterproof?


I have some other questions, but I don't want to ask without having photos to support the questions, so I'll hold off on that for now. Thanks in advance.
 

Attachments

  • GSX_Pad.jpg
    GSX_Pad.jpg
    320.7 KB · Views: 67
  • SPX_Pad.jpg
    SPX_Pad.jpg
    371.6 KB · Views: 60
Black tip or the preferred Hydro Turf brand.

There is a discount code on a sticky on this website to save you $ at checkout.

Chose your favorite color combo.

Drill out all rivets, seal holes with marine Tex or a good 2 part epoxy.
 
First, welcome to the best SeaDoo forum; lotsa good info and help here.

Read up here on cleaning out the fuel system before running them, especially if not been run in a while.
 
Read up here on cleaning out the fuel system before running them, especially if not been run in a while.


Is there a guide or something? Where do I start. I read something here a few months ago that said all the fuel lines might need to be replaced. How do I know if this applies to me?

Also, FYI I got these from a client who said he "winterized" them both before putting them in the hard and ignoring them for about 12 years. So if someone can give me a list of "things to do". I've never owned seadoos before, but I've owned a few motorcycles and can do my own car repair. These things look complicated and scary and so I'm reluctant to even touch them.

Is there an equivalent of a "Haynes" or "Chiltons" manual I can buy or illegally download?

Black tip or the preferred Hydro Turf brand.

There is a discount code on a sticky on this website to save you $ at checkout.

Chose your favorite color combo.

Drill out all rivets, seal holes with marine Tex or a good 2 part epoxy.

Can I drill the new pads and use new rivets? I kind of like the idea of "not gluing" if I can avoid it. What's underneath those rivet holes? If water gets in them, where does it go? Doesn't the plastic rivet allow water to pass? Or is filling and sanding them more cosmetic? (I can do the epoxy thing, btw. I fixed a hole in a fiberglass bathtub the size of a golf ball by pushing concrete in for structural support, and then a few days later overfilled the void with 2 part epoxy. Next day took an orbital sander and it works perfect and doesn't look too bad either. They set the tub without sand or concrete underneath to support the tub while people were standing on it. Eventually stress fractures turned into a hole. Anyways, my point is I am one with 2-part epoxy.)

I'm assuming that there is no hope to recondition these dry pads? Today I broke down and slathered a heavy layer of petroleum jelly on them. I said a few prayers and made-up some fake native american incantations. Pretended there was a Great Spirit and asked for his help.
 
Here is a quote of one of my posts in a separate thread, re old doos. Hope it helps!

-------------
On the machines that "haven't run in years", the main concerns are:
- internal corrosion in the engine (bearings, rings, pins)
- sludging/gumming of the old lubricants (oil)
- stale gas
- dry, cracked, leaking, deteriorating hoses and rubber boots etc.
- corroded electrical, crack wiring insulation, disintegrated connectors.

Looks like you did get it running. However, I would not jump on it and going out in the middle of the lake just yet! Before you put it on the water you will want to be 100% confident in the reliability and the safety of the machine. That Murphy guy is out there and sometimes it can be a long swim back to shore. It may just be my approach, but I do not like surprises when I am surrounded by water.

The basic short list on an old machine, my process, is this. Takes about 10 casual hours overall. This is the basic minimum I start with. If things are not "just right" in sound form and function afterwards, only then do I go deeper in disassembly.

- remove and toss in the spark plugs in the trash. Put new plugs in, but only a few threads. At this point they are only there to plug the holes from anything falling in.
- dump or siphon all fluids. Gas, injection oil, jet pump. Remove and thoroughly clean the tanks.
- while the tanks are out, swab and cleanup the hull interior
- Replace all fuel and oil lines (30' fuel, 10' oil). This is most important as old lines stiffen and crack from the ethanol and other additives in the fuel/oil. In the process check and clean the gas filter water separator. Replace the inline oil filter. Clean the fuel selector valve.
- Replace the battery. SLOW/trickle charge the brand new battery on low current overnight 16+hrs. Going slow on a new battery gives the longest life.
- Remove the carburater, take it completely apart. Thoroughly clean all internals. Blow through all ports and jets with carb cleaner and compressed air. Work on a dust free bench. Find and clean the carb internal fuel filter.
- While the carb is off. Select the solvent cleaner of your liking and pour at least 1 cup full through the open carb mount opening and down into the crankcase of the engine. I use a light oil - aka WD40. Some guys use transmission oil. Point is to get dissolving liquid in there to soften and work out any gumming sludges and loosen corrosion particles. Put a rag over the carb opening so nothing falls in there. Let that soak while you are working on the carb. Come back to it and turn it over by hand every 30 minutes or so (remove the rag when you turn, put it back when done).
- while the engine is still soaking ......... and occasionally hand turning.
- Remove the jet pump. Dump the oil. Pour varsol or whatever you want into the pump to dissolve and rinse out rest of the old oil and gunk. With no oil in it, dry, turn the impeller over by hand, listening and feeling for any rough spots in bearings. Replace bearings if needed. Inspect the wear ring, replace if needed. Inspect the impeller, remove and repair/replace if needed. Add new oil and reinstall the pump.
- reinstall the carb and hook up all the new fuel and oil lines. Set the throttle and choke cables travel. Put the airbox back together.
- call it a day, go have a beer while the battery finishes charging.
next day.
- install the new battery
- remove the new spark plugs
- You are going to go for a starter turnover now. Remember you have solvents liquid in the crankcase. To prevent hydrolok and damage to pistons or blowing out seals, the spark plugs MUST BE OUT. Put an old rag over the spark plug holes to catch the oil and debris (and prevent a huge mess over our shop as it shoots out). "bump/stop" the starter to turn over the engine - like 1/2 second at a time. As the cleaner oils clear through the plug holes and exhaust you can run the starter longer. When all you get is air or mist, with the starter spinning it over, now you are ready to move on to putting fire into the belly of the beast.
- half fill the oil tank and gas tank with fresh new oil and gas.
- pour 2 tablespoon of fresh gas into each spark plug hole.
- install spark plugs and hook up the plug wires
- hook up a garden hose to the cooling lines
- turn on the fuel valve
- go for a start. It will cough and spit until it has stable fuel supply. keep kicking it over and it will go.
- once started, DO NOT REV! Let it run at idle and gas it just slightly above idle. At this time it is warming and clearing of the rest of the old oil sludges particulates etc from the crankcase. If you rev it, you risk spinning out a bearing, seizing a piston ring etc before all that crap clears. Run like this for 20 minutes. All the while listening for anything that doesn't sound or feel right.
- OK it is now running smoothly and sounds great! Go ahead and gun it a few times to rev it up. it will blow alot of smoke and crap out the back at this point. Do not worry, that is normal.
- shut it down and let it cool for 15-30 minutes while you have a beer celebrating success.
- now put a compression tester on. check and hope the values are in spec range. They may be a bit low on an old sitting engine as the rings may not have loosened up yet. So as long as it is 70+% don't worry about.
- Go test on the water and play! Run it up in the water on the trailer before you untie everything and take off. Once in the water and riding, taking it easy for first 10 minutes or so, then work up to full throttle ops. After an hour of runtime, check compression again.

That's it, enjoy the summer blastin about!


You may encounter specific troubleshooting on different parts along the way through this. Keep it simple. Don't dig or disassemble any further than absolutely necessary. These 2c Rotax engines are simple and very tough and reliable. There are only a few things that could go wrong with them, and when they do it is obvious what the problem is.

Hope that Helps!
 
Manuals for research and reference:

For some reason the boards trumps the text for this link so hopefully you figure this address out. All one word.

Seadoo manuals dot net
 
Last edited by a moderator:
About the pads. They have been fairly hard and stiff right from new. So it is not clear what the problem is that you are trying to fix. Krylon, Rustoleum, and Flex-Seal make a clear no slip sprays that you could try top the pads with if you are wanting more grip. Not the sand stuff. It is like a thin nice grippy rubber. It is like the duratouch stuff.

On my old doos I was thinking of just cutting and glueing down a layer of cushy camper sleeping pad. The rolls are cheap and easy to cut. BUT then I always am wearing watersports sandals or watershoes when riding. I have plenty of grip on the doos, and my tootsies are really comfy and they are not put at risk to rocks or whatever else is down there under the water when I get bucked off or am landing or leaving shallow waters. So I ended up not dooing anything with the pads.

115.jpg
 
Last edited by a moderator:
Save your time and hassle. One word "Hydroturf"!

+1 and the hydoturf with the pre applied pressure sensitive adhesive is great to use and sticks well. Just make sure you have the area clean first. I would never try to hand make these. And I am CHEAP! Hit the easy and best button- you will not regret it.
 
Manuals for research and reference:

For some reason the boards trumps the text for this link so hopefully you figure this address out. All one word.

Seadoo manuals dot net

Thanks I'm in process of downloading all the relevent manuals. That was a REALLY useful piece of information, so thanks.

About the pads. They have been fairly hard and stiff right from new. So it is not clear what the problem is that you are trying to fix.

If you look close at the photos, you'll see a severe "ripple" on the GSX (purple) pads. It looks like that when the pad dried-out, it expanded laterally and "tented" upwards. The SPX (black) pads are less severe. but are still puckered.


Krylon, Rustoleum, and Flex-Seal make a clear no slip sprays that you could try top the pads with if you are wanting more grip. Not the sand stuff. It is like a thin nice grippy rubber. It is like the duratouch stuff.

I'm real reluctant to go too far away from factory. I've never used these, and I may want to sell them, so presenting them to a prospective buyer as close to factory original as possible is a consideration. Plus, as I imagine riding them, I would think the pad would be more comfortable to the bottom of your feet. I've ridden seadoos once, and that was 20 years ago, so I might not know what I'm talking about here.


Save your time and hassle. One word "Hydroturf"!

Again, can I drill holes in the Hydroturf (or whatever material I might use) and "re-rivet" it back down, instead of gluing? Also the Hydroturf website seems pretty limited, as I could only see the color "Black" and none of the other colors or patterns they say they sell. Maybe I'm missing something?
 
New Problem, the GSX Handlebar Pad has a Wire in it.

So today I surfed eBay and found a replacement pad for the GSX (see photo) for $30.00.

http://www.ebay.com/itm/1997-97-SEA...ash=item58ca977f66:g:hiQAAOSwHnFVxVaS&vxp=mtr

GSX Pad.jpg

So I went out into the blazing, hot, HOT heat and sweated until I got the old pad loose, just to visually verify that the old pad matches what's being sold on eBay (link above). Note the wire and the sensor thingie going through the round circle. It won't go through. So how do I remove and replace that pad?

Also what's that sensor thing?
 

Attachments

  • GSX Pad.jpg
    GSX Pad.jpg
    532.4 KB · Views: 37
You will have to either cut the wires and splice or remove the plug from the inside to feed it through the steering column.

For the pads Hydroturf are held on with adhesive. Do yourself a favor and get it with the 3M pressure sensitive adhesive already applied.
They offer any color you can imagine and it is on their website.
[MENTION=2]hfgreg[/MENTION] here will give you a discount and is great to deal with.
 
You will have to either cut the wires and splice or remove the plug from the inside to feed it through the steering column.

Thats the beeper

"buzzer"? the parts manual has a thing that looks the same called a "buzzer". Does it beep, buzz, or does it depend on the make/model/year?

2 pin connector inside of hull use this to remove pins
note location of pins in connector prior to removal

So the choice is to either buy a special tool and remove the pins inside the hull, or cut and splice the wires?
 
It is a beeper and 99% of them are bad. New ones can be bought direct from Floyd Bell part number SP-1136 $17.50.

Yes either cut or pin removal tool, or you could try magic.
 
It is a beeper and 99% of them are bad. New ones can be bought direct from Floyd Bell part number SP-1136 $17.50.

Okay so I just came back in from the hot, HOT heat after applying power and trying to start the GST, just to see what would happen.

The batteries that came with them are old and bad, so I pulled a small car battery out of our miata and connected it to the GST. Eventually I got the starter to make a medium soft "buzzing" noise. Not a buzz like a buzzer, yet not so hard and loud as when a car's starter won't engage. I didn't know what it was doing, or if it was bad and damaging something, so after 4, 2-second bursts I disconnected the battery and came here to ask what this means?

My guess is that the engine is frozen in some way, and I wonder if there is some kind of manual way to rotate the engine to break it free? Like you turn the crankshaft on a car with a socket and breaker bar.

Also, what's up with these "encrypted" keys? Are they really encrypted? What if I lose one? Do I have to match the key to something else? Is it a coincidence that both keys made the GST try to start? How many different combinations are there?

Also on batteries, is there a "type" of battery that I can search for? I thought I made a post asking about this but I guess something went wrong.
 
Yes the keys are encrypted. They are programmed to the MPEM (multi purpose electronics module). You can have several keys programmed to on MPEM so you can have multiple keys if you like. They all have different codes and all must be individually programmed. You can use a cheap wet cell battery or a much better AGM battery. Most here use AGM.

Honestly you are working on several things at once here and it is hard to follow. But first, when you put the key on the DESS post (the black knob that you connect the key to) it should beep twice out of that beeper. The gauges should also come to life. If not beep and gauges are working, then your beeper is bad. The beeper really helps you as it beeps out codes to you. You can use the info above on the factory beeper, or go to radio shack and get a 12 VDC beeper and use that. Search this forum for radio shack and you will find the part number quickly. Once you get the beeper working, then put on your key. One beep means they key is correct and it is talking to the MPEM. One beep means the key is wrong. Once you get two beeps, you should be able hit the start button and attempt to start it. Using a car battery is fine, but NEVER use a boost box or jump it from a running car (fries expensive stuff...)

Sounds like you have done some of this. To see what is up with the motor, pull the plugs and try to turn it over by hand using the rear flywheel (under that gray plastic cover). If it still will not turn over, then pull the jet pump and try again. If it still wont turn over, either your starter is bound up or you motor is locked up.
 
You will have to either cut the wires and splice or remove the plug from the inside to feed it through the steering column.

For the pads Hydroturf are held on with adhesive. Do yourself a favor and get it with the 3M pressure sensitive adhesive already applied.
They offer any color you can imagine and it is on their website.
[MENTION=2]hfgreg[/MENTION] here will give you a discount and is great to deal with.

Or you can take a hacksaw and make two small cuts at the bottom of the plastic circle, then the wires will slide right out, easy button again !
 
To see what is up with the motor, pull the plugs and try to turn it over by hand using the rear flywheel (under that gray plastic cover). If it still will not turn over, then pull the jet pump and try again. If it still wont turn over, either your starter is bound up or you motor is locked up.

I just got done doing this.

[video]https://youtu.be/mdU8nTaYLmM[/video]


I found and removed the grey cover and and removed the spark plugs, and while the crankshaft would move a few degrees (about 20) with my bare hand, I had to use a vise grip in order to spin it all the way around. During this process it felt "crunchy" like there was rust in the combustion chamber. So I spun the crankshaft without lubrication for a few turns in order to knock whatever rust might be in there, loose. Then hit both cylinders with a high-powered shop vac while rotating the crankshaft a few times. Then sprayed that NASTY Seadoo lubricant into each cylinder, about 3 seconds each and then continued spinning about 4 times all the way around. It still did not move perfectly free, but it was better than when I started. Then hooked up the battery, and the thing TURNED OVER!!!!

:hurray:

So then I got real ambitious and put the spark plugs in, just to see if the starter had enough "oomph" (technical word, there) to turn over the engine with the spark plugs in, fighting against the compression.

It also turned over this time.

However, there's an odd noise that I want to ask about, so I took a recording of the starting operation and uploaded it as a video to YouTube (see above). It's hitting the "Start" button 5 times, for about 2 seconds each time, with a 3 second pause between hitting the starter. (Note: I'm not actually trying to START the engine. I just want to know that the electrical, the starter and the mechanics of the engine are all good.)

The question is the 1/2 second time lag initial "BANG" noise of the starter engaging and when the engine actually starts to turn over. If this were a car, I would describe it as the moment when the throw-out bearing engages and when the engine turns over. It's the 1/2 second delay that consistently happened every time I hit the start button.

Is this normal?

Another thing I noticed was that when I had the vise grips on the drive shaft and I moved it clockwise and counter-clockwise, there was a bit of "play" or "slop" from one direction to the other. About 3 degrees. Not a lot, but enough to notice. Is this normal?

Other thoughts and questions:

The plugs came out black. I'll post pics of them in another post. That plus the "crunchy" noise, I wonder if this means there was serious cylinder wall/piston ring damage when these things went out-of-service in 2003. My sense is that the previous owner (a Doctor) did not use them often or hard enough to cause much damage, so I'm holding out hope that black plugs might be due to too much oil in the fuel, or something else that does not involve a major repair on the engine. (The Dr. and his family did not live on a lake and would have had to tow the Seadoos and the family at least 30 miles to the nearest lake. So a busy family might use them 10 times a year, at most. While I'm thinking about it, is there any way to estimate (or know) how many hours these Seadoos have been used?)

The buzzer did not work at all, however I did get a red light on one of the gauges when I tried to start it without the killswitch/key thing inserted.

On the "console" of the handlebars, there's a faded "title" there that says something like "Information Center" and there are two waterproof buttons. What do they do?
 
Last edited by a moderator:
Today I Drained the Old Gas

Today I took about 12 feet of 3/16 clear plastic house, reinforced the "sucker" end with some bailing wire and siphoned off about a gallon of 13 year old gasoline from the GSX fuel tank. After I was finished, I wondered if there was a "drain line" specifically for this purpose.

I've read that standard procedure to put old seadoos back into service is to pull both the gas and oil tanks and clean them. True?

Also I assume that since the gas in the tanks is 13 years old, there's 13 year old gas in the carbs and so they are going to have to get pulled and cleaned.

Am I on the right track?
 
You are on track. I did not go back and re-read all the posts. So if it was asked already, sorry.

Do you have Grey Tempo fuel lines?
 
You are on track. I did not go back and re-read all the posts. So if it was asked already, sorry.

Do you have Grey Tempo fuel lines?

I don't know, but I read a post that said that when they deteriorate they clog stuff like carburetor filters. Don't know what else is in jeopardy if I have these fuel lines. I'll have to look at them tomorrow, maybe take a picture and then compare that to a pic of the Grey Tempo fuel lines.

I assume that if I do have the Grey Tempo fuel lines, replacing them is a MUST. Also will the oil lines be Grey Tempo?
 
They clog every connection, fuel selector, ports, needles and seats within the carbs, and the filter in the carbs.

If you have them, nothing else matters until they are replaced, selector replaced, carbs rebuilt with OEM Gaskets and the needles and seats.

147.jpg


148.jpg
 
If you have them, nothing else matters until they are replaced, selector replaced, carbs rebuilt with OEM Gaskets and the needles and seats.

Besides Grey Tempo, do you know how many other possible fuel lines were used on a 1997 GSX? Is there an identifying characteristic that makes it definately Grey Tempo or not?
 
Will say Tempo on them. Back in the day, These were approved for recreational vessels by Coast Guard.
Today, Most All fuels now have ETHANNOL, and is a deteriative additive, and also acts like a water magnet.
The H2O settles/falls to bottom where the fuel tube ends are, and is first to get sucked into the fuel cycle.
Please buy Ethannol resistant fuel lines, use non-ethanol gas, use Stabil storage additive or isophropy alcohol, and Most importantly
FOG ENGINE after you use your ski!
 
Status
Not open for further replies.
Back
Top