In 97 they used only GT lines. So unless someone changed them, that's what you have.


You are using an out of date browser. It may not display this or other websites correctly.
You should upgrade or use an alternative browser.
You should upgrade or use an alternative browser.
Getting Old, '97 Seadoos Back in the Water
- Thread starter Frank_Hassa
- Start date
- Status
- Not open for further replies.
Frank_Hassa
Member
In 97 they used only GT lines. So unless someone changed them, that's what you have.
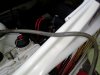
I just took a picture of the fuel line(s).
It says "TEMPO MEETS SAE J1527 R1 USCG TYPE B-1 6595 SIZE 6MM"
Are there different kinds of Tempos, some good, some bad, or is this definitely bad?
Attachments
Not in the case of Seadoos. The GT lines are all bad.
You have some work in front of you.
If you have Grey Tempo fuel lines, nothing else matters just yet. They are engine killers as they force a Lean condition and the pistons will eat themselves. You need to replace the lines, pull and rebuild the carbs and internal filters using OEM gaskets, replace the needle and seat as well as the fuel selector.
Sadly, this is a must do.
Frank_Hassa
Member
From the pictures as Coastie said those are 100% the original tempo lines. In no way do they look like they have been changes. Get them out ASAP.
Okay, given that, what's the consensus on the best replacement hoses? I've read some posts that say to just do standard rubber house like what you get at Auto Zone, but my sense is that people here are going to recommend something a little more high-end.
Last edited by a moderator:
hotrodssnova
Member
1/4 fuel line from the auto parts store. That's what I use.
Frank_Hassa
Member
From the pictures as Coastie said those are 100% the original tempo lines. In no way do they look like they have been changes. Get them out ASAP.
okay so today I took a close look at the end of the Grey Tempo hose, and I see no sign of deterioration, etc... like in the "horror pictures" i've seen posted.
Is it possible that I could simply replace the fuel lines and not tear down and rebuild the carburetors?
The readout on the "information center" says the Seadoos have about 110 hours use on them, and they haven't (based on the last registration) haven't been used since 2003. First, I wonder how common ethanol gasoline was in 2003, and how possible it is that these two Seadoos never saw any of it. And even if they did, how much use does 110 hours represent in terms of "average" (compared to everyone else). Is 110 hours "high use", "low use", or what?
How reliable is this information, btw, and with no (starter) battery, how was it (the information) stored? Is there a decomposing memory battery in some electronics somewhere, leaking?
I was hoping to get the Seadoos in the water before it gets too cold, but if I have to tear down and rebuild two sets of two carburetors, that's not going to happen, considering everything else I have to do.
Also I read that there are 6mm and 8mm hoses and there was some discussion on whether you can use "one size fits all" hosing, or if you should match the 6mm to once size and the 8mm hose to another.
Last edited by a moderator:
Frank_Hassa
Member
97 models did use the two size hoses. As you replace them one at a time, match size and length. The carbs are not that big of a project. You should be able to do them in a relatively short time.
Thanks for that. This is starting to get overwhelming, especially when I think that after I do the GSX, I have to do the SPX also.
http://www.seadooforum.com/showthre...k-in-the-Water&p=538930&viewfull=1#post538930
I put serious effort into reading FaceMan007's post about "things to do" on an old Seadoo, and have refined his post to a succinct list of things that I am going to do, in order to have some kind of big-picture "roadmap" of what's in front of me. So far, the list looks like this:
- Replace all Fuel and Oil Lines (30' fuel, 10' oil)
- Remove and Clean Carburetors, including the Carb Internal Fuel Filters
- Compression Test
- Check and Clean the gas filter water separator.
- Replace Spark Plugs
- Replace the Inline Oil Filter
- Clean the Fuel Selector Valve
- Remove and thoroughly clean the Fuel, Injection Oil and Jet Pump? Tanks
- Clean Hull Interior
As Needed:
- Replace Beeper/Buzzer
- Replace Handlebar Pad
- Replace dry, cracked, leaking, deteriorating hoses and rubber boots
- Repair/Replace corroded electrical, crack wiring insulation, disintegrated connectors.
Question:
- Remove and Service the Jet Pump?
Some Questions:
Isn't there a fuel filter that also could/should be replaced?
How necessary is it to remove and service the Jet Pump?
That sounds like a big hairy deal. Do I HAVE to do this?
I have read that some people advocate doing a complete rebuild of the carbs, rather than a cleaning. Replacing seals, gaskets, etc... Is this necessary, particularly since, at least at this point, I see no evidence of the Grey Tempo fuel lines degrading and sloughing off crud?
Also I get the general idea that the jet pump is "oil filled" and that there is a tank for it, somewhere? Intuitively I would assume a "jet pump" is being driven by the motor to pump water, so I don't understand how oil is involved. I'm confused about this, can someone please straighten me out?
Last edited by a moderator:
JJinSC
Well-Known Member
No fuel filter unless someone added an aftermarket inline filter. Just the water/separator filter.
The jet pump is your propulsion system. There is a seal/bearing in it that must be lubricated. Oil has to be replaced every so often and should be done regularly in case water gets in. The oil is in the cone on the back of the impeller. It is not hairy or a big job and there are a lot of how-Tos on this forum and YouTube videos on how to do this.
For carbs, order kits. Go through them good and clean them. replace only what needs replacing from the kits.
Frank_Hassa
Member
No fuel filter unless someone added an aftermarket inline filter. Just the water/separator filter.
Seems like adding an aftermarket inline fuel filter is a good idea. Any reason to NOT do this?
The jet pump is your propulsion system. There is a seal/bearing in it that must be lubricated. Oil has to be replaced every so often and should be done regularly in case water gets in. The oil is in the cone on the back of the impeller. It is not hairy or a big job and there are a lot of how-Tos on this forum and YouTube videos on how to do this
How often is "every so often"? The gauge readout says 110 hours and it's been 13 years since this 1997 GSX has been run. Is it time to do the jet pump oil and seal/bearing lubrication. (I interpret the above to mean that the jet pump gets serviced two ways, one is the oil, which I assume has some kind of reservoir, but I don't know if it's internal or external, like a tank, and two is the seal/bearing lubrication. I think I saw a grease fitting. Is this a simple matter of pumping fresh grease in, or is it more like a car axle bearing, where you remove the bearing and pack in grease by hand?
For carbs, order kits. Go through them good and clean them. replace only what needs replacing from the kits.
Since the whole thing is apart, why wouldn't you replace everything?
Also, what do you (and anyone else), think about my list of "Things To Do"? Is anything missing?
The list is good. The pump stuff is important, especially in 2 strokes. The nose and or rear seals seem to fail more often than the 4-tecs. When they do, water gets into the bearings and then seize. When they do, the engine stops.
soccerdad
Well-Known Member
The jet pump spins up to 7000 rpm. So it gets a lot of stress. Many here change the oil in it every season. Easy and smart. It uses synthetic marine gear oil. Mobil one has a good one. Also BRP as you would expect. The stuff stinks, but besides that a simple job. If when you drain the old oil, it is milky, you had water in there too. If you find that, post back. The fuel filter is not a bad idea and lets you see air bubbles if they are in there.
FaceDeAce
Member
Here is quoted prior other thread post on old doos. This is your todoo list.
------------------
On the machines that "haven't run in years", the main concerns are:
- internal corrosion in the engine (bearings, rings, pins)
- sludging/gumming of the old lubricants (oil)
- stale gas
- dry, cracked, leaking, deteriorating hoses and rubber boots etc.
- corroded electrical, crack wiring insulation, disintegrated connectors.
Looks like you did get it running. However, I would not jump on it and going out in the middle of the lake just yet! Before you put it on the water you will want to be 100% confident in the reliability and the safety of the machine. That Murphy guy is out there and sometimes it can be a long swim back to shore. It may just be my approach, but I do not like surprises when I am surrounded by water.
The basic short list on an old machine, my process, is this. Takes about 10 casual hours overall. This is the basic minimum I start with. If things are not "just right" in sound form and function afterwards, only then do I go deeper in disassembly.
- remove and toss in the spark plugs in the trash. Put new plugs in, but only a few threads. At this point they are only there to plug the holes from anything falling in.
- dump or siphon all fluids. Gas, injection oil, jet pump. Remove and thoroughly clean the tanks.
- while the tanks are out, swab and cleanup the hull interior
- Replace all fuel and oil lines (30' fuel, 10' oil). This is most important as old lines stiffen and crack from the ethanol and other additives in the fuel/oil. In the process check and clean the gas filter water separator. Replace the inline oil filter. Clean the fuel selector valve.
- Replace the battery. SLOW/trickle charge the brand new battery on low current overnight 16+hrs. Going slow on a new battery gives the longest life.
- Remove the carburater, take it completely apart. Thoroughly clean all internals. Blow through all ports and jets with carb cleaner and compressed air. Work on a dust free bench. Find and clean the carb internal fuel filter.
- While the carb is off. Select the solvent cleaner of your liking and pour at least 1 cup full through the open carb mount opening and down into the crankcase of the engine. I use a light oil - aka WD40. Some guys use transmission oil. Point is to get dissolving liquid in there to soften and work out any gumming sludges and loosen corrosion particles. Put a rag over the carb opening so nothing falls in there. Let that soak while you are working on the carb. Come back to it and turn it over by hand every 30 minutes or so (remove the rag when you turn, put it back when done).
- while the engine is still soaking ......... and occasionally hand turning.
- Remove the jet pump. Dump the oil. Pour varsol or whatever you want into the pump to dissolve and rinse out rest of the old oil and gunk. With no oil in it, dry, turn the impeller over by hand, listening and feeling for any rough spots in bearings. Replace bearings if needed. Inspect the wear ring, replace if needed. Inspect the impeller, remove and repair/replace if needed. Add new oil and reinstall the pump.
- reinstall the carb and hook up all the new fuel and oil lines. Set the throttle and choke cables travel. Put the airbox back together.
- call it a day, go have a beer while the battery finishes charging.
next day.
- install the new battery
- remove the new spark plugs
- You are going to go for a starter turnover now. Remember you have solvents liquid in the crankcase. To prevent hydrolok and damage to pistons or blowing out seals, the spark plugs MUST BE OUT. Put an old rag over the spark plug holes to catch the oil and debris (and prevent a huge mess over our shop as it shoots out). "bump/stop" the starter to turn over the engine - like 1/2 second at a time. As the cleaner oils clear through the plug holes and exhaust you can run the starter longer. When all you get is air or mist, with the starter spinning it over, now you are ready to move on to putting fire into the belly of the beast.
- half fill the oil tank and gas tank with fresh new oil and gas.
- pour 2 tablespoon of fresh gas into each spark plug hole.
- install spark plugs and hook up the plug wires
- hook up a garden hose to the cooling lines
- turn on the fuel valve
- go for a start. It will cough and spit until it has stable fuel supply. keep kicking it over and it will go.
- once started, DO NOT REV! Let it run at idle and gas it just slightly above idle. At this time it is warming and clearing of the rest of the old oil sludges particulates etc from the crankcase. If you rev it, you risk spinning out a bearing, seizing a piston ring etc before all that crap clears. Run like this for 20 minutes. All the while listening for anything that doesn't sound or feel right.
- OK it is now running smoothly and sounds great! Go ahead and gun it a few times to rev it up. it will blow alot of smoke and crap out the back at this point. Do not worry, that is normal.
- shut it down and let it cool for 15-30 minutes while you have a beer celebrating success.
- now put a compression tester on. check and hope the values are in spec range. They may be a bit low on an old sitting engine as the rings may not have loosened up yet. So as long as it is 70+% don't worry about.
- Go test on the water and play! Run it up in the water on the trailer before you untie everything and take off. Once in the water and riding, taking it easy for first 10 minutes or so, then work up to full throttle ops. After an hour of runtime, check compression again. It should have improved by a bunch.
That's it, enjoy the summer blastin about!
You may encounter specific troubleshooting on different parts along the way through this. Keep it simple. Don't dig or disassemble any further than absolutely necessary. These 2c Rotax engines are simple and very tough and reliable. There are only a few things that could go wrong with them, and when they do it is obvious what the problem is.
Hope that Helps!
--------------
Adding a couple points
- when running it on the trailer on a hose start the engine first then turn on the water. To shut down turn off the water first then stop the engine
- out of the water the drive shaft seal is not cooled or lubricated. To run it for an extended time as I described you need to add a drizzle of water spray somehow onto the carbon seals.
Last edited by a moderator:
Frank_Hassa
Member
It's been a while so I thought I'd do an Update.
1) I bought a new buzzer and have it "mocked up" on the GSX and get the double-beep when the lanyard is inserted. Waiting for glue-lined heat shrink to make a waterproof splice.
2) The machine starts and will run if I pour gas in the spark plug holes.
3) The VTS system seems to work, but removing the cover there was a lot of fine-powder corrosion.
4) Waiting for "Minnetonka" to get back to me via email (because his PM box here was full) on a quote for a carb rebuild kit (genuine Mikuni, with base gasket, and needles and seats.
5) Purchased a compression tester and waiting for it to arrive so I can test cylinder head compression
6) Waiting for my choice of fuel line to be "blessed" by forum members (in another thread) before buying clear blue fuel line & stainless steel clamps.
7) Waiting for replacement "Start" and "VTS" button covers to arrive via eBay.
8) Negotiating with eBay vendor for red handlebar pad. Mine is chewed and missing foam. He wants $35 for his good but not excellent condition pad, and I think it's worth $25. I'm contemplating filling in the missing styrofoam with spray-can insulation foam, cutting it to shape after it hardens and hiring the guy that recovered my seats to recover the pad also. I'm also wondering if I can mount the buzzer INSIDE the pad, instead of using the two black plastic clips that can't be used now because the Radio Shack buzzer's diameter is bigger than the broken OEM buzzer.
Someone told me the failure rate of those buzzers is "97%", and I'm thinking it's because they get wet, and they get wet because, while the electronics and wires might be water-resistant, the metal vibrating part of the buzzer itself is exposed to the water. So, it occurs to me that burying it INSIDE the foam of the pad might protect it from water and prolong it's life.
It's all torn apart now, so if it's going to be done, now is the time to do it.
Next, while I'm waiting for parts and new knowledge and direction to come in, is to pull and clean the gas tank, and the oil tank too, I guess. Not sure why, but I've read both get pulled and cleaned in this situation. Also the oil lines get replaced too, but again not sure why.
soccerdad
Well-Known Member
I wouldn't overthink the buzzer. Once changed, the RS ones work for years. Even around water. I would just get a decent new pad and go with that. Ask Nick, [MENTION=41828]Minnetonka4me[/MENTION] if he has one. He may make you a package deal with your carb stuff. I would only drain the GSX gas tank. Getting it out is impossible without pulling the motor. The oil tank will come out fine. You just need to make sure no water or crappy gas is left in the tank. And the oil tank should be cleaned just so you are sure that you have good supply of the correct oil.
With all this stuff, it is up to you what you clean or change. Use common sense and you should be good. The stuff is all 20 years old and every ski has a different history. Some are cherry and others have been abused. If you lines look great and are not brittle, then reuse them if you want. The little lines from the oil pump are known to crack,so I would replace those for sure. Most oil tanks are dirty and could have sludge in them. YMMV.
With all this stuff, it is up to you what you clean or change. Use common sense and you should be good. The stuff is all 20 years old and every ski has a different history. Some are cherry and others have been abused. If you lines look great and are not brittle, then reuse them if you want. The little lines from the oil pump are known to crack,so I would replace those for sure. Most oil tanks are dirty and could have sludge in them. YMMV.
- Status
- Not open for further replies.
Similar threads
- Replies
- 79
- Views
- 856
- Replies
- 10
- Views
- 216
- Replies
- 3
- Views
- 197
- Replies
- 0
- Views
- 116