


Windig89
New Member
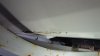
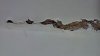
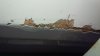
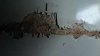
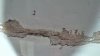
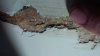
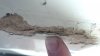
Hi All, I am in the final stages of brining a 2000 Speedster 240 EFI back to seaworthy condition, its been out of water for almost 3 years before I purchased her, it was abused a little and not maintained like I would have, but I got it for so cheap I'm happy to invest in it. All the mechanical issues have been addressed (except oil bypass, will do that next winter). The last step before launching is some Gelcote repairs that need to be addressed. I have done all the research and purchased all my supplies to complete the job using Gelcote paste. Once I got under the boat, a close up inspection of the Keel damage revealed that I might need more than a coat of Gelcote to complete the job properly. The keel looks like it was bumped a little harder than I initially thought, it looks like some of the glass has been touched.
Should I grind the loose material out with my dremel, sand with 80 grit and do a Marine-tex fix, call it a day? Or does it need some glass and then Gelcote paste to finish it off? Maybe im GTG with what I have, and should just clean up the damage and lay on the paste as originally planned? There are no holes or deep chunks missing, maybe just a layer of glass lifted.
Let me know what you think on how to proceed with this repair. I tried to get allot of different angles in the pictures as shading can drastically make the damage look worse.
Thanks
Jason
Attachments
-
 Keel damage 1.jpg100.8 KB · Views: 43
 -
 Keel damage 2.jpg91.4 KB · Views: 41
 -
 Keel damage 3.jpg110.9 KB · Views: 38
 -
 Keel damage 4.jpg134.6 KB · Views: 40
 -
 Keel damage 5.jpg141 KB · Views: 40
 -
 Keel damage 6.jpg137.9 KB · Views: 39
 -
 Keel damage 7.jpg130.2 KB · Views: 41
 -
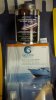 Gelcote paste.jpg199.1 KB · Views: 40
 -
 Tools for the Job.jpg105.8 KB · Views: 33