• This site contains eBay affiliate links for which Sea-Doo Forum may be compensated.

driveshaft bearing woes - '93 SPX

Status
Not open for further replies.

kmack

New Member
While doing some general winter maintenance the other day, my older 'doo appears to have some bearing issues. I was starting both Seadoos up and running fresh fuel through, but I was having problems getting my '93 SPX started and running.

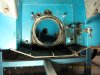
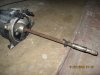
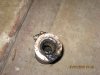
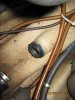
Here's what I found out (see pic). The bearing on the driveshaft (right red arrow) will only turn in one direction, the same direction as the rotation of the shaft (yellow arrow). The rubber shroud has also become separated from the hull where the shaft runs thru (left red arrow).

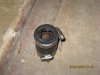
I don't think this is supposed to be correct and I think the bearing (right red arrow) is bad. Especially since it will only spin in one direction (kind of like a sprag clutch).

I have a maintenance manual for my '97 GSX and it also includes info for a '97 SPX, so I think I may be able to figure this out, but I have a few questions before I get started.

In the manual, it mentions using a shaft puller to get the shaft disconnected from the engine. Is this required, or is it possible to get them separated another way? Once I get the shaft out, how hard is it to get the old bearing off? Any tips or suggestions?

Once I have everything replaced, will I need to worry about alignment issues with the driveshaft? As long as I don't move the engine on its mounts, it should be ok, right?

How do I reconnect the rubber shroud back to the hull (left red arrow)? Is there a glue that is required?

I think that's all for the questions for now. I'm suprised that this bearing went bad because I've kept up with greasing it all last year (every other time we used the ski). But then again, stuff is still going to fail at some point.

I plan to start this work sometime in the next few weeks. I want to make sure I have time to get it fixed before riding season starts again here in S. Texas (which will be around March).

Thanks in advance for any help.
 

Attachments

  • IMG_4119-a.JPG
    IMG_4119-a.JPG
    249.9 KB · Views: 150
Do you mean the driveshaft will only turn one direction when you turn the pto flywheel by hand?

The rubber boot attached to the hull/bearing housing is only held on by the clamps and there is no sealant required here. Is the thru hull insert where the boot clamps to the hull rotaing? It's not supposed to.

You don't need a shaft puller to remove the driveshaft, just remove the pump, release the clamp on the driveshaft/pto boot and pull it out.

No, you don't have to worry about engine alignment but I would make sure your driveshaft is still true.

The driveshaft bearings fail when the seal goes out and water gets in.
 
The rubber boot and bearing (with grease zerk) both spin with the shaft when the engine is running. That can't be good.

Assuming that the drive shaft comes loose from the engine after I pull the pump & impeller, how hard will it be to slide the bearing off the shaft in order to get the shaft out thru the hull? That's my other concern.
 
If the rubber boot with the carrier and all turns with the shaft . Then the through hull piece needs replaced.
I've used pvc pipe to do this. Not sure if SeaDoo offers a repair kit though... They should..
 
Thanks for the replies. It sounds like I need to just tear it apart and rebuild the drive-line (which is what I thought). I'll plan to start this sometime this week.

If anybody has some scans of the repair manual for this year ('93 SPX), then I'd appreciate a look at them. I should be able to figure it out, though. It doesn't look hard by any stretch.

If I have anymore quetions, you'll definitely see them here! Thanks.
 
common problem on the older ski that use the bearing set up
bearing siezes to the shaft and the whole thing spins with the engine
if this happens for awhile it tears up the portion of the hull that hold the rubber tube
seadoo offers a brass piece that get glued in place
if the hull portion is still good, then just rebuild bearing carrier
if it is chewed up, you cut the nub off flush to hull and glue / epoxy the brass repair piece in , this gives you a new area to clamp hose to
i tell peoples to grease this fitting ever time you ride!!
the front fitting on the engine side / pto , onlys needs grease ever so often
good luck
mud
 
new problem...

Ok...so I have a new problem now.

I started last night pulling parts off. Got the steering linkage disconnected, pulled the rear step off (aftermarket - bolts onto the pump housing), pulled the nozzle off, then tried to get the pump housing off. No go!

I have the bottom side of the pump is loose and will pull away from the hull about 1/16". But the top portion won't break free. There looks to be some sort of black sealant that was used on it against the hull that was squeezed out the last time it was pulled off (previous owner). I've grabbed and pulled as much of that stuff off that I can get to. I've tried a little bit of pressure from a pry bar (not much at all, but some) against the bottom of the housing to see if would break free. Still nothing. Then I got a slide hammer and bolted it to the housing where the nozzle bolts on. That's how I got the bottom half to break free. But I still can't get it off.

Any tricks or ideas?

Last year I replaced the wear ring on my GSX and had no trouble pulling the pump housing off. But this one....this one has got me worried.

I pulled the intake grate off and was going to get the bottom plate off too in hopes of sliding something in between the housing and the hull. But I can't get the screws on the bottom plate to budge. And I don't want to strip the heads out. I might try an impact hammer on those screws to see if maybe they will break loose. But I know I have to be a little delicate with the hull.

This just really sucks because I've come to a stopping point just barely after I got started! If anybody has a better idea to help get this thing off, I'd love to hear it. In fact, any idea will help. If I can't use it, I may be able to adopt it somehow and maybe make something work. I'm definitely going to put this thing back together a lot different than whoever did it last time. That and I want to clean up some of the corrosion on the nozzle and pump housing.
 
Last edited by a moderator:
did you disconnect the 3 hoses on the inside of the hull that connect to the top side of the pump?

some of the pumps are difficult to remove, you can use a long prybar or 3' 2x4 and pry against the bumper rail and the nozzle but be careful you can bust the nozzle off. keep working with it, you'll get it, especially since the bottom is free.

don't mess with the intake grate if you don't have to, those bolts snap off all the time, then you have to drill and ez out them to get them out.
 
What 3 hoses? I guess I didn't. My GSX didn't have that problem. It just came off with a little nudging from a rubber mallet.

Are the connections inside the hull?
 
Yes, the older pumps have 3 connections inside the hull. The 2 clear bailer lines at the top center that are attached with zip ties and the black rubber water inlet hose on the right that is attached with a hose clamp.

Once you remove those, it will come right off. :rofl:
 
Thanks for the replies. It sounds like I need to just tear it apart and rebuild the drive-line (which is what I thought). I'll plan to start this sometime this week.

If anybody has some scans of the repair manual for this year ('93 SPX), then I'd appreciate a look at them. I should be able to figure it out, though. It doesn't look hard by any stretch.

If I have anymore quetions, you'll definitely see them here! Thanks.

Hope this Helps
 
Last edited by a moderator:
Yes, the older pumps have 3 connections inside the hull. The 2 clear bailer lines at the top center that are attached with zip ties and the black rubber water inlet hose on the right that is attached with a hose clamp.

Once you remove those, it will come right off. :rofl:

That's why this site is so great! Without this knowledge, I'd probably be hammering on this for who knows how many days! Thank you very much.

I'll see what happens tonight if I get the chance to work on it. (I have a lot of work to finish tonight)
 
Further update...

Well, I finally got the pump housing off last night. After disconnecting the 3 hoses on the inside, it seemed to move a bit more, the final culprit was some corrosion build up on one of the upper hull studs. A few whacks with the slide hammer and it came right off.

I've attached a few pictures of what it all looks like.

1st picture is of the hull. You can see the black sealant still left on the hull. This stuff was the consistency of the stuff used to glue car windshields in place!

2nd picture is of the drive shaft and what's left of what I presume to be the hull seal (it was in the rear of the rubber boot). Yes, the shaft shows some surface rust (this ski was used at the coast for its entire life until almost two years ago), but I don't have funds to get that done at this time. Maybe next winter.

3rd & 4th pictures are the carrier bearing (back and front). In the front view you can see where one of the needle bearings is gone and the bearing is shot. I think what was happening was the rear seal failed and my grease attempts didn't do a whole lot.

5th picture is the thru hull connection. Looks like part of the rubber boot melted onto the hull opening from when it started spinning with the shaft. It's hard but can be cleaned off with a razor blade.

So here I am getting ready to buy what I need. I'm planning to get the carrier bearing from the link posted above (unless someone else has had any problems with that setup). But I'm not sure what needs to be done at the thru hull opening. It looks like it can be salvaged and the rubber boot still connected, but I don't know what seal goes there.

So I'm still looking for a little bit of help in order to get this put back together. Thanks again for all the great help in getting me this far.
 

Attachments

  • IMG_4187.jpg
    IMG_4187.jpg
    542.8 KB · Views: 112
  • IMG_4188.jpg
    IMG_4188.jpg
    594.5 KB · Views: 128
  • IMG_4189.jpg
    IMG_4189.jpg
    614.6 KB · Views: 106
  • IMG_4190.jpg
    IMG_4190.jpg
    685.2 KB · Views: 108
  • IMG_4192.jpg
    IMG_4192.jpg
    298.2 KB · Views: 123
The black sealant is called "The Right Stuff" by Permatex, it's a very heavy bodied excellent sealant. You can get it at your local auto parts store but it's expensive so most people use regular silicone.

Your driveshaft looks to be in bad shape. The area where the bearing and seals rub needs to be a perfectly smooth and polished area or you'll be doing this repair again soon. I suggest buying used parts for such an old ski. It's hard to justify spending a lot money especially when there are tons of good used parts available and dirt cheap. I'm sure I have everything you need or you can find them on ebay or pwc junkyards. SeaDoo used that same setup for many years so nice freshwater parts are easy to find.

If your thru hull insert is solid and not loose, you should be able to scrape the leftover hose off and reattach a new hose. There is no seal here, the rubber boot just clamps on and the only water seal is in the bearing housing.
 
I'm gut'n a 97gtx, so if your interested, i'll sell you the complete drive assy....driveshaft, accordian boot, carbon seal, stell collar and cir-clip. Its a version used, i think it came out late 95's early/all 96 and newer. The driveshaft measures 21in, but will double-check tomorrow, if interested. pm me if so.
 
that portion on the hull ,were the bearing carier hose clamps too looks shot!
prolly gonna have to use the repair piece from brp to fix
good luck
mud
 
Well, for now I'll be using the original drive shaft. I can clean up the rust some and the shaft is still solid. I may put some anti-rust treatment also.

As for the thru-hull spot for the rubber to clamp to, it has cleaned up nicely and I have a good solid 1/4" lip to clamp the rubber to. I think it will be ok.

The ski is old and I only expect it to last a couple more years. That being said, it's hard to keep throwing big money into something I'll never get it back out of. Especially when I can do it a little cheaper and it will be just fine.

I'll keep posting when I get it all back together and running. I have to wait until next month's pay check to finish getting all my parts together, so my posts may be far between.
 
Thru-hull Replacement

It looks like the thru-hull is shot. Just from what I see in the Pics.
I've done a thru-hull replacement Myself and it wasn't that hard.
I got it from the Web somewhere, I can't remember. Only cost 10 or 15
dollars. The end that fits in the hull was knurled. I coated it with Epoxy.
I used a piece of all thread and some washers and some nuts. The all thread
was long enough to go from inside the ski and the thru-hull fitting out the
rear to the pump mount. I used a piece of 2x4 box steel that I had. I cut it
down to fit in the pump area and drilled a hole thru it. I made a long puller.
The engine was in the ski so I couldn't swing a hammer on it.
For a few bucks more it came with a carrier, Bearings and seals. The shaft
in My ski didn't look that bad. I took it to work and sandblasted it, then
chucked it in the lathe and polished the bearing and seal surface with some
440 grit followed by a green scotchbrite pad. shined like new. I painted
the rest of the shaft.
I hope Yours turns out to be as easy. Good luck!
 
Your hull fitting needs to be about 3/4 inch long for the hose to attach - less than that and you will be sinking before the trailer is in the parking space near the ramp. Good thing is the replacement fitting is easy to do, hacksaw off back to the blue segment and clean away as much frayed stuff you can, then sand the hole with 100 grit and clean out with thinner to give the new resin a chance to seal to the hull - when I did mine ip wrapped a broken broom handle with rags till it fit tight into the sleeve so all the resin I applied went into the crack between the hull and the sleeve, 2 or 3 small applications and you will be watertight again for your slowly prepared labor time, smooth the shaft the best you can and do not tighten the hull clamp so tight to make any further bearing trouble become burnt hull stub.
 
Somebody help!

hello i am new here and i am about to tackle this same job on the same ski my question is how do i get the thru hull insert (broken one)out without damaging the hull so i can install a new one my insert is broke off flush to the fiberglass any help would be appreciated!!!!!!!!!!!!!!!
 
Ok am i correct does the new insert just fit inside the old one?
That would explain alot!!!!!!!

Yes it does. You have to cut the old piece off flush with the hull and install the new insert with epoxy. The part number is 292-000-075.

Chester
 
Ok...I got my parts in. Bought the seal carrier, hull insert combo from the link above.

What epoxy/glue should I use on the hull insert? Anything specific?
 
Status
Not open for further replies.
Back
Top