mejim707
Active Member
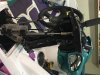
Hi, I just joined. I purchased a 96 Sea-Doo Challenger 5896 with the 787 Rotax engine a week and a half ago. Going into the purchase I knew I'd have work to do. I'm very good mechanically so this is not an issue plus I have a great garage to work on it!
So far I've done the following;
Mechanically:
Trim Cable.
Shift / Reverse Cable.
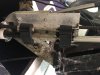
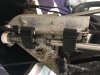
Welded exhaust pipe "plug". The previous owner used JB weld. I prefer to do things right.
Replaced Starter.
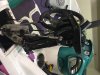
Non Mechanical:
Replaced Cup holders.
Fixed Gas Gage.
Replaced controls cap cover.
Replaced hydraulic engine bay cover support.
Fixed scupper (not mounted properly).
Other than the above the boat is clean. I took it out at the dock for a quick smoke test to work out any bugs. I found the starter needed to be replaced and the scupper was allowing water in, but not enough to become a problem. As mentioned above I replaced the starter and I fixed the Scupper. The engine seemed to run great for about 15 minutes while I safely trolled around the dock area (out of the way) testing functionality. I then docked and allowed a little time to pass checking water seals.
A few questions after reading a number of threads on this site.
1. I've read about the 2 cycle oil delivery system. I don't want to convert to premix or remove the oil pump from the magneto to test it (unless absolutely necessary). Is there a good proven way to test that the oil pump is properly delivering oil without pulling things apart? As mentioned, I was running for about 15 minutes without issue and forward / reverse propulsion at different RPMs seemed stellar.
2. How long would it take for the engine to overheat if the oil was not being delivered properly?
3. I've read about the rotary valve clearance. A few people have said they've checked the clearance. I have the gap tool for this but can someone provide assistance on the procedure to check the gap?
As of now everything else seems good. I just want to make sure before the next time I take the boat out I've fully verified the oil delivery and rotary valve clearance. Over the winter I may pull the engine to rebuild it and give the components a fresh coat of paint but I'd like to get through the season knowing that everything is in check.
Any other suggestions on things to check for a Sea-Doo noob I'd really appreciate it.
Thanks a lot in advance!
So far I've done the following;
Mechanically:
Trim Cable.
Shift / Reverse Cable.
Welded exhaust pipe "plug". The previous owner used JB weld. I prefer to do things right.
Replaced Starter.
Non Mechanical:
Replaced Cup holders.
Fixed Gas Gage.
Replaced controls cap cover.
Replaced hydraulic engine bay cover support.
Fixed scupper (not mounted properly).
Other than the above the boat is clean. I took it out at the dock for a quick smoke test to work out any bugs. I found the starter needed to be replaced and the scupper was allowing water in, but not enough to become a problem. As mentioned above I replaced the starter and I fixed the Scupper. The engine seemed to run great for about 15 minutes while I safely trolled around the dock area (out of the way) testing functionality. I then docked and allowed a little time to pass checking water seals.
A few questions after reading a number of threads on this site.
1. I've read about the 2 cycle oil delivery system. I don't want to convert to premix or remove the oil pump from the magneto to test it (unless absolutely necessary). Is there a good proven way to test that the oil pump is properly delivering oil without pulling things apart? As mentioned, I was running for about 15 minutes without issue and forward / reverse propulsion at different RPMs seemed stellar.
2. How long would it take for the engine to overheat if the oil was not being delivered properly?
3. I've read about the rotary valve clearance. A few people have said they've checked the clearance. I have the gap tool for this but can someone provide assistance on the procedure to check the gap?
As of now everything else seems good. I just want to make sure before the next time I take the boat out I've fully verified the oil delivery and rotary valve clearance. Over the winter I may pull the engine to rebuild it and give the components a fresh coat of paint but I'd like to get through the season knowing that everything is in check.
Any other suggestions on things to check for a Sea-Doo noob I'd really appreciate it.
Thanks a lot in advance!