• This site contains eBay affiliate links for which Sea-Doo Forum may be compensated.

RESTO 95 XP Partial Restore (multi topics)

Status
Not open for further replies.
That sounds a lot easier!!
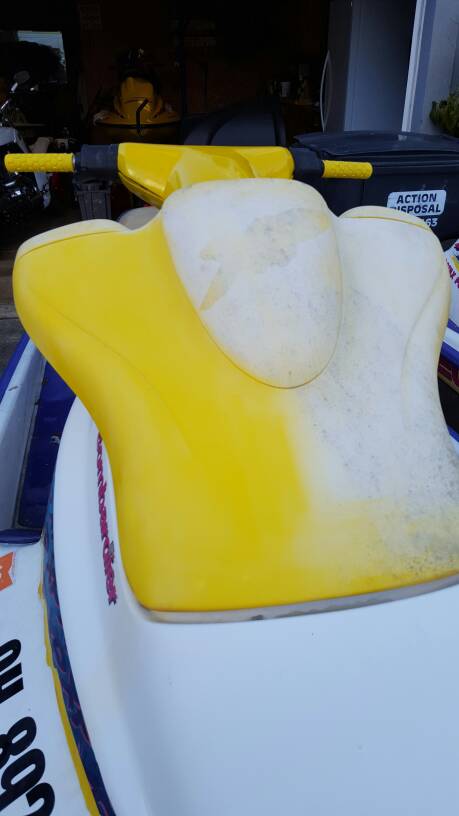
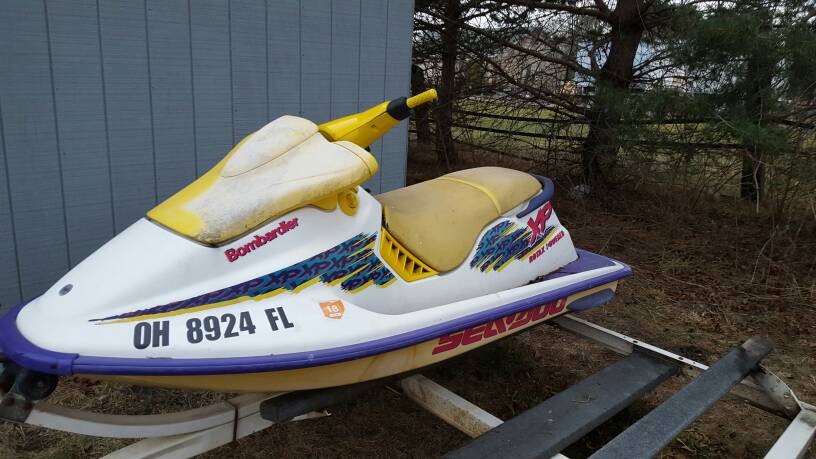
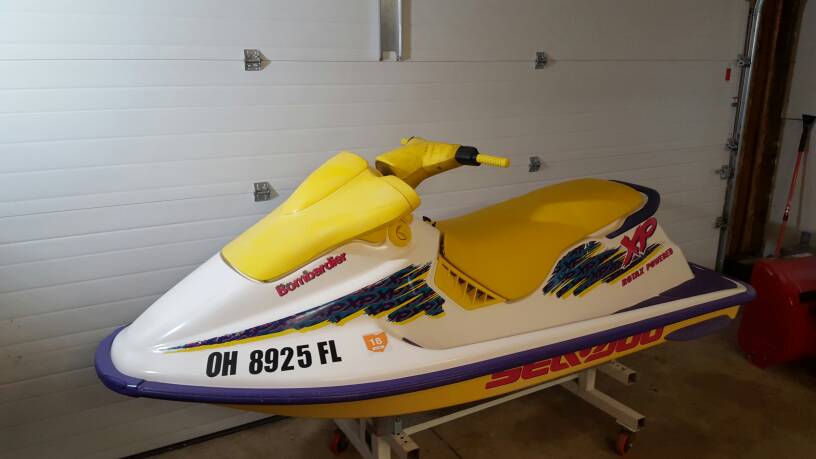
I think I'm done needing the heat gun except for the corner pieces of the bumper/trim.

I thought about pulling them off and painting them but will try to make them look better some other way before the last resort option.

That's a great link for the step by step process but none of the pictures were loading.
 
I'm working on getting custom registration numbers done.
I like the idea of matching the XP font- looks like sloppy paint brush or something like that.
Any body know the name of that font so I can tell my vinyl lady?
 
I sent him a PM- thanks!!

I can't wait until Friday evening to get home, open up all the parts in the mail and get to work!

I don't have good covers for either so I have to tie a tarp over both which takes for ever to put back on.

I've put so much into this XP already a good cover seems out of the question. I'm crossing fingers I don't have to put any money into the ZXi or these will cost me money instead of making me some.
 
Looked at Poppy covers- way out of my price range at the moment. I have so much into these skis already and I haven't really started with the ZXi yet.

I put the seat with the new cover installed and new rear handle temporarily in place to see how it looks.
The wife likes the new parts but not so much for the old, original graphics and purple bumpers anymore.
So they might be added to the list of things to do.
 
For the hood I use Mr clean magic eraser works great
419.jpg
 
Also if you just want to clean it up miguiers oxidation remover with a finish pad Is awesome I went over the grafics and everything
420.jpg
421.jpg
 
Very nice!! I'm going to try the Magic Eraser for sure.

I really like the yellow grips, too.

Not sure if I've seen the oxidation remover around here but I'll look.

I have a buddy that's going to be trading me out and will be cleaning them up for me, he might have it.
 
I ordered it on ebay it comes as a 3 part kit but what you see there is only the oxidation remover I used a Finnish pad instead of the cutting pad so it wouldn't hurt the grafics doing the vents on the side and hood took 3 magic erasers
 
I'm about to dive into rebuilding the carbs with the new kits I just got.
I thought I heard somewhere that you must paint the carbs before reinstalling them.
I'm assuming this is due to the amount of moisture in the compartment.
My question is; what kind of paint will work? Just a good quality like Krylon spray paint or something else?
 
Before reinstalling the carbs I decided to do everything else in there first.
First thing was to install my new trim motor.
No joy.
The module just clicks with the button and no juice at the wires that connect to the trim motor.
After reading a bunch of posts about this on this forum, it seems like I just need to buy a new one.
I'm posting in the classified section for this. Hopefully somebody has a good deal on one that will fit.
I noticed several different sizes and shapes when looking on eBay.
The "Trim-Fix" looks a little hokey to trust.
 
You don't need to paint the carbs. Just do them one at a time and take your time. Many guys have used the trim fix or the DEI 451 relay trick with an automatic resetting fuse/circuit breaker with no problems. I prefer a working VTS unit. You might want to hold off to make sure she checks out 100% legit on the water before getting the VTS module, on account of tha toil line being broken off. Have you done a compression test yet?
 
Oh, and wipe that bar pad down with alcohol or lacquer thinner. Forgot to shoot you a PM back.
 
I just spent the last 3 hours cleaning out the gunk out of the bottom. Nasty stuff- where does it come from? Looks old.

I have not done a compression test yet on it or a pop off test for the carbs. I need to find all the parts to make the pop off tester but I do have a compression tester.

I was reading other's posts about changing oil lines and now I'm worried about the 2 big lines that go each side and under the motor to where you can't see. I never read a definitive answer if I need to change those or not. Mine look and feel good but I'm sure they're original. I did change the smaller single line and it's filter.

I changed the very small lines and used zip ties to hold them in.

Now I just have to figure out how to bleed them. The posts I read are for different motors, not the 717.

I want to see what kind of deal I can get on an actual vts module before diving into the trim-fix or the relay trick.
 
Last edited by a moderator:
Updated list:


So far my tune up list includes:
Change all fuel lines Done
Change all oil lines & filter 1/2 way there- need to bleed and verify if big lines need changed
Grease everything- cables, drive shaft splines, etc.
Clean carbs inside and out & fuel selector thingy cleaned, rebuilt and replaced
Check impeller, wear ring checked, seems fine
VTS doesn't work currently but will see if repair is needed after first water test where's the little banging head against wall animation?
Clean/spray all electrical connections

Cosmetic list includes:
Replace foot pads, grips, handle bar cover, controls, splash guard grips and controls done, rest later
Paint all yellow components (if I could just figure out how to take hood off with all the electrical in the way...) still working on it
Clean & wax remaining last step
Replace seat cover (have seat cover, waiting on upholstery guy) done
Possibly paint all purple items (rear handle, bumpers) Krylon Plastic Paint doesn't have a good purple. bumpers only purple thing left and haven't made up my mind about painting them yet. Not sure how durable the paint will be
Order hull numbers with fancy font and install still trying to find a good font
 
copy and pasted from one of Dr. Honda's posts:


OK... so after you change the hoses, and filter... bleed the system as outlined in the manual.

1) Open the screw on the face of the pump to let oil flow down the main hose, and fill the filter.
2) start the engine, and hold the pump arm to "Full".
3) watch the oil pulse up the small hoses. It will alternate, and it should pulse about 1/8" each time. When full... shut off the engine. (done)

Note: Most of the time, you don't need to hook up water. You can normally fill the small hoses in about 10 to 15 seconds. Hold the pump arm open while starting, so you start bleeding as soon as it fires.
.


My question after this is:

I haven't reinstalled the carbs yet so they won't be in the way of other things I need to do first.
It sounds like the ski needs to be able to start and run (for the 10 to 15 seconds) to prime the lines with oil but can you not just bump the starter for about 5 seconds, wait a minute then bump again until the lines are filled?
It seems like the above process of holding pump arm to "full" and opening the screw would be easier to do without the carbs installed.
I already have oil filled up in the new line including the filter down to the pump.
Also it seems like 1/2 of both little lines are filled already. Gravity? Or is that a symptom of a problem?
 
Last edited by a moderator:
Went ahead and installed the carbs and inline fuel filter (I like adding these to all my machines to help diagnose no starts in the future).
I got it fired up pretty easily and let it idle for a couple of seconds. I'm actually surprised the carb settings were ok. I used the original needle spring and didn't mess with any of the other adjustments.
Pulled the plugs and did a compression test.
Both cylinders were at 130 psi. Can't remember what it's supposed to be.
Installed new plugs (took a little while to get that small gap just right-either too little or too much. Never had a plug needing that small of a gap before!).
I was able to bleed the small oil lines by reaching down and around the carbs to the oil pump and turned it full on while idling until fully bled and then another couple of seconds. Easier than I thought it would be.
I changed the pump oil and greased the drive shaft.
I inspected the wear ring after starting it a few times and no rubbing so I think I'm good there.
I need a new VTS module before I take it on the water (I don't want to do that install twice).
Should there be anything between the carbs and the air box (like a gasket or sealant)?
Anything else I might be missing/not thinking about before hitting the water for a test run? -Yes I double checked my drain plug.
 
Status
Not open for further replies.
Back
Top