


-
This site contains eBay affiliate links for which Sea-Doo Forum may be compensated.
You are using an out of date browser. It may not display this or other websites correctly.
You should upgrade or use an alternative browser.
You should upgrade or use an alternative browser.
2005 RXT SC rebuild project
- Thread starter Eodbru
- Start date
- Status
- Not open for further replies.
Tytan
Active Member
Michael211_2000
Well-Known Member
Blue thread lock the acorn nut on the impeller side, but RED threadlock the open nut on the other end where the gear and washers are though! You do not want that nut coming loose on it's own no matter what! If you ever need to take it off again just use a hand held torch to heat the nut up some that will release the red loctite for you. I've done it it works well.
No hammering on the new bearings and make sure to put them in oriented correctly (the instructions specify, but it helps to carefully note how they are oriented when you push the original shaft assembly out of the housing). In fact, I'd recommend (and I practiced on mine!) laying out all the old parts in a line in the order and orientation you take them out of the housing and use that as a guide to help you put the new assembly together!
Unfortunately, my 1st SC rebuild attempt failed today... gorgeous weather here in Texas this weekend, after 2 hours of run time on the rebuild last weekend I decided I better check it before pulling my RXT up to the lake this morning and what do I find but an easy to spin impeller! Crap!
Pull it out, fun fun... everything is there, the 2 main bearings still feel good but it's clear the drive gear has no resistance and is a little loose on the shaft. For some reason, all the little roller bearings inside the gear burned up I do not yet understand why I can feel they are oily... all 40 roller bearings are accounted for though, a little smaller in diameter than they started out when new... so nothing fell loose into my engine at least!
So that's why I'm on here right now, about to ask for thoughts on this development. The thing had good pull-test before I put it back into the engine... not sure what happened really. Just glad all the parts are still present and accounted for! Now what do I do though? Grrrr!
- Michael
Michael211_2000
Well-Known Member
You know, just thinking about the burned up needle roller bearings they came in a plastic ring that held all 40 bearings exactly as they went onto the shaft and the instructions that came with my kit said to push the bearings and plastic ring onto the main drive gear and it would push the plastic off the bearings as they go into the gear... it never made any mention of lubing these needle roller bearings, I assumed they came with lube already in them in the plastic carrier thingy they came in.
Now I'm wondering if there really wasn't any lube in them and that allowed them to burn up? But I'd have thought the oiler tube that squirts engine oil into the end of the SC shaft would have gotten oil to the needle roller bearings in very short order? I can feel engine oil inside the drive gear where the bearings were (it's all apart on an old white towel now so I could count all the bearings). Hmmm.... I'm confused.
But do take note in your kits instructions if it says anything about pre-lubing those little roller needle bearings that go inside the main gear!
Previously at 56 hours (when I bought this RXT and fixed the engine in it) I replaced the OE ceramic slip washers with upgraded metal washers and re-used all the little needle bearings packing them with a little grease (molly-lube engine assembly grease actually) by fingertip inside the drive gear before putting it onto the shaft, and they were still in like new condition when I rebuilt my SC at 95 hours. So I can only imagine that lack of lube burned these new ones up before engine oil could make it's way into them, perhaps? Either that or this new shaft isn't letting engine oil get into the main drive gear... gonna go see if I can find a way to verify that the hole in the end really goes all the way to the hole in the shaft where the main drive gear rides now!
- Michael
Michael211_2000
Well-Known Member
I tightened the impeller's acorn nut 1st, which was as per the order of the instructions.
I confirmed this morning with an led flashlight that the oiler hole thru the center of the kit shaft does indeed go to the hole in the side of the shaft where the needle bearings rode inside the drive gear so they should have been able to get lubed by engine oil (but maybe not immediately, as they'd have to be turning on the shaft for oil to get into them?). I'm guessing they burned up before engine oil could get in to them enough to lube all of them? The needles were oily when I took this all back apart during the "autopsy" Saturday.
Something else I notice that's strange, putting all the kit parts back together on the SC shaft this morning I hand tightened the end nut to snug and cannot turn the drive gear easily now... but Saturday upon pulling the SC out of the engine I immediately noticed how the drive gear was loose (though no gap between the slip washers and the drive gear) and could be easily spun by fingertip, even though the spring washers were too tight to turn and the end nut was exactly where it was supposed to be (ie. plenty of threads sticking out the end). So why was that drive gear loose Saturday with the end nut on tight and spring washers clearly too tight to turn by hand, but today with the end nut just hand tightened (ie. no threads at all showing out the end) the drive gear will barely slip at all? Weird, this is!
I'm befuddled, to say the least.
- Michael
Michael211_2000
Well-Known Member
ps. Eodbru I only bring my situation up in your thread because maybe you'll glean some insight into how the SC works and the potential pitfalls the darned things pose... I got off light, no SC parts were shed into my engine. But with all the care and attention to detail I put into installing this rebuild kit I just cannot begin to figure what went wrong. I'm pretty convinced the needle bearings inside the SC drive gear burned up 1st and foremost, that they didn't come pre-lubed and the instructions failed to mention this! But, IDK anything for certain honestly.
Regards!
- Michael
Regards!
- Michael
Tytan
Active Member
I tightened the impeller's acorn nut 1st, which was as per the order of the instructions.
I confirmed this morning with an led flashlight that the oiler hole thru the center of the kit shaft does indeed go to the hole in the side of the shaft where the needle bearings rode inside the drive gear so they should have been able to get lubed by engine oil (but maybe not immediately, as they'd have to be turning on the shaft for oil to get into them?). I'm guessing they burned up before engine oil could get in to them enough to lube all of them? The needles were oily when I took this all back apart during the "autopsy" Saturday.
Something else I notice that's strange, putting all the kit parts back together on the SC shaft this morning I hand tightened the end nut to snug and cannot turn the drive gear easily now... but Saturday upon pulling the SC out of the engine I immediately noticed how the drive gear was loose (though no gap between the slip washers and the drive gear) and could be easily spun by fingertip, even though the spring washers were too tight to turn and the end nut was exactly where it was supposed to be (ie. plenty of threads sticking out the end). So why was that drive gear loose Saturday with the end nut on tight and spring washers clearly too tight to turn by hand, but today with the end nut just hand tightened (ie. no threads at all showing out the end) the drive gear will barely slip at all? Weird, this is!
I'm befuddled, to say the least.
- Michael
There are two different oiling systems for the superchargers, 08 and newer have the oil feed positioned so it squirts oil down the center of the S/C shaft and the oil is then flung out between the gear and the washers providing postive lubrication to the needle bearings and slip washers. The older system has a sprayer that squirts oil on the exterior of the gear and washers but does not provide great oil flow to the needle bearings. All of the S/C rebuild kits have the hollow shaft so they can be used on any model.
Yours being an 06 has the older set up so if the needle bearings were not lubed on install this may have caused the problem. The older models can be retrofitted with the 08 oiler system the rear PTO has to come off which can be done in the hull but it's a PITA and much easier done with the engine out.
The drag is caused by tightening the nut on the shaft to compress the thrust washers (the clutch). The roller bearing under the gear have nothing to do with the drag unless they seize up so the gear can not rotate on the shaft when it has to. See picture below
The way the clutch works is the thrust washers are springs. When you compress the spring it squeezes the gear between the collar the gear is on the and the ring between the gear and the washers (see picture). The reason they use spring washers is as the parts wear, the change in dimensions will have less effect on the torque. The clutch has two functions- one is to slip during sudden changes in speed such as your machine comes out of the water when you jump a wake so you do not damage the supercharger. The other function is it should not slip during normal running. This is why they tell you to check both the torque it should slip at as well as the torque it should not slip at after you rebuild it.
Some reasons why this could slip-
If it slipped after being run- One of the shaft end nuts maybe did not have thread locker on it or there was oil on it when the thread locker was applied so it did not work. If the impeller nut loosens the shaft can slide in causing the pre-load on the washers to be lost. If the nut on the gear end loosens it causes the "L-ring" (next to nut on gear end) to slide back loosening the pre-load on the washers. Less pre-load means it slips easier. Or there was insufficient oil on the discs causing the discs and gear to wear (not likely).
If is slipped prior to running- For some reason when you assembled it the stack up on components from the collar the gear rides on through the impeller was not tight. The shaft moved allowing the collar to slide loosening the pre-load on the washers.
Was the nut tight when you initially tried to remove it?
Does the orientation and number of thrust washers agree with the picture?
Hope this helps
Last edited by a moderator:
Michael211_2000
Well-Known Member
Well that's something I did not know, Tytan! My original shaft also has the same hole thru the center and another hole where the drive gear bearings were located though... I'm going to stick a mirror down there and see if I can get a look inside the SC hole in the engine, see what's is or is not in there. Will tell you what I find tomorrow sometime.
Thanks.
- Michael
Thanks.
- Michael
Last edited by a moderator:
Michael211_2000
Well-Known Member
dcm0123,
I did the slip test with a torque wrench before I installed the SC though... and it fell well within specs! What's confusing is that when I removed it last Saturday the drive gear would spin easily it was like it had no pressure on it at all, though the spring washers were compressed and I specifically tried to rotate them by fingers and they were tight. BOTH nuts had loctite on them, red on the open-end nut and blue on the acorn nut... and both nuts were good and TIGHT Saturday after removing the SC! I had to heat the open-end nut to release the red loctite in fact. Here is a pic of it all together, taken just after I'd pulled it out of the engine Saturday, showing clearly the compressed spring washers and threads exposed beyond the open-ended nut:

In that pic, I could spin the drive gear easily and could tell it had needle bearings in it still but lots of slop on the shaft. I could not rotate the spring washers though, they were tight. What was holding the tension off the slip washers and drive gear, I do not know.
Today when I put the open-end nut back on and tightened it up by finger pressure I was surprised to find I could not easily turn the drive gear (with all the parts back on and in correct order again).
I'm leaning towards the apparent fact that the needle bearings did not come pre-lubed in their plastic carrier, and the instructions in this kit did not make any mention of lubing them but instead instructed to install the needle bearings using their plastic case (hard to explain it, but following the instructions I never once touched any of the needle bearings and they were never exposed so I could have put lube on them... the plastic case parts pushed off as the bearings were pushed into the gear and then onto the shaft). I think they burned up as a result... I think, at least, that's what caused the failure of my 1st SC rebuild attempt.
Thanks and I appreciate the ideas! If you see anything wrong in my pic please let me know!
- Michael
I did the slip test with a torque wrench before I installed the SC though... and it fell well within specs! What's confusing is that when I removed it last Saturday the drive gear would spin easily it was like it had no pressure on it at all, though the spring washers were compressed and I specifically tried to rotate them by fingers and they were tight. BOTH nuts had loctite on them, red on the open-end nut and blue on the acorn nut... and both nuts were good and TIGHT Saturday after removing the SC! I had to heat the open-end nut to release the red loctite in fact. Here is a pic of it all together, taken just after I'd pulled it out of the engine Saturday, showing clearly the compressed spring washers and threads exposed beyond the open-ended nut:
In that pic, I could spin the drive gear easily and could tell it had needle bearings in it still but lots of slop on the shaft. I could not rotate the spring washers though, they were tight. What was holding the tension off the slip washers and drive gear, I do not know.
Today when I put the open-end nut back on and tightened it up by finger pressure I was surprised to find I could not easily turn the drive gear (with all the parts back on and in correct order again).
I'm leaning towards the apparent fact that the needle bearings did not come pre-lubed in their plastic carrier, and the instructions in this kit did not make any mention of lubing them but instead instructed to install the needle bearings using their plastic case (hard to explain it, but following the instructions I never once touched any of the needle bearings and they were never exposed so I could have put lube on them... the plastic case parts pushed off as the bearings were pushed into the gear and then onto the shaft). I think they burned up as a result... I think, at least, that's what caused the failure of my 1st SC rebuild attempt.
Thanks and I appreciate the ideas! If you see anything wrong in my pic please let me know!
- Michael
AircraftDoc
Active Member
I just bought the brand new latest for both of my skis after a failed rebuild. Plus the newer ones go two hundred hours.
Tytan
Active Member
dcm0123,
I did the slip test with a torque wrench before I installed the SC though... and it fell well within specs! What's confusing is that when I removed it last Saturday the drive gear would spin easily it was like it had no pressure on it at all, though the spring washers were compressed and I specifically tried to rotate them by fingers and they were tight. BOTH nuts had loctite on them, red on the open-end nut and blue on the acorn nut... and both nuts were good and TIGHT Saturday after removing the SC! I had to heat the open-end nut to release the red loctite in fact. Here is a pic of it all together, taken just after I'd pulled it out of the engine Saturday, showing clearly the compressed spring washers and threads exposed beyond the open-ended nut:
View attachment 32985
In that pic, I could spin the drive gear easily and could tell it had needle bearings in it still but lots of slop on the shaft. I could not rotate the spring washers though, they were tight. What was holding the tension off the slip washers and drive gear, I do not know.
Today when I put the open-end nut back on and tightened it up by finger pressure I was surprised to find I could not easily turn the drive gear (with all the parts back on and in correct order again).
I'm leaning towards the apparent fact that the needle bearings did not come pre-lubed in their plastic carrier, and the instructions in this kit did not make any mention of lubing them but instead instructed to install the needle bearings using their plastic case (hard to explain it, but following the instructions I never once touched any of the needle bearings and they were never exposed so I could have put lube on them... the plastic case parts pushed off as the bearings were pushed into the gear and then onto the shaft). I think they burned up as a result... I think, at least, that's what caused the failure of my 1st SC rebuild attempt.
Thanks and I appreciate the ideas! If you see anything wrong in my pic please let me know!
- Michael
Did you use a BRP kit or aftermarket ?
Those clutch washers being gold coloured are either aftermarket or an old stock BRP kit the new kits have dark gray washers.
Michael211_2000
Well-Known Member
Aftermarket. Had SeaDoo OEM printed all over the packaging but pretty sure that was a lie. The main bearings in it were double-shielded (ie. shielded on both sides of the bearing), and after doing some reading about the bearing specs I tossed them and got a new set of BRP OEM bearings instead (which are shielded on 1 side only). Strangely the new spacer sleeve didn't fit over the new shaft, so since it's just a spacer and not a wear item I re-used my original spacer sleeve which fit the new shaft like a glove. Weird that!
The clutch washers look silver to me?
Now on my original shaft it took a slightly larger inner-diameter washer on 1 side of the gear and a slightly smaller sized inner-diameter washer on the other side (easy to screw up if you weren't looking for the slight difference between the washers)... but on this new shaft with new washers, it made no difference I checked and both washers were identical even their inner-diameters and the shaft didn't care which washer went on which side of the drive gear. I assumed this was a design change to prevent users from accidentally installing the washers in the wrong order which would be a major mistake easy to make. IDK.
- Michael
Michael211_2000
Well-Known Member
I just bought the brand new latest for both of my skis after a failed rebuild. Plus the newer ones go two hundred hours.
Yeah but I've read that's just an arbitrary decision that was made and has nothing to do with any design change or change in materials in the kits themselves. I've read some rebuilders still insist they need to be rebuilt every 100 hrs even with these newest kits. IDK.
You have my RXT!
")
Uhhm, since looks like I may be in the market for another SC kit, where did you get yours from? How was the parts fit and instructions in the kits? How long have you run them so far?
- Michael
Michael211_2000
Well-Known Member
Yep you are right Tytan... took pics of mine, and there's no oiler tube to be seen just gears mostly. Makes me wonder though why my original SC shaft was drilled and ported as if for an oiler tube to squirt oil into the end of it.... another weird thing for me to ponder I suppose! LOL!

I agree, I don't want to pull the PTO unit off the end of the engine just to add that squirter tube. However if I ever do have to pull the engine out for any reason that will be something I'll take care of adding! And put stronger PTO bolts on the flywheel too I think.
Now, for those SC kits (and new X-Chargers) which claim 200 hrs between rebuilds, I wonder if the lack of that oiler tube on the pre-2008 models should affect that 200 hr number???
So anyhow, I'm pretty well convinced that no lube on the needle bearings resulted in them rapidly burning up, and thus my SC rebuild failed ludicrously fast (but at least it didn't harm my engine, so I have that to be thankful for!). And I'm learning ever more about these SC's and how to rebuild them... you only learn by doing, and the more you know the more you know.
Thinking I want to kit it again, and this time I won't follow the directions on the needle bearings install and will take the things out of their plastic container and apply lube to them as I install the little buggers 1 by 1 into the drive gear by hand! I think I'd be enjoying my SeaDoo instead of ordering parts and working on it had I put the needle bearings in the old fashioned way to begin with... arghhh!
And this gorgeous weather we're having in Texas right now is just mocking me I swear! LOL!
Thanks!
- Michael
There are two different oiling systems for the superchargers, 08 and newer have the oil feed positioned so it squirts oil down the center of the S/C shaft and the oil is then flung out between the gear and the washers providing postive lubrication to the needle bearings and slip washers. The older system has a sprayer that squirts oil on the exterior of the gear and washers but does not provide great oil flow to the needle bearings. All of the S/C rebuild kits have the hollow shaft so they can be used on any model.
Yours being an 06 has the older set up so if the needle bearings were not lubed on install this may have caused the problem. The older models can be retrofitted with the 08 oiler system the rear PTO has to come off which can be done in the hull but it's a PITA and much easier done with the engine out.
Last edited by a moderator:
Tytan
Active Member
Hearing about double shielded bearings and pieces not fitting correctly confirms my belief that the extra few dollars for an oem kit is money well spent.
I just rebuilt a supercharger on a friends ski with an oem kit it went together with no problems and the slip was right where it should be first time no messing with shims or re arranging spring washers.
I just rebuilt a supercharger on a friends ski with an oem kit it went together with no problems and the slip was right where it should be first time no messing with shims or re arranging spring washers.
Michael211_2000
Well-Known Member
Yeah well, as I said I thought that was what I had ordered and received... marketing is deceptive, anybody can print "SeaDoo OEM" on their packing I suppose. :-\
However I believe that had I put the needle bearings in by hand manually lubing them as I went (instead of pushing them into the gear and then onto the shaft in their plastic packing thingy as per the instructions) it wouldn't have failed. The instructions were just plain wrong, for my year model without the oil squirter tube thingy inside the pto. :-\
The slip was right on this one too, before I installed it into my engine. I tested it with my torque wrench and the little tool that holds the drive gear stationary. I checked (the night I completed assembly in my living room) and double checked it the next morning before installing, it was good.
With that said, have you checked your friend's ski to verify it's still right after a few hours of operation Tytan??? Proof is in the pudding as they say... I did not expect to find mine spinning freely after 2 hours of operation either! :-(
I believe the instructions specify after 5 hours of operation you need to repeat the slip test and adjust if necessary (to adjust would mean pulling the SC out of the engine again of course), as the parts break-in the slip level may decrease.
- Michael
AircraftDoc
Active Member
Yeah but I've read that's just an arbitrary decision that was made and has nothing to do with any design change or change in materials in the kits themselves. I've read some rebuilders still insist they need to be rebuilt every 100 hrs even with these newest kits. IDK.
You have my RXT!
Uhhm, since looks like I may be in the market for another SC kit, where did you get yours from? How was the parts fit and instructions in the kits? How long have you run them so far?
The latest is heavier duty. Newer oil port, upgraded shaft and housing. I beat my local dealer down to Internet prices plus taxes. $775. Fit nice and tight. I pre oiled before installed and blue loctite a must. Hours of worry free riding, 40 hrs so far. Stay below 5,000 rpms for an hour for a little break in time.
Doc
Michael
I still believe the rollers under the gear can not result in a free spinning gear. If anything they will seize up and prevent the gear from spinning free. If the rollers were missing the gear would be off center but the clutch would still work right because it pushes on the face of the gear.
I also can not tell exactly what is going on in your picture so I want to ask you a few more questions which may help-
1) Are you spinning the gear or the impeller?
2) When you try to rotate the gear, does the spring washers and the thick washer it pushes against the gear spin with the gear or are they stationary when the gear spins?
3) Can you see if the washers are compressed?
If the washers are compressed and the gear spins but the washers do not, then something is preventing the thick washer from pressing on the gear or the thickness of the gear is less than it should be. If the thick washer bottoms out against the collar the gear is on before it pushes on the gear, then the gear will spin freely because the washer can not compress it.
If the washers and gear spin together, I would look at the impeller to make sure the nut on the impeller end spins with the impeller. If the nut does not spin with the impeller, then the impeller is loose on the shaft which is more complex to explain so I will wait to hear if this is the issue.
I would also double check each of the 5 washers to make sure they are facing the right way (compare to the picture in my earlier post) because my recollection was when I compressed mine there were no gaps showing between them. Your picture shows 2 gaps (I rebuilt mine about 2 months ago so my memory may be wrong).
Good luck with your new kit but let us know if you figure out what was wrong with the original.
Last edited by a moderator:
Michael211_2000
Well-Known Member
#1, it was the drive gear I could spin (once I removed the SC from the engine, of course). When it was in the engine that morning I could spin the impeller, which was why I pulled the SC out of the engine to find out what had happened! The impeller end is still tight the acorn nut is blue thread-locked in place still.
#2, I was unable to turn the spring washers they were definitely compressed still and tight! The clutch/slip washers could however be turned easily by fingertips the same as the drive gear... but there was no gap between any of those parts, there was just no pressure on them.
#3, I've since taken the end nut off (and yes, it was still very tight the red loctite hadn't let go I had to warm it up with a hand torch before I could get the nut loose!). I took the pic of it before I took the end nut loose however in case there was any question of whether I had the parts on it in correct order/orientation. The spring washers were still compressed then, they could not be rotated by hand, even though the drive gear and clutch/slip washers could be rotated by hand. And no, it was NOT like that before I put it into the engine, I did the slip-test with a torque wrench on my bench and it was fine then!
I theorize that grit being worn off the needle bearings must have built up in the assembly somewhere and taken the spring washer load off the clutch/slip washers and drive gear. I must have cleared the grit when I disassembled it to check the status of the needle bearings and count them! Reassembled again but only finger tightening the end nut, the drive gear no longer spins easily by fingertip... so something that was preventing the spring washers from applying pressure to the gear is no longer in the way.
The gaps you can see in the spring washers in my pic, are like 1/2 the gap of them uncompressed held between my finger tips (ergo, they weren't uncompressed, though clearly weren't holding as much pressure as they did when I did the slip test on the SC before installing it into my engine). Of course, now there is also wear on the side of the drive gear and clutch/slip washers from spinning.
Clearly the SC did NOT lock-up, all 40 needle bearings are there I've counted them... they are very worn down though, I'd estimate at least 1/4 of their diameter is just gone! I re-assembled them into the old/original drive gear I had kept in storage, and they no longer fill it up (there is gap on the inside of the original drive gear, with all 40 of these needle bearings put inside of it... so I know they've worn down significantly). Definite sign of lack of lubrication. Arghhh!
I think after all this, that if I had lubed the needle bearings and installed them by hand the old fashioned way (instead of following the directions, which made no mention of needing to lube the needle bearings), this failure would not have occurred. I know that as soon as I get new parts to go into the SC, I WILL install the new needle bearings individually by hand and rub some Molly Lube into them!!!
ps. I replaced the original ceramic clutch/slip washers with upgraded steel washers back at 56 hours in 2009 (I think it was) when I 1st bought this SeaDoo used, and I re-used the original needle bearings then (which of course fell right out of the original drive gear when I took it off the shaft to replace the ceramic washers; I put them back into the gear with a dab of Molly Lube to keep them in place at the time)... at 96 hours last month, those original needle bearings were still like brand new as were the steel clutch/slip washers and sides of the original drive gear! Thus I have had the gear end of this SC apart before and was completely successful at replacing the ceramic washers with upgraded steel washers... ergo this wasn't really my 1st rodeo, just my 1st try with a full rebuild kit including the main bearings seal and shaft replacement!
- Michael
Michael211_2000
Well-Known Member
Good luck take your time and triple check EVERYTHING! Take pics before you disassemble the original SC parts, then lay the old parts out in the order they come off the shaft... once you get the shaft pushed out of the SC housing put the old parts back on it in the correct order, so as to have it available for reference as you put the new parts together!
And for Pete's Sake ignore the instructions on those needle bearings... get them out of that plastic carrier they come in (use a large white towel on your work bench to insure none get lost!) and put them into the new drive gear by hand with a dab of lube (I prefer Molly Lube, an engine assembly grease) on them to keep them in place! I don't believe they have any lube on them in that plastic container they come it and that's a big problem on our pre-2008 engines apparently! They need lube!
I see a Riva Racing sticker in your kit, does that mean you ordered this kit from the Riva website?
Regards!
ps. Check YouTube there are several videos posted there that may be helpful as well.
- Michael
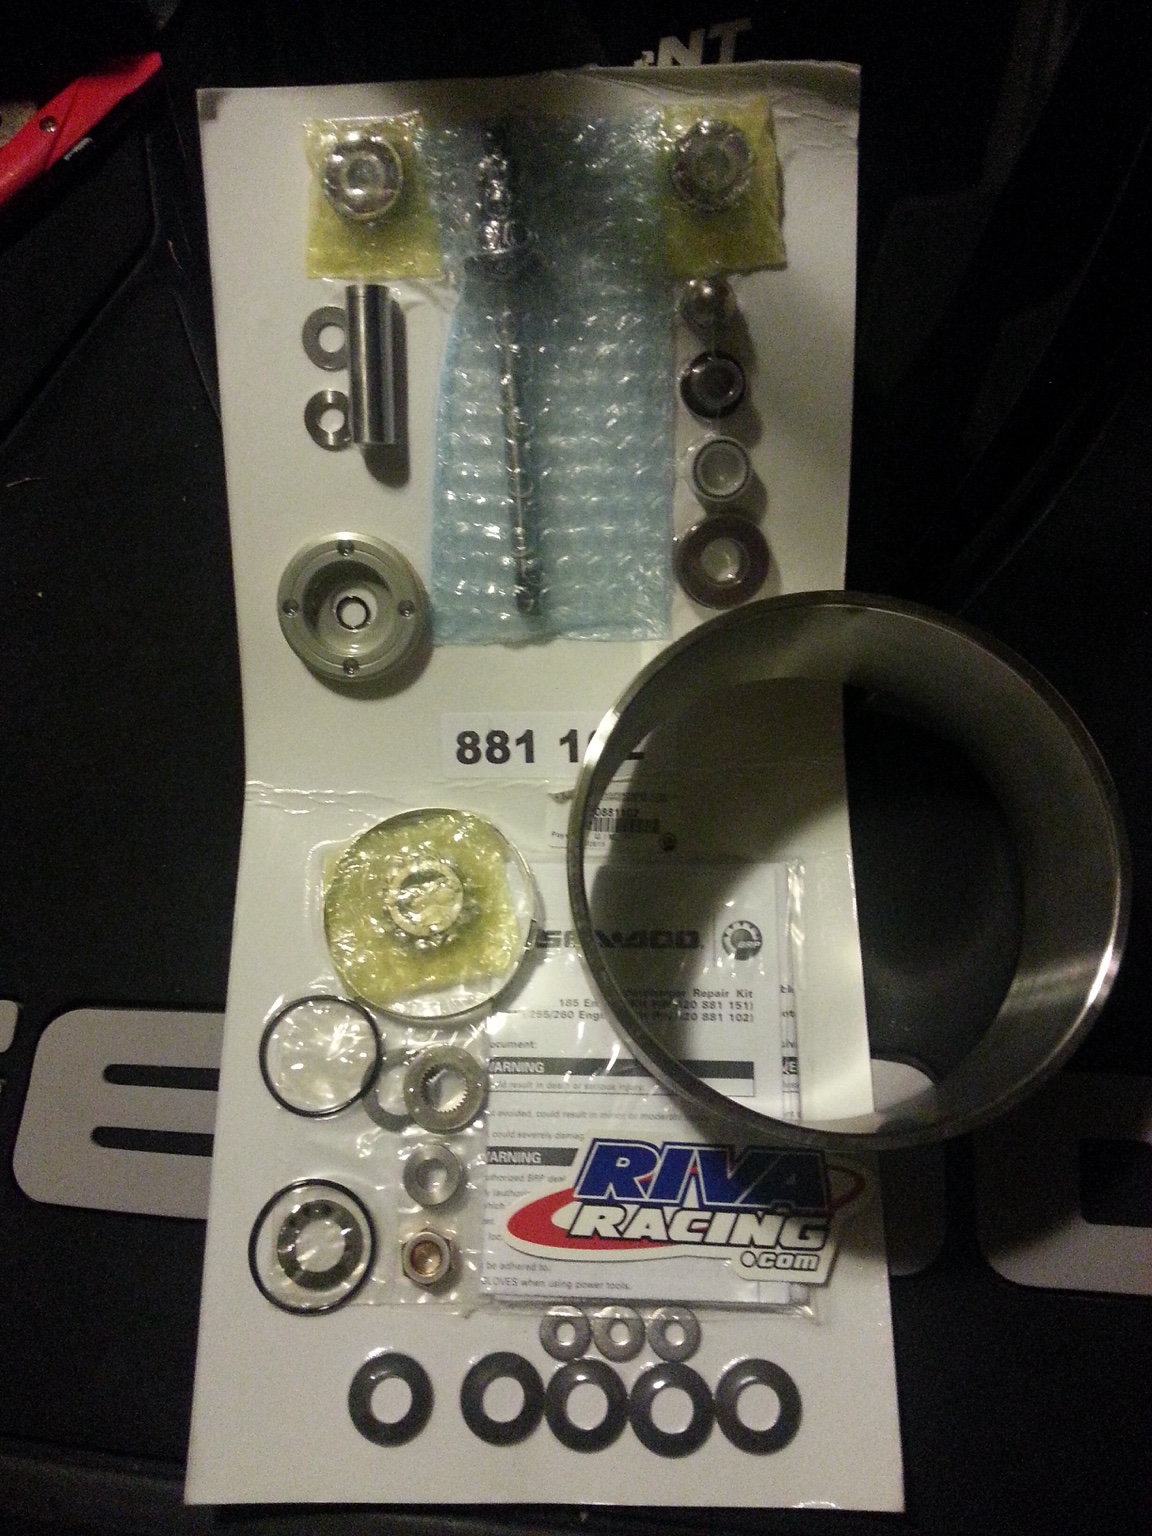
Got the parts in, now I can get started!
Sent from my iPad using Tapatalk
Last edited by a moderator:
Michael211_2000
Well-Known Member
Is that a Stainless Steel wear ring for your jetpump holding the SC kit open for the pic? Most people stay with the plastic (Delron?) wear rings... steel doesn't wear against steel very nicely, and you'd rather the wear ring get the wear than your stainless steel impeller.
Just happened to notice that in your pic.
- Michael
Just happened to notice that in your pic.
- Michael
- Status
- Not open for further replies.
Similar threads
- Replies
- 0
- Views
- 30
- Replies
- 2
- Views
- 210
- Replies
- 2
- Views
- 87