


-
This site contains eBay affiliate links for which Sea-Doo Forum may be compensated.
You are using an out of date browser. It may not display this or other websites correctly.
You should upgrade or use an alternative browser.
You should upgrade or use an alternative browser.
RESTO 1996 Seadoo HX for $300 that I got running. What now?
- Thread starter noviceskier
- Start date
- Status
- Not open for further replies.
noviceskier
Active Member
Do any of you think it’ll be worth finding a used oem pulse line(if that’s a thing)? Or will it be fine (for a stock motor) just using some 5/16 fuel line. The line itself is no longer usable and I completely forgot about that thing with it being tucked away.
When I have the time today I’ll continue putting it all back together and see where I end up getting. Would it be fine just dry fitting the exhaust to get it running this weekend? (No gasket or copper rtv but the ski won’t see any water while doing so)
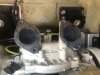
spent about 20 mins slowly getting all the crud off the the intakes (having stuff thing with towels before doing so) to the point where it all felt even for me to mount the carbs on.
Ofcourse during the rebuild I forgot that bracket on the mag side carb, would it be too lazy of me to just pop those two screws off and bolt it back on? Or would that mess with the gaskets sealing you think?
When I have the time today I’ll continue putting it all back together and see where I end up getting. Would it be fine just dry fitting the exhaust to get it running this weekend? (No gasket or copper rtv but the ski won’t see any water while doing so)
spent about 20 mins slowly getting all the crud off the the intakes (having stuff thing with towels before doing so) to the point where it all felt even for me to mount the carbs on.
Ofcourse during the rebuild I forgot that bracket on the mag side carb, would it be too lazy of me to just pop those two screws off and bolt it back on? Or would that mess with the gaskets sealing you think?
Attachments
The pulse line is 1/4" not 5/16 and yes you can use regular fuel hose but make sure it is as short as possible and no kinks.
I wouldn't bother dry fitting the exhaust, just wait until you have the gaskets and do it once.
Yes, you should be fine putting the bracket on but if possible just do one bolt at a time.
I wouldn't bother dry fitting the exhaust, just wait until you have the gaskets and do it once.
Yes, you should be fine putting the bracket on but if possible just do one bolt at a time.
noviceskier
Active Member
There’s two bolts that need to come off that need to go on the bracket, was thinking taking one off then loosely put it back in with the bracket, and when taking out the second one, get the threads started. Then tighten them both down.Yes, you should be fine putting the bracket on but if possible just do one bolt at a time.
noviceskier
Active Member
alright good haha, i'll put down a towel underneath the carb so I don't loose those bolts to whatever lies underneath there.The cable bracket? If so yes, you can remove both bolts and put the bracket on and it won't hurt anything, we have all done that once or twice.
That's my bad I should be including more pictures along with what I'm saying.
I'll update this thread with the progress I make tonight and along the weekend.
noviceskier
Active Member
((Quick add-on while I'm still here, am I able to run the ski as long as the flame arrestor is still in place? Last thing I want to do is be running it lean.))
noviceskier
Active Member
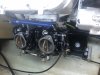
All was going well until I tried putting on the line for the oil pump, think the spring came off or broke? Don’t know how to go about this. Can’t do much for now since I don’t know what I’ll have to do in order to get this fixed. I’m able to move the oil pump arm wherever I want positive that isn’t good.
Attachments
It's possible to get the spring to come off it's stop if you turn it the wrong way but you won't damage anything.
Your spring still looks intact so I would pull the cable off and see if you can turn the arm to get the spring to engage and put tension on the arm again.
Usually it is as simple as turning the arm the correct way.
Your spring still looks intact so I would pull the cable off and see if you can turn the arm to get the spring to engage and put tension on the arm again.
Usually it is as simple as turning the arm the correct way.
noviceskier
Active Member
Usually it is as simple as turning the arm the correct way.
Yeah i was trying to get the line to hook onto the carb and I think I was a little overzealous with it all and it popped past its retainer. For the fix, would I just take off the cable on the pump arm and spin (clockwise?) till it falls back into place?
I was dreading the thought of taking the carbs off in order to fix what I had done. But if it's as simple as you say it is, I should have it ready to run tomorrow.
noviceskier
Active Member
Alright i've been trying what you said and it has me puzzled, nothing happens turning it clockwise, I can see one end of the spring catching on the arm and then slipping off. Don't want to do anything else if I can still make it a simple fix.
((FIXED!! About lost it not gonna lie haha, turned it counterclockwise till it gave me a lot of resistance till, touched the spring arm to fit back onto the pump arm, followed by turning it clockwise seemed to fix it, now I just need to align the pump arm with the marks and we're golden))
((FIXED!! About lost it not gonna lie haha, turned it counterclockwise till it gave me a lot of resistance till, touched the spring arm to fit back onto the pump arm, followed by turning it clockwise seemed to fix it, now I just need to align the pump arm with the marks and we're golden))
Last edited:
noviceskier
Active Member
Don't know how to send videos on here, but here's where I'm at, the spring putting tension counter-clockwise, recorded myself doing quick snaps with the throttle and I see no slop or anything sticking. From what I can tell I have the alignment correct? Posting this just to make sure before I finish bolting on the carbs.
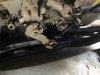
What's the best way to adjust the throttle cable? I have it so its resting on the bumpstop for idle, is that correct? A small amount of play is where I have it. Although I left all the nuts hand tight so I'm still able to quickly adjust for its first run.
All that's left is the choke cable and bleeding the oil system.
Attachments
![IMG_3002[1].JPG](/data/attachments/46/46540-8038d9448842f35cc9eadc490a7c9600.jpg?hash=gDjZRIhC81)
noviceskier
Active Member
So from what you can see the pump looks aligned? I have it so the carbs are sitting on the idle adjuster with slight play before the throttle begins to actuate.double check the oil pump marks are still aligned.
I remember seeing it on other posts but can't remember, is it safe to run it only on the flame arrestor? Just for testing?
I would clean the pump arm and pump as the dirt and oil makes it hard to see the marks but it looks close.
You can run it out of the water without the air box but you need to have the carb braces installed.
Never run it on the water without the air box.
You can run it out of the water without the air box but you need to have the carb braces installed.
Never run it on the water without the air box.
noviceskier
Active Member
Almost ready for the finale moment, got the exhaust mounted, final fuel lines ran, cleaned some connections that would've been hard to reach with exhaust on. Will send pictures later today.I would clean the pump arm and pump as the dirt and oil makes it hard to see the marks but it looks close.
You can run it out of the water without the air box but you need to have the carb braces installed.
Never run it on the water without the air box.
noviceskier
Active Member
Alright, I bled the air out of the oil pump, cracked the bleeder till i saw no air/oil mix come out and it was just pure gold drops, the large return line coming back to the oil tank I fed into a bottle until only the correct oil started appearing in the
Applied two beads of the copper rtv spread the one on top a little bit.


Put a little bit of loctite on everything as I went through the reassembly.

took a small bit of wire off the plug wires to remove any of the corrosion that had built up, don't have any new BR8ES plugs for it but I'll just swap from another running ski since I'll just be doing a test fire on land.

((Update))
Alright I added 6 gallons of 93 octane and within the first 10 seconds of cranking the fuel separator filled up with water and feeling throughout the lines I could tell they had fuel in them, "new" battery is drained (has sat in the tool room since last season was over) and I'm out of time for today. I have a video of it cranking over, but don't have a youtube to post to. Figuring these old plugs are just no good, going back to autozone to swap out for a good battery and pick up some new BR8ES plugs and hopefully see if it all goes well.
Had trouble with this line getting oil from just cranking w/o plugs pump arm set WOT(when fuel tank had no fuel and fuel selector was set to off) Once I get the HX idling can i just set the pump arm WOT again for it to fill up?

Applied two beads of the copper rtv spread the one on top a little bit.
Put a little bit of loctite on everything as I went through the reassembly.
took a small bit of wire off the plug wires to remove any of the corrosion that had built up, don't have any new BR8ES plugs for it but I'll just swap from another running ski since I'll just be doing a test fire on land.
((Update))
Alright I added 6 gallons of 93 octane and within the first 10 seconds of cranking the fuel separator filled up with water and feeling throughout the lines I could tell they had fuel in them, "new" battery is drained (has sat in the tool room since last season was over) and I'm out of time for today. I have a video of it cranking over, but don't have a youtube to post to. Figuring these old plugs are just no good, going back to autozone to swap out for a good battery and pick up some new BR8ES plugs and hopefully see if it all goes well.
Had trouble with this line getting oil from just cranking w/o plugs pump arm set WOT(when fuel tank had no fuel and fuel selector was set to off) Once I get the HX idling can i just set the pump arm WOT again for it to fill up?
Last edited:
noviceskier
Active Member
yeah that's what I'll do when the weather clears up, got some new plugs today but wont be able to test from all this rain.No, leave the pump arm adjusted correctly.
Put a little premix down each carb and start the engine. With it idling reach down and hold the oil arm wide open with your hand until the oil lines fill up.

noviceskier
Active Member
IT RUNS!! Well like, I knew it had run by pouring some premix down the carbs, but like it runs on its own fuel system now haha. Talk about a lot of smoke for its first actual start since 2014-2017, gonna let the carbon seal cool down even though I only ran it for about 20 seconds total with a couple revs once it got a warm. Oil lines are fuel, too early to check plugs but I mounted the air filter on so the flame arrestor doesnt fall off again.

The new plugs worked like a charm (even though I knew thats what it needed.) I honestly didnt think it would go so well and the trailer isn't even able to tow I have it sitting on some jack stands with the ski.
Although before I actually take it on the water I have a minor electrical problem, I think its the killswitch or solenoid, pressing start/stop button sometimes I'll hear a little clunk in the mpem, but if it is the solenoid it doesnt make sense how moving the lanyard around fixes this issues, definitely something I want fixed prior to taking it on the water.
Going to take another compression test after I run it a bit more today. Making sure my carbon seal doesn't get too warm though.
Probably my next chapter to this rebuild would be the jetpump, haven't touched it yet but I want to make sure it'll atleast run in the water before doing anything else to it.
noviceskier
Active Member
Yeah that's why I called it the killswitch rather than the DESS post, weird though since when I first found that out I thought all 96 models had it except the HX which was neat. I think I will just replace them both but keep the original solenoid on hand as a backup.If moving the lanyard fixes the issue it's probably the kill switch. THe 19996 HX just uses the old simple push button kill switch, not the DESS one.
Going to need to watertest it soon though.
- Status
- Not open for further replies.
Similar threads
- Replies
- 5
- Views
- 577
- Replies
- 2
- Views
- 381
- Replies
- 13
- Views
- 799