LikeabossTM
Active Member
Lube the tough grommet with a little dish soap.


For the zip ties only use the good ones with the stainless locking tabs. I get them from McMaster Carr.
On the grommet remove the plastic fitting, install just the grommet then push the fitting back in to lock the grommet in place.
Definitely not looking to tell anyone "I told you so." I've made plenty of dumb mistakes over the years that have cost me, and hate to see others do the same.Thankfully I am not using this ski to flip and plan to keep it for the long haul, went to autozone and they wanted $40 to rent, although renting vs rebuilding entire motor is understandable. Asked one of my work buddies if I can borrow his and I am just waiting for him to bring in most likely monday.
Crank feels good when I turn it by hand so from my limited knowledge rebuilding the top end doesn't sound terrible? (aside from bad crank seals) I got two running skis already and plan on taking them out tomorrow actually lol.
Thankyou for your response and helpful feedback though! I know it's my bad for not doing that as soon as I picked up the ski, I got it to run on premix but all that tells me is it runs.
Luckily when I estimate my projects like these I allocate some wiggle room cash just in case I run into anything that isn't in my favor. Thankfully as of right now I would be able to afford rebuilding the motor, and plan to have ski on water in the next week or two if the motor is truly healthy. (Not including the time it will take for me to wetsand and repair any exterior cosmetic issues.)
If not.. I'll be riding my Kawasakis for this summer lol
Also bonus for you and miki, if motor does blow up in my face you have the i told you so in storage!
Definitely not looking to tell anyone "I told you so." I've made plenty of dumb mistakes over the years that have cost me, and hate to see others do the same.
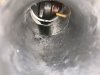
You need to open the little bleed screw on the oil pump to get the old oil and air out before you even think of starting it.
Then once it’s bled then you start it and hold the lever wide open with it idling to purge the little 3/32” oil lines.
.
Open the 8mm bleed screw, and bleed until you get a constant stream of "good" oil. Make sure to put down some shop rags under the pump, and use of a mirror helps to get a better view. Close the bleed screw and start the motor to bleed the injection linesJust to make sure I got it I:
Crack open (someone said it was 8mm nut?)
Keep turning till oil comes out
Stop when flow of oil comes out
Wait till the correct oil flows.
Start engine and let idle while lever is wide open till motor bogs?
Tighten screw?
If it was mine and I was going to ride it hard I would pull it apart and replace all gaskets and seals.
Keep in mind all the o-rings and crank seals are not soft after being 20+ years old.
All you need is a WSM complete gasket kit and some piston snap rings. Be careful as the piston pin bearings are loose needles so either make a sleeve to hold them when you pull the piston pins or buy new caged bearings. I cut a cheap deep socket it half to take the place of the piston pin to hold the bearing sin one of mine.
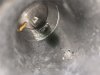
I can see you also have to old yellow driveshaft dampers that will let go and destroy the shaft and PTO. Make sure you upgrade to the new red ones.
The clamps just squeeze and will loosen up or just wiggle them off with needle nose pliers.
For the driveshaft dampener remove the jet pump then it will come out the back.
Not sure what ring you are looking for but osd parts has the bolts you are looking for

")
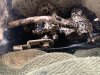
poke around for the joys of getting that joint sealed well. The usual advice is don't take the joint apart … pull the entire pipe.
since you have the pipe apart, inspect the welch plugs - the welded shut bungs. They have a habit to corrode from the inside out and pinhole. It's possible to grind them off and reweld on new plugs if you can weld aluminum, but it may be just as easy to get a used pipe in good shape.
$36 a gallon?!?! I'm going to have to do that for sure.That is the wrong oil and is pretty typical as a lot of idiots just go to walmart and buy outboard oil.
You can use any API-TC rated oil in your ski, Amsoil, Lucas or Seadoo and it doesn't have to be full synthetic. I have a bunch of seadoo's so to simplify I just use the Seadoo XPS E-Tec full synthetic in everything. You can get all your OEM parts and the full synthetic oil for $36 per gallon from Pro Caliber out of washington with free shipping over $99.
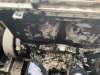
I would pull the oil tank and rinse out with gasoline. I would try to drain out as much oil as you can from the two lines running into the side of the engine block then use some fresh correct oil to flush out the remainder. Next reinstall the tank and a new oil filter then open the oil pump bleed screw and let it flow until you see the nice clean new oil coming out and you will be fine.
The copper ring is no longer available. Just reuse the old one as they don’t go bad just put some ultra copper RTV on both sides.
You also need to replace all four #6 rubber pipe bushings or you will snap head pipe bolts.