


-
This site contains eBay affiliate links for which Sea-Doo Forum may be compensated.
You are using an out of date browser. It may not display this or other websites correctly.
You should upgrade or use an alternative browser.
You should upgrade or use an alternative browser.
RESTO 1996 GSX complete restore and re gelcoat
- Thread starter GGuillot
- Start date
- Status
- Not open for further replies.
GGuillot
Well-Known Member
Update:
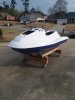
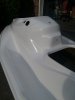
Hull gelcoat refurbishing is complete!!! Just on topside I'd say about 55 hours of work. Prepping hull for gelcoat - 8 hours. Applying white gelcoat - 6 hours. Sanding smooth using 150 - 2000 grit - 35 hours. Retouch sanding, polishing and glaze - 6 hours. I'll do the final wax after all decals and mats are applied.
I've disassembled the engine and sent the cylinders and one new piston off to Full Bore for a resleeve. Popped the PTO flywheel off the crankshaft for a reman swap, (4 foot cheater bar) looks like one bearing on the crankshaft is noisy. Has original pistons, standard bore, I didn't do a compression test, but the rings were very loose in the cylinders. Straight up full rebuild planned, I don't know the hours yet, but it looks pretty worn out. RV cover is out of spec, over 20 thousandths, so it'll need machining.
All downhill from here forward now that the hull is done I can start getting stuff back on the ski, hoping to be done by May, which is a year from purchasing. I've started getting the rail back on, heat gun is necessary, for some reason it shrinks a bit once you remove it. This week I'm applying the mats I purchased during the black friday sale. Seat cover just came in and the decal set should be in soon.
Attachments

Wow! That is the most thorough hull resto that I can ever remember seeing. Great job!
GGuillot
Well-Known Member
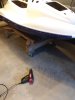
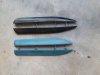
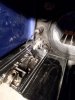
Making progress, I picked up a pair of XPL sponsons recently to replace the stock ones I had off. They're slightly longer in comparison, but I mainly wanted them not having to paint the faded stock ones black.
Installing was a big pain, it took a awhile, using a mirror and a claw tool it was one washer and locking washer at a time.
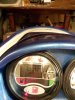
I finished installing the mats, rear grab handle, rear eyelet, HIN plate, rub rail and inserts. For the hard to find exclusive 96' GSX rear insert, which seems to fall out easily on this ski, I secured it indiscreetly using some small screws from underneath. Pricey and difficult to find that 1 1/4" piece, but it looks borrowed from a Sportster rail and insert.
Installing was a big pain, it took a awhile, using a mirror and a claw tool it was one washer and locking washer at a time.
I finished installing the mats, rear grab handle, rear eyelet, HIN plate, rub rail and inserts. For the hard to find exclusive 96' GSX rear insert, which seems to fall out easily on this ski, I secured it indiscreetly using some small screws from underneath. Pricey and difficult to find that 1 1/4" piece, but it looks borrowed from a Sportster rail and insert.
Attachments
Last edited:
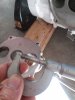
For the sponson nuts and washers the easiest way I have found is to cut the head off a bolt and/or stud, thread the nut on one or two threads then slide the lock washer on then the flat washer, then put a few drops of CA glue on them and some Zip Kicker to make them one solid unit. Then remove from the stud and with some masking tape on the nut it will stay in a deep socket. Finally I just use a long extension and a mirror and thread them on by hand.
It is pretty easy this way and once tightened the glue breaks free.
It is pretty easy this way and once tightened the glue breaks free.
GGuillot
Well-Known Member
For the sponson nuts and washers the easiest way I have found is to cut the head off a bolt and/or stud, thread the nut on one or two threads then slide the lock washer on then the flat washer, then put a few drops of CA glue on them and some Zip Kicker to make them one solid unit. Then remove from the stud and with some masking tape on the nut it will stay in a deep socket. Finally I just use a long extension and a mirror and thread them on by hand.
It is pretty easy this way and once tightened the glue breaks free.
That's a good tip, it was the locking washer that kept falling off my claw tool, once I carefully got both on it was a matter of the nut taped in the socket on the extension. I got the hang of it after the first sponson, second went on quicker. Much easier on the GTX last year, on that ski I could get my hand down in there better and reach the threads.
GGuillot
Well-Known Member
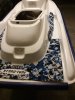
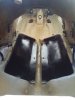
Making some progress, cosmetics coming along. Applied the blue carbon fiber graphics kit from pwc graphics, quality stuff. It's a good thing I could lift and reapply, the forward decals were tricky with the contour getting it lined up perfect.
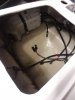
I made one more final cleaning in the hull with some simple green and installed the rubber pads under the tank. I washed the tank out thoroughly, which had residue on the bottom.
After much frustration trying to get a good fuel baffle, I finally did. I discovered the original one had corrosion in the top on one of the poles to the board, I tore it apart thinking a blown F1 fuse, but deemed it non-repairable. Picked one up off ebay which had a bad ohm reading, with nothing registering below 1/3 level. Has a bad resistor on the board somewhere, ebay seller made good on it and sent me another one, this one I verified, 2-90 ohms like it should be.
Continuing to get stuff on the ski and finishing up covering the seat, during stapling my 25 yr old B&D stapler broke. I did some media blasting on engine parts at Ft. Benning, but the moisture was causing issues, so need to try again next weekend. One welch plug is bad on the exhaust, so need to fix that.
This week I'm deciding on the hood color, I have it prepped for primer. Leaning towards a color that compliments the mats and the seat, likely a metallic medium blue. Thought about a wrap on the hood, but I don't want to overdo the black carbon fiber, I've got it everywhere, all the decals and the middle fabric of the seat.
Attachments


GGuillot
Well-Known Member
That's looking really really awesome! Those new graphics are sweet! I fixed up my 96 GSX 2 years ago but didn't do new side graphics.
The set comes with all of them, the one on top the hull under the steering and all the warning labels. I meant to call Mike back at PWC graphics and let him know the roll over decal is wrong, if you flip it counter clockwise like it indicates it'll flood.
They are of a good quality, much better than the decals I picked up from exoticsigns.com for the GTX last year.
GGuillot
Well-Known Member
Update, getting close to wrapping up the cosmetics, wiring, and everything else so I can turn my attention to the engine phase. Full Bore still has my cylinders, but I expect them back within the next week or two, they are backed up as we near the season.
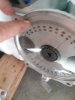
I rebuilt the jet pump, thanks OSD for the bearing/seal rebuild kit. I had to purchase a new impeller shaft, there was some pitting on it I wasn't willing to accept. The jet pump was a rusted mess when I took it apart. I installed the new wear ring, the old one was a blue aftermarket one. Pump rebuild kit $38, wear ring $35 shipped (ebay) new impeller shaft $35 shipped (ebay).
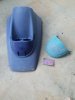
I painted the hood, wanted to do 2 part single stage like on the GTX last year, but local place wanted to sell me a quart. Way too much for the outside of this small GSX hood. So stopped at Home Depot and spent $11 on a can of metallic blue and clear gloss. I had some bad runs because I got in a hurry one night, but that's another story. Stripped it back down and started over, but it's good now. I had to get the heat gun out to adjust the hood flush with the hull, it was badly out of whack flaring out near the vent holes. The hinge area was bent badly and causing the hood to sit high, but got it perfect now. It's seals just right with the bin installed.
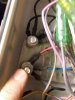
Wiring up the gauges and the steering, I purchased the ambient temp sensor, compass, and speed sensor, everything is there connection wise, little bit of a challenge getting it all in the hood. The ambient temp and compass lines I pulled back into the hood and will zip tie the ambient temp sensor near the opening where the lines exit. The guage was totally cooked when I got the ski, I did the lcd film change and it cleaned up nice, like new, did a 12 volt test on the bench a while back. I had a large oring laying around that I used to fill the gap of the metal ring that becomes unusable after opening the gauge.
Ran 4 wires and connected a switch under the steering for the auto bilge, manual override will be one of the modified button slots to the far left on the info center. Inconspicuous installation on the bilge pump, only doing it for piece of mind.
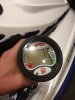
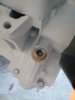
Hard to see in the pic, but purchased a black anodized billet choke knob, it was either that or buy another choke cable, the knob was missing. $25 shipped, ebay seller that makes them.
I rebuilt the jet pump, thanks OSD for the bearing/seal rebuild kit. I had to purchase a new impeller shaft, there was some pitting on it I wasn't willing to accept. The jet pump was a rusted mess when I took it apart. I installed the new wear ring, the old one was a blue aftermarket one. Pump rebuild kit $38, wear ring $35 shipped (ebay) new impeller shaft $35 shipped (ebay).
I painted the hood, wanted to do 2 part single stage like on the GTX last year, but local place wanted to sell me a quart. Way too much for the outside of this small GSX hood. So stopped at Home Depot and spent $11 on a can of metallic blue and clear gloss. I had some bad runs because I got in a hurry one night, but that's another story. Stripped it back down and started over, but it's good now. I had to get the heat gun out to adjust the hood flush with the hull, it was badly out of whack flaring out near the vent holes. The hinge area was bent badly and causing the hood to sit high, but got it perfect now. It's seals just right with the bin installed.
Wiring up the gauges and the steering, I purchased the ambient temp sensor, compass, and speed sensor, everything is there connection wise, little bit of a challenge getting it all in the hood. The ambient temp and compass lines I pulled back into the hood and will zip tie the ambient temp sensor near the opening where the lines exit. The guage was totally cooked when I got the ski, I did the lcd film change and it cleaned up nice, like new, did a 12 volt test on the bench a while back. I had a large oring laying around that I used to fill the gap of the metal ring that becomes unusable after opening the gauge.
Ran 4 wires and connected a switch under the steering for the auto bilge, manual override will be one of the modified button slots to the far left on the info center. Inconspicuous installation on the bilge pump, only doing it for piece of mind.
Hard to see in the pic, but purchased a black anodized billet choke knob, it was either that or buy another choke cable, the knob was missing. $25 shipped, ebay seller that makes them.
Attachments


Last edited:
SIMPLEARKANSAN
Well-Known Member
Have you wired in the speedometer to the MPEM yet? I've got mine ready, just waiting to see it you figured out the exact wiring.
GGuillot
Well-Known Member
Have you wired in the speedometer to the MPEM yet? I've got mine ready, just waiting to see it you figured out the exact wiring.
I should have that Speed O addition done in the next few days, my Yuasa battery came in yesterday and I hope to get power on it to check a few things out by the weekend. I'm hoping to find out if the VTS is good or not and maybe program my new DESS lanyard.
Another update coming soon...
Paul Bretz
Active Member
That's a good tip, it was the locking washer that kept falling off my claw tool, once I carefully got both on it was a matter of the nut taped in the socket on the extension. I got the hang of it after the first sponson, second went on quicker. Much easier on the GTX last year, on that ski I could get my hand down in there better and reach the threads.
Easiest i found was using a mcdonalds straw. Put straw on bolt and insert through outside of hull. Starw is long enough to easily get washers and nuts on. Slide washers onto straw and wiggle till washers get on bolt. Easy peezy
GGuillot
Well-Known Member
Update: I pretty much have the engine and carbs left to do, there's been a problem with the media blaster out at Ft. Benning for the last couple weeks, so I've been doing other items on the ski until they fix it. Would love to add media blast cabinet to the garage, but they take some serious CFM that my compressor doesn't have.
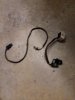
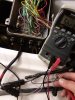
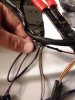
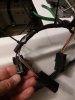
I did some finessing to get the gauges/wiring in the hood, which only on the 96' it doesn't come apart to make it easier, adding the compass, ambient temp and the Speed O presents a challenge. I plugged up the compass and the ambient temp, pretty simple, then pulled the plugs/wiring up into the hood which it's already crowded, so I put the compass and some plugs under the Tach gauge where there's room. I pulled the ambient temp sensor down near the opening on the left and zip tied it. On the right side opening is where the tach gauge power and sensor (2 plugs) and Speed O and red/blk reference plugs exit. Everything else exits on the left side, which makes it easy. I'm not sure how it is stock, but this is the way I set it up.
The Speed O and red/blk reference plugs are identified as being capped on the 96' GSX. The red/blk wire must be grounded to activate the Speed O to read MPH. The MPEM has good ground points... more on that..
On the right side hood exit identifying the purple and blk plug, which runs power directly to the tach gauge, I spliced in the red/blk wire to the blk ground wire because it's cleaner and simple, no need to actually run the wire into the MPEM, which would require making a hole and so forth. Now that leaves connecting the 3 wire plug for the Speed O. I couldn't use the plug on either end at the rear and up front, so I cut them off and spliced in a water proof 3 wire male/female plug at the hood and extended and spliced in about 8 feet of 3 conductor wire to the sensor on the ride plate.
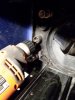
The ski has the dummy plate, I just removed it and reused the screws, little blue loctite, then I ran the wire through the hull. After installing the sensor, I drilled out the plug in the hull plate, 1/4 bit or less will work, just enough to slip the wire through.
With everything now connected in the hood, I wanted to try it out, but with no motor in the hull the circuit is incomplete and nothing will come on. I plugged in the stator/tach sensor and ran a bolt/nut through it with a ground wire back to the battery. I connected the battery and the gauges lit up pushing the start/stop button. I'm having issues getting the confirmed 2 beeps and the lanyard to recognize, tried connecting the Candoo to no avail. I'm thinking later when the engine is in and I'm ready to start I'll readdress, could be a bad DESS post or something.
VTS works!!! happy about that, I just replaced the old dry rotted boot with one from OSD. Gauge is now clear and crisp after the LCD repair. Scrolling through the info gauge it now shows MPH and MPHMAX? and TEMP E, TEMP L and COMPASS info. All the extras I added really are not that expensive to do, the ambient temp and compass simply plug in, the Speed O is a little more wiring to do using a solder iron and a DMM.
I did some finessing to get the gauges/wiring in the hood, which only on the 96' it doesn't come apart to make it easier, adding the compass, ambient temp and the Speed O presents a challenge. I plugged up the compass and the ambient temp, pretty simple, then pulled the plugs/wiring up into the hood which it's already crowded, so I put the compass and some plugs under the Tach gauge where there's room. I pulled the ambient temp sensor down near the opening on the left and zip tied it. On the right side opening is where the tach gauge power and sensor (2 plugs) and Speed O and red/blk reference plugs exit. Everything else exits on the left side, which makes it easy. I'm not sure how it is stock, but this is the way I set it up.
The Speed O and red/blk reference plugs are identified as being capped on the 96' GSX. The red/blk wire must be grounded to activate the Speed O to read MPH. The MPEM has good ground points... more on that..
On the right side hood exit identifying the purple and blk plug, which runs power directly to the tach gauge, I spliced in the red/blk wire to the blk ground wire because it's cleaner and simple, no need to actually run the wire into the MPEM, which would require making a hole and so forth. Now that leaves connecting the 3 wire plug for the Speed O. I couldn't use the plug on either end at the rear and up front, so I cut them off and spliced in a water proof 3 wire male/female plug at the hood and extended and spliced in about 8 feet of 3 conductor wire to the sensor on the ride plate.
The ski has the dummy plate, I just removed it and reused the screws, little blue loctite, then I ran the wire through the hull. After installing the sensor, I drilled out the plug in the hull plate, 1/4 bit or less will work, just enough to slip the wire through.
With everything now connected in the hood, I wanted to try it out, but with no motor in the hull the circuit is incomplete and nothing will come on. I plugged in the stator/tach sensor and ran a bolt/nut through it with a ground wire back to the battery. I connected the battery and the gauges lit up pushing the start/stop button. I'm having issues getting the confirmed 2 beeps and the lanyard to recognize, tried connecting the Candoo to no avail. I'm thinking later when the engine is in and I'm ready to start I'll readdress, could be a bad DESS post or something.
VTS works!!! happy about that, I just replaced the old dry rotted boot with one from OSD. Gauge is now clear and crisp after the LCD repair. Scrolling through the info gauge it now shows MPH and MPHMAX? and TEMP E, TEMP L and COMPASS info. All the extras I added really are not that expensive to do, the ambient temp and compass simply plug in, the Speed O is a little more wiring to do using a solder iron and a DMM.
Attachments
-
 20190327_200402.jpg746.6 KB · Views: 79
 -
 20190327_200032.jpg743 KB · Views: 75
 -
 20190327_201502.jpg894.4 KB · Views: 75
 -
 20190327_204815.jpg887.9 KB · Views: 78
 -
 20190327_205346.jpg824.8 KB · Views: 73
 -
 20190327_205840.jpg741.5 KB · Views: 73
 -
 20190327_211038.jpg773.5 KB · Views: 74
 -
 20190327_213043.jpg800.4 KB · Views: 78
 -
 20190331_192247.jpg875.5 KB · Views: 83
 -
 20190331_195714.jpg992.5 KB · Views: 81
Last edited:
GGuillot
Well-Known Member
Been a while since I've posted an update, but it appears I'm less than a week away from starting and getting on the water. I resolved the issue with not getting 2 beeps, after working with Nick at Westside Power Sports, it was the MPEM, no blown fuses, just wouldn't recognize DESS. I'm irritated spending $200 to get another MPEM, this ski really needed everything, I probably should have walked away, but too late to dwell on that.
I was delayed a few weeks getting media blasting completed because of an equipment issue at the place I go to, finally got that done a couple weeks ago, painted everything and assembled it last weekend. I prepped the hull recently to accept the engine and installed it today. Little tight with the auto bilge, but it's in and secure, wiring runs to a small switch on the steering to activate the auto setting, manual override takes a spot on the info center. Strictly piece of mind, I don't anticipate any leaks, just encase of major failure the ski won't fill up with water and hopefully would buy some time.
Running NOS clearance standard bore Wisecos, good quality forged pistons, I run them on the 97' GTX, takes a little patience to find them for $150 shipped. Fullbore did the resleeve, about $315 to get that done. SBT provided the core swap crankshaft, about $330 total including the shipping charges to AL. Balance shaft was in surprisingly good shape, seals good, but slight noise on the bearing on the weight side. I swapped it out for a NOS Nachi 6304 bearing, cost, $9.
Before dropping the engine in I set the timing using the degree wheel, and double checked the rotary valve clearance after getting the cover back from the machine shop today. I asked for a .007 shave on the lip and oring, they got it pretty close, now measures at .015, which is still .001 out of spec. But I'm not going to sweat it, I know it'll run fine, the 97' GTX, measured afterwards at .017 which is a big improvement from an initial .024 and .020 respectively on the GSX.
I went ahead and tapped the balance shaft area for a fill and drain. I used a 3/8" NPT tap which was perfect for the stainless cap I picked up. Little oil proof teflon tape to seal it up and red loctite on the M6 grub screw on the bottom.
The alignment tool that I bought last year worked fine, I was able to confirm I'm lined up. Carbs are rebuilt with OEM kits, new needle/seats and all stainless hardware. I checked the pop off and pressure tested, appears both seats lift at about 34 - 35 psi. Sealed them up in zip lock bags ready to install.
What's left....I need to finish connecting a few things in the hull, prime/test the oil pump on the bench, finish painting the header and remaining exhaust pieces, install the jet pump and add oil, grease fill the pto boot, install the the new HD ss hat and carbon ring. The add fuel and oil, charge the battery, then attempt to start.
Attachments


Last edited:
AKnarrowback
Well-Known Member
Outstanding work.
I have never seen such a thorough restoration done.
I have never seen such a thorough restoration done.
AKnarrowback
Well-Known Member
this ski really needed everything, I probably should have walked away, but too late to dwell on that.
Sounds like my 94 XP. I had the budget for the mechanical side of things. I'll have to recall the fond momories of what it looked like the day I set it up out of the crate (it's aged a bit since then).
GGuillot
Well-Known Member
For future projects SBT does the rotary cover machining on an exchange basis.
I know they do, but how would they know how much to machine off on the one they'd send me? Not like I'd be sending them the cases so they can verify to get it right.
GGuillot
Well-Known Member
In most cases it's the cover that wears causing the clearance issues
Both 787's I've done the cases had the wear, the covers still have the visible vertical grooves machined from the original production. I'm thinking the 787 laying at a 45 degree angle is why it would wear more on the cases and less on the cover. Maybe the other upright 657, 717, engines it wears on the cover more, but not from what I'm seeing on the 787 carb engines I have.
I've heard stories were people have done the RV cover swap with SBT and it didn't improve the clearance. I'm just not sure how they could really machine anything or send me a core swap cover without a measurement first.
SBT is $100 plus shipping, I go to a local place and it's a flat $100. The better choice is local for me, I can tell them how much I need taken off and get it back within a couple days.
GGuillot
Well-Known Member
UPDDATE: It's finally done and on the water. I made a mistake with the RV which delayed me about a week, I had the RV cover lip and o ring groove machined when it didn't need it, which it ended up being too tight and causing issues. So picked up another RV cover and a new rotary valve to resolve it. Lesson learned, the solder method, even using 2 small tiny pieces like the SM recommends gives a false reading. Measuring with the valve in it throws the clearance off by .005 to .007. I think the RV valve out then subtract the valve thickness is about as close as a way to find out, from what I found out it to is off by .002 or so. All measurements using the solder is tighter than what is indicated when measuring. I spoke to Dan Fairchild of Fullbore, who shed some light on it. He indicates the solder method is too hard and flexes the RV cover when tightened, so he uses clay instead. So moving on it fired right up after I did the swap.
Had to tighten the pump down with it running it was so tight with the new OEM wear ring. But it's good, the impeller shaved it and it's smooth now.
I went out and did a 20 minute run, light throttle and took it easy. Came back in took a break from the heat then went back out for an hour, mainly up to half throttle for a little then idle, I didn't get much over 35 mph at any point. Then I went home for a while then went back out after dinner, stayed out over an hour and 1/2, hit WOT a couple brief seconds here and there. It performed great, no hesitation, no cavitation, no stalling, no cutting out, and cranked right up every time. It seems to be much better on fuel than my 97' GTX, after all the running on the water it still has a little over a half a tank left.
Leaks: The only I leak I have is the fitting at the bottom of the oil tank, bad enough it was filling up rags I stuffed underneath it. I pulled the tank, what a mess and challenge getting it out, of course I had to practically fill it to the top then have this issue.
I don't even want to get into the cost on completing this resto, several things busted the budget. I didn't plan on the MPEM being an issue, I needlessly wasted money on machining the RV cover and getting another one. To me the cosmetics stuff, mats, graphics, and gelcoat work was worth it. So is adding the MPH, compass, ambient temp and an auto bilge. I probably easily spent $1000 more than I needed to....but the guy at the dock yesterday with the Seadoo Spark Trixx spent way more than me...
Overall fun resto, it takes a while to get it like I want it, I purchased this ski a year ago, May 2018, and gave myself a year to complete it. I'm done, now I need a double trailer and I intend to take the entire family out on them at a vacation lake house sometime late this Summer.
Last edited:
- Status
- Not open for further replies.
Similar threads
- Replies
- 4
- Views
- 526
- Replies
- 38
- Views
- 1,843
- Replies
- 21
- Views
- 1,942
- Replies
- 10
- Views
- 311