RESTO Unforeseen FULL resto on a 99 GTI. Picture heavy!

Status
Not open for further replies.

Kwik_uk

Active Member
TL;DR I bought a crappy GTI, now it is not a crappy GTI.

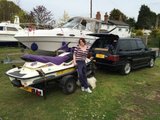
So, a 1999 GTI pops up on eBay. My dad calls me about it and says it would be a fun way to get my other half into watersports, as shes a bit scared of driving my Sidewinder.
Went to see the item, listed as "Works fine, just has a high idle as the carb gasket needs replacing". I'm no fool, nor stranger to eBay or boats, so I knew for the price he was asking there were other things going on.

Trailer was structurally sound, but cosmetically so ugly even a dog wouldn't lick it.
Ski was externally very well looked after. No fade or scratching. In fact the only fault was the brand "SeaDoo" had rubbed off the seat as per normal (did SeaDoo put this on with face paint at the factory?).

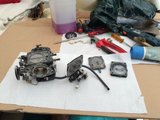
Internally it was filthy. Absolutely covered in black oil and crap. Every. Single. Surface.

Anyway, I hitched it up, handed over my hard earned and I was on my way.


Towed it back to our marina just before the other boat went in for the season.


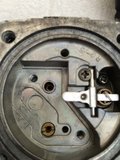
As soon as it was home after the weekend, I picked up a Mikuni carb rebuild kit and set to work on the carb. A few hours later, plus with a new home made pop-off tester built, it was ready to go back in the ski.


I made a small trolley for it to sit on whilst the trailer was at the sandblaster.


Got the trailer back from the sandblaster, and gave it two coats of battleship primer, and then five coats of bright yellow (yes, that's just how I roll). New coupler, new hubs, re-con'd the wheels, new winch, new saftey strap, new boards for the bunks out of mahogany leftovers, and new acrylic carpet. Looking a lot better than it started!

 
Got it started after a new AGM battery went in. Great.
Kicked out a load of sludge, and realised the needle and seat were worn. Not great.

A new needle and seat later, bingo! Firing like a champ. No rattles or nasty noises. Also no fuel reading....

Yanked the sender, checked the float - fine, sender no ohms. Common fault.


Chopped a hole in the sender and removed the F1 fuse and bridged it. Plastic soldered my little cut out (white cable ties and a decent paddle iron) and all was working as it should.

Getting closer to splash time!

Made up a new bracket to hold down one of the bilge strainers, as mine was completely AWOL:


Spent a little *cough* time cleaning the inside of the hull, not perfect but getting there. This is where Frankie, my other half did all the hard work. She's an absolute ninja with a parts washer gun full of paraffin. Pipe showed signs of getting a lot warmer than it should have.
Alarm bells begin to ring.


Anyway, decided to take my chances and water test it:


It took a few adjustments to the carbs to get it to run correctly at first. It also gave me the chance to try out the new primer I'd fitted in place of the choke (best thing I've done so far).

Ran well for about 30 minutes, then started to lose power and want to cut. Seemed like a fuelling issue. So back to the ramp to fiddle.
Found out the fuel filter O-ring was split and I was sucking air. Bypassed the filter and in doing so noticed the fuel selector only worked on RES. Bypassed that too, so I was running direct from the tank (I know, not ideal, just for testing).

Took it out again, ran great for 10 minutes then wanted to die again. Coaxed it back to the trailer and went home a bit let down.
Checked the compression and I was running 125 PTO, 128 MAG.

Rebuild time.
 
Last edited by a moderator:
I noticed the PTO side crank seal was leaking, so it was probably sucking in air and running progressively worse as it warmed up.
I've read with these, that if the PTO seal is gone, it's likely that the MAG side is also gone too.

I thought it would be a good time to send it down to a company I found in the South East of England (I'm not going to say who, you'll understand why later in this thread). They said they'd have the motor back to me in a week if I sent it on the Friday, so they had it for the Monday morning.

Brilliant, it's 9pm Thursday night when that email comes through. Off come the PJ's, on go the dirty clothes, out comes the halogen worklight and a damn strong cup of coffee.

*several sleep deprived hours later*


So off it goes on 5th June....

I get a call the following Friday to say that it's failed it's crankcase pressure test and it needs to be stripped down.

Two weeks (and many phone calls) later... I'm told:

  1. The jugs are rotten and need to be replaced.
  2. The head is also rotten and that needs to be replaced too.
  3. The crank bearings aren't great and the crank needs a rebuild. (I was after this being done anyway)

A month later, and still no jugs from his supplier in the US, no sign of a head either. At which point I told him to leave the top end to me and just get on with the rest.

I ordered a full top end kit from the US shop ut_crankshaft_shortblock and had it on my doorstep in the UK 5 days later. Perfectly media blasted and machined items, well packed and great guys to talk to.

Time passes and I eventually call the UK shop and tell him just to send my engine back in whatever state it's in, and I'll pay him for what he's already done. Magically... it's almost finished. He was just waiting for the head to come and I'd have it by Friday.
So I pay the guy, parts arrive the following week on Tuesday :facepalm:

I unpack a torn and shoddy box to find my bare engine, with nothing more than a 2' square bit of old 1/4" foam over the top. Not happy.
I'd asked for my old jugs and head back. Only the jugs were sent. I'd asked for the remainder of the gasket set so I could do the top end. Half of it was missing.

I felt totally ripped off. He said he'd soda blasted it...nope. Didn't even wipe it down.

I have a horrible feeling he had two 720's in his shop at the same time. I'll put money the other guy "needed a new head" and the heads were just swapped with each other :cuss:

I'm still not done with him. It'll be a cold day in hell before I let a con man like that away with it.

Anyway, back to the rebuild!
 
Last edited by a moderator:
So, now I have my engine to clean down and get ready for paint.
Alas I don't have a soda blaster, so it was a case of mask everything off, use a splash of paint stripper and then get nasty with a selection of wire brushes on a drill...


This is how my motor came back, but without the rags protecting the rods...


Time for wire brush fun on these too!


Time for primer, base and clear! I used a heavy duty marine primer, and alloy acryllic and then a fuel resistant lacquer. I know you're supposed to use 2k, and when it's all assembled. However if you really take your time and mask off properly you're fine.


Nice work. Lacquer will work just fine. Used it for years on v8 blocks. I see why you don't mention the build shop. Sucks to hear the horror stories. Keep the faith and BUILD on.
 
Left the paint to cure over the weekend ready for assembly!

I'm a bit anal when it come to how things should look. So I spent a good while with a wire wheel and all of my nuts and bolts. Here is an example, Ahhhh, much better. I'll sleep well tonight. Albeit with vibrational white finger.


Now the fun part!


I replaced the crusty old oil lines while I was on. They were rotten. Like crispy silver oily noodles. No thank you sir.


So I tried to find some decent pipe of the right ID, but nada. Not a jot of luck. In the end I was resigning myself to using equally crappy and kinky (and not in the good way) PVC tube. But then, like a mad man in the night I had an idea!

Fuel line from nitro 2 stroke radio controlled cars (I used to race these. A lot. Therefore many, many many boxes of spares etc).
This fuel line is perfect. Impossible to kink, will handle the oil without discolouring and best of all I already had it! *happy dance*.

So after going down the rabbit hole looking at all my old RC race gear I eventually got back to work.

The hull was given a deeper clean, and new mounts installed:


Then FINALLY, the motor went back in and was aligned:


I just need to put the pipe and carb back on, bleed the oil system and connect up a few odds and sods.....
 
Nice work. Lacquer will work just fine. Used it for years on v8 blocks. I see why you don't mention the build shop. Sucks to hear the horror stories. Keep the faith and BUILD on.

Thanks. Yeah, I don't really like to publicly shame people. Their work speaks for itself.
Besides, it's been a good learning experience :)
 
Wow!

Very good work and the pictures are greatly appreciated so others can see how easy it is.

I think your [MENTION=57920]racerxxx[/MENTION] doppelgänger but on other other side of the world.

Keep up the good work and the pictures.

Welcome to the forum BTW
:cheers:
 
Wow!

Very good work and the pictures are greatly appreciated so others can see how easy it is.

I think your [MENTION=57920]racerxxx[/MENTION] doppelgänger but on other other side of the world.

Keep up the good work and the pictures.

Welcome to the forum BTW
:cheers:

Thanks, I've been reading [MENTION=57920]racerxxx[/MENTION] resto threads. Very impressive!
 
Here's a short 40 second time lapse video of the hull being detailed.

Before anyone says anything...It's in the wrong order and shows the wax stage first. Video editing fail :facepalm:

[video=youtube;nmmIn4r_ORg]https://www.youtube.com/watch?v=nmmIn4r_ORg&spfreload=10[/video]

This is a partial record of the detail. I was just playing with time lapse. Captured on a GoPro Hero 3 black, and iPhone 5S.

I'd already completed this process on the underside of the hull.

Process:
  • Pressure washed hull.
  • Decontaminated glass with clay bar.
  • Cut with Farecla G10 on a medium 3" mop.
  • Waxed with Dodo Juice Supernatural Hybrid.
 
Last edited by a moderator:
LOL, you guys kill me. Thanks for the kind words and keep up the great work.

Many you must be an American trapped in the UK (kidding). Probably not too many Fieros over there. Hell, I haven't seen one here in years, LOL.
 
Hey I'll pay you $200 per hour if you come over an detail my skis (as long as they only take 40 seconds each!) Lets see.... Here is a five dollar bill...

Great job. And nice pictures.

Hope it runs as good as it looks! Enjoy your toy.
 
Very good work. Hope you're putting grease around those bolt shanks, otherwise you'll get a ton of salt corrosion around them later. I never thought to use paint stripper to clean off the old paint. I can tell you though that sand blasting the block is a super PITA! I have a GTI just like this, great ski. I think she'll like it.
 
Ran well for about 30 minutes, then started to lose power and want to cut. Seemed like a fuelling issue. So back to the ramp to fiddle.
Found out the fuel filter O-ring was split and I was sucking air. Bypassed the filter and in doing so noticed the fuel selector only worked on RES. Bypassed that too, so I was running direct from the tank (I know, not ideal, just for testing).
.

Hey [MENTION=77009]Kwik_uk[/MENTION] , I'm kind of experiencing a similar issue... When you noticed the fuel filter o-ring was split/sucking air, what were your symptoms? Did the ski start up and idle fine all the time, then once you nailed it or started giving a little gas it would cut?
Thanks!
 
Hey [MENTION=77009]Kwik_uk[/MENTION] , I'm kind of experiencing a similar issue... When you noticed the fuel filter o-ring was split/sucking air, what were your symptoms? Did the ski start up and idle fine all the time, then once you nailed it or started giving a little gas it would cut?
Thanks!

It wasn't just the fuel O-ring. I piped it direct to the tank trying to rule it out, alas the issue persisted. I actually had an air leak on both crank seals (amongst other things).

I think you'd get similar symptoms, although I could be wrong.

For the sake of £2 it's worth swapping if you doubt it's sealing. Make sure the filter housing is tight. Any hoses that have rough ends, cut them and re do the crimps.

Rule out all the simple issues first.


Sent from my iPhone using Tapatalk
 
Well, I got to doing a few more bits to the ski today.

Fuel system is now all hooked up. New hose all round, new fuel selector, new filter O-ring.

Old selector had gone crusty and oxidised itself to bits, so that went the journey - how they can charge £32 plus £3 for the plastic nut (which is made of cheese I might add) for this is beyond me. Needs must though.


Once this was out of the way, I fixed the foolish mistake I made. Did any of you eagle eyed souls spot it? I didn't even see it when I was staring at it. Here is a hint....


Fail. Sorted now, just annoying to remove, clean, regrease and re-threadlock the studs. Ah well.


I also fought with the 3" plastic air hose on the starboard side. Took some jiggling and a lot of swearing, but it's finally back where it should be.

Carb is on, oil pump was bled and set up correctly. Thank god for mirrors on telescopic rods.


So, I'm sitting there feeling quite smug as it didn't take that long....when I notice OIL. Argh, where is this damn oil coming from? Did I not tighten the bleed screw? Is my tank split? Nope. *head scratch, head scratch, head scratch*

You know the oil feed on the bottom of the motor? That one that's hidden so far that you need octopus tentacles to reach? Yup, that's the one that was leaking. Seems there was a minute split where the clip went round. So an oily hour later and that's sorted.

I'm watching you oil line, I'm watching you....


I replaced the oil in the jet pump too. I thought why not. I've got a bottle of it, and it's the once doing this season.

I re-gapped the plugs, injected some oil down the bores and gave it a few good turns by hand. Running pre-mix in the tank too for break in, in addition to the standard oil injection.

Connected all the remaining wires, got the fire extinguisher, primed the fuel lines and pulled the trigger...BOOM we have lift off!

I know compression isn't true yet till the rings bed in, but as a preliminary reading I was getting 152 PTO, 151 MAG. Quite happy with that.

All that remains now it to install the seat support and the glove box and she's ready to hit the water for break in :thumbsup:

A quick shot of the motor before the airbox goes back on and it's given a final clean and tidy.

 
This is funny, Brother from a different Mother! You are a brother to us from a different shore. I LOVE IT !
You need any help or advice don't hesitate to ask. Wrenching is International with the Internet involved!
 
This is funny, Brother from a different Mother! You are a brother to us from a different shore. I LOVE IT !
You need any help or advice don't hesitate to ask. Wrenching is International with the Internet involved!

Haha thanks Mick. It's great how the internet is the universal leveller. Advice from old threads on this forum has been a great help to get me this far.
 
Right, well it's all now back in one piece. No more leaks, no 'left over' bits, and no reason not to hit the water ASAP!

IMG_9639.JPG IMG_9648.JPG

I'm missing one part. Can anyone see what's missing in the picture? C'mon, best game you played as a kid on the back of a cereal box.There's a free plastic toy to the first person with the right answer on a postcard.

It's a part I thought I'd ordered, and had plain old just not. Oh well, worse things happen and sea.....hey hang on :facepalm:


Here are a few shots of it back in one piece, albeit it covered in dust. Quite happy with the paint finish on the hood. The time spent compounding and waxing really paid off. I do need to attend to that small crack however. Mini-project for the darker nights.

IMG_9645.JPG IMG_9643.JPG IMG_9646.JPG
 
So the GTI got splashed today and the break in started. Running 50:1 premix XPS mineral, and it has standard oil injection.

The break in method I'm following is below:

  1. 1st 30mins after warm up running at up to 20% short blips,
  2. Let it cool 30mins,
  3. 2nd 30minutes up to 50% blips
  4. Let it cool 30min
  5. Run the rest of the tank varied up to 80% blips


Second tank premix too, and do the same as the first tank for the first half tank, then run it as normal for the rest of the tank, without holding 100% for longer than a few seconds.


This all went peachy till 5 minutes into the 50% runs. It backfired like a beast and power dropped. Plugs were oily wet. Cleaned the plugs, back in, better. At that point the tide had started to turn and I didn't have much time to go any further.

My question is, is it normal for the plugs to oil up so much during break in? I'm guessing yes due to all the extra oil, but a definite yay/nay would put my mind at rest. If this is correct, is it normal to bring it back in several times during break in to clean off the plugs?

Oddly, it sounds far superior to before the rebuild. Almost a deeper note to it.
 
Nope. Think bigger. Once you see it...

tags are out
i just broke one in,,yes,my plugs were horribly oily,,changed them twice for break in period.one set actually oil fouled.
what a great write up,,had me crackin up a few times!!
 
Last edited by a moderator:
Status
Not open for further replies.
Back
Top