The Seadoo Carb Rebuild Thread

Note: This site contains eBay affiliate links for which SeaDooForum.com may be compensated
Status
Not open for further replies.

mikidymac

Moderator
Staff member
Moderator
So, I know we keep talking about making a How-To thread on rebuilding carbs and never get around to it so last night I decided to finally get-r-done. This will be a work in progress as there are a lot of pictures and text to upload for this so give me a little time. I also welcome any tips and hints that others might have so we can make this as easy as possible for the first timers.

This will work for any of the Seadoo carbs except for the old round body carbs found on the early models and even the Yamaha's.

First off I am going to assume you have removed the carbs and it might not hurt to label the hoses and cables so that you can get them back on. I know some people remove the cable brackets from the carbs with the cables on so you don't have to readjust them.

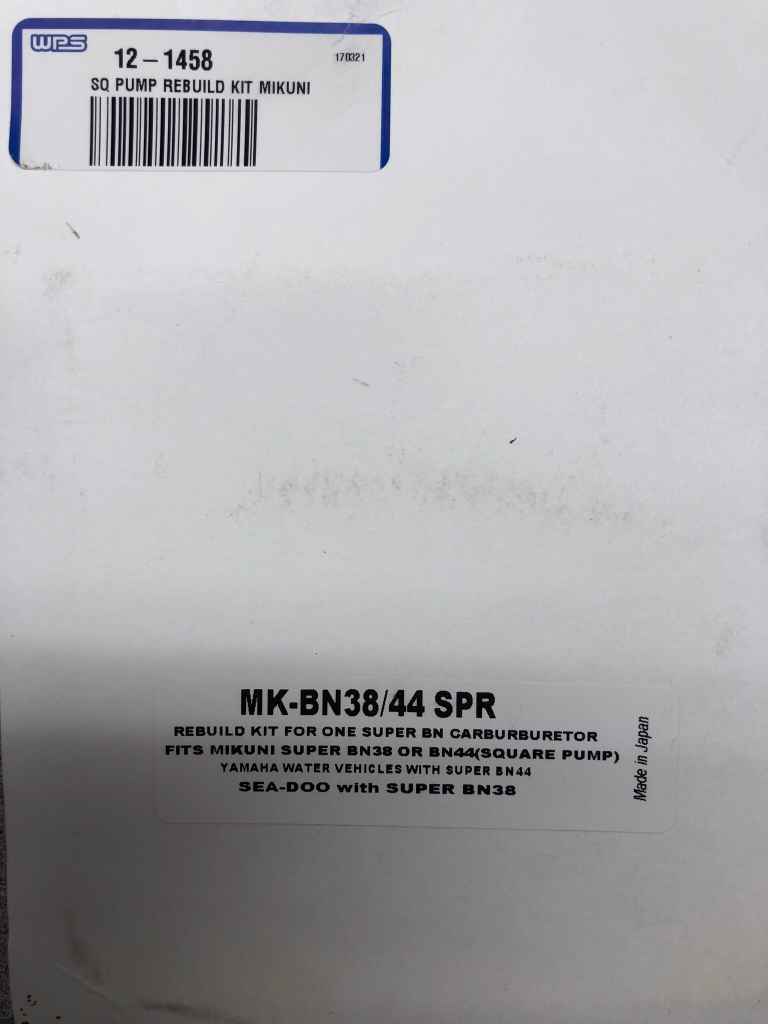
The supplies you will need are new GENUINE Mikuni carb kits and needle and seats. You can get them from Amazon, Ebay, Site Sponsors and OSD Seadoo parts DO NOT buy SBT, WSM, Wonderosa, Venom, Titan or any kits as they are guaranteed to be junk and give you more problems. All carbs except the 951 use the Mikuni number MK-BN38/44-SPR. The 951 uses different carb kits number MK-BN46I and pop-off springs exclusive to them. You will need new carb to manifold gaskets, new standard black automotive fuel hose in 1/4" for 97 and older 787's, 720's, 650's and 580's. 951's and 98-99 787 use 5/16" fuel supply hose and 1/4" return hose. Nitrile rubber gloves for the cleaning solvents. I like Walmart brake parts cleaner because it is cheap and works great. WD-40 for checking pop-off and some paper towels. I have a notepad and pen to record the settings.

IMG_0518.JPG
The Tools: Needle nose pliers, flat blade screwdriver (as you can see the tip is ground down for reaching the pilot jet), small phillips, small flat screwdriver and the green one is very important as it is not a phillips but a Japanese Industrial Standard, the reason it is so important is that the Mikuni carbs use JIS screws and a phillips can and will strip them out. I bought this one on Amazon. You will also need to buy or make a pop-off gauge. As you can see mine is a brass tee, a schrader valve, a barb for the hose and a 0-100 gauge from Harbor Freight, I then use the bike pump for pressure. An air compressor and spray nozzle or some canned air if you don't have a compressor. Also some razor blades, maybe a small pick. Safety glasses as brake parts cleaner burns really bad in the eyes. Last is a clean work space and some clean rags.

So lets get started......
If your carbs are really dirty I suggest a spray with brake parts cleaner first and a blast with air. Remember the gloves as the parts cleaner is hard on the skin. I also would snap some pictures so you can see how the hoses go back on.
IMG_0482.JPG
As you can see these carbs are very clean and are from a 1997 GSX. THey have the dreaded TEMPO gray fuel lines that rot from the inside and ruin engines. These do not have accelerator pumps but I will add that later.

I suggest marking the carbs as MAG for magnito/front carb and PTO as in Power Take Off/rear carb. I also mark the rod connecting the carbs.
IMG_0485.JPG
Next we will remove the hoses...
IMG_0487.JPG
If you get a little flat screwdriver into the crimp of the clamp and wiggle it side to side the clamp will loosen and you can pull them off, dont worry about dammaging them as we won't reuse them.

IMG_0488.JPG
Here is the start of the green goo, it is caused when the ethanol in the newer fuel degrades the inside of the Tempo lines as it was never intended to be used with ethanol fuels. The goo makes it's way into the carbs and plugs the internal filters and starves the engine from fuel burning up the pistons.

Next we will want to record the carb settings for the High and Low speed screws.

IMG_0490.JPG

The high speed screw is under the plastic cap at the top of the picture and it can be wiggled off with needle nose pliers.
IMG_0492.JPG

The low speed screw is on the opposite side and has a Tee handle.
IMG_0491.JPG

We are going to turn each one in, clockwise until they lightly stop, counting the turns in and record the number of turns.
IMG_0493.JPG

Now we are going to remove both low and high speed screws. Make sure you get the o-rings and springs out.IMG_0523.JPG

Next post we will start taking the carb apart as it will only let me post 10 pictures.
 
Last edited:
Ok, taking the carb apart......
IMG_0528.JPG
It's a little out of focus but there is a small dimple on the screw that signifies the JIS (Japanese Industrial Standard) and NOT a Phillips. So use your JIS screwdriver.

So moving onto the fuel pump which is only on the MAG carb. We will remove the 4 screws and pull off the cover.
IMG_0495.JPG

You might have to tap the cover but it will come off.

IMG_0496.JPG
In the background you can see the cover that has a black mylar film on it this should be clear. This was my first clue these carbs did not have Genuine Mikuni parts, the black disc to the right is one of 2 fuel pump check valves and I have never seen black ones, again, they should be clear.

IMG_0498.JPG
Remove the check valve block....

IMG_0499.JPG
Under the check valve block is a thin rubber membrane, the shaped o-ring and a small filter.

IMG_0500.JPG
Pull the filter out and hopefully it isn't plugged like this one. This is what kills so many seadoo engines. Once this plugs your engine will starve for fuel and lubrication because it is a 2 stroke and the engine will seize.

Now we will flop the carb over and work on the metering body side.

IMG_0504.JPG

IMG_0505.JPG
In the picture you can see the diaphragm that actually opens the needle and allows fuel int the carb body from the fuel pump side. As you can see in the middle of this one the dimple should be red, again this carb does not have good quality parts in it.

IMG_0506.JPG
That's not good! This one had water in it at one point but it is salvageable.


IMG_0508.JPG

We are going to remove the small screw that holds the needle arm and spring on now.

Next thread......
 
Last edited:
IMG_0509.JPG
Remove the arm....IMG_0510.JPG
And the spring under it. IF yours is correct then save it to reuse it as the ones in the kits are typically wrong. This one is too corroded to work and doesn't look correct so we will be replacing it.

IMG_0507.JPG
We are going to remove the small screw that holds the plate that holds the seat for the needle in. This actually lets fuel into the metering chamber. Again' use your JIS screwdriver.
IMG_0512.JPG
Use your needle nose pliers to pull the seat out.
IMG_0513.JPG
Next the 2 screws for the metering block. As you can see these are rusted and might strip if you don't use the JIS screwdriver. I used to use an impact screwdriver to get them out until I bought this screwdriver but haven't had an issue since.
IMG_0514.JPG
Lift the block up and out.IMG_0517.JPG
On the back of it you will see me pointing at a small mylar check valve. If this is damaged or missing the ski will run like carp or not at all, Remove the small screw and plate, hopefully your's is not rusted.
IMG_0519.JPG
Here you can see a flat screwdriver I ground down to fit into the pilot jet just to the left of the tip. It is standard threads so unscrew it. You might have to tap the carb upside down to get it to fall out.
IMG_0520.JPG
And do the same for the main jet.

For the PTO carb without a fuel pump the metering side is exactly the same.
IMG_0527.JPG
Remove the plate where the fuel pump would be....
 
And inside is just an o-ring seal and another filter that on this ski was plugged also.IMG_0529.JPG

Now on to the cleaning....
I like to get all the parts laid out and ready to go and throw away all the old parts that will not be reused.
IMG_0538.JPG
This is what I threw away but be aware if you use the OSD kit you will need to reuse the spring arm, large o-ring and shaped o-ring, the rest can go in the round bin.
IMG_0540.JPG

For the rust on this one I used a pick and a small brass wire brush and just take your time and scrub and use the brake cleaner. I didn't take a lot of pictures of this but make sure all parts are clean and blown out with air. The rusted screws and retaining plates were cleaned with the brass wire brush.

IMG_0545.JPG
Notice the gloves now? The brake parts cleaner is very harsh on skin.
Here you can see the main jet was plugged, if the brake cleaner will not get it clean pluck a wire from your wire brush and use it to get it clear then more brake cleaner. DO NOT use a drill, welding torch cleaner or file or you will change the flow of the jet.
IMG_0546.JPG
Nice and clean.
IMG_0547.JPG
You can see the pilot is plugged too. This ski would have never run like this.
IMG_0548.JPG
And clean too.

Next is one of the most important parts of cleaning the carb. In the pilot circuit there are three small hols and one large hole that meter fuel into the carb at idle and just off idle and it is typically the three small ones that get plugged. This will cause a poor idle and a stumble or hesitation off idle when you start getting into the throttle.
IMG_0551.JPG
This is looking into the carb from the bottom with the butterfly held open.

IMG_0552.JPG
Here you can see the cleaner starting to flow out of the large hole at the 1:00 position and a small stream out of the three small holes at the 2:00 position just below the "8" stamping. If you don't get any flow put the low speed adjuster screw back in about 1 full turn once the threads catch.

IMG_0556.JPG
Now we have a good strong flow out of all four holes. Now remove the low speed screw and blow everything out with air.
 
Last edited:
Moving on, make sure you get all the green slime off the fuel hose fittings.
IMG_0557.JPG
I like to use q-tips with some brake cleaner on them.
IMG_0558.JPG

At this point I kike to give one more hosedown of everything with cleaner and compressed air, layout a new clean rag and get all my parts in order as cleaning is done and we are ready to put them back together.

Getting it back together.....

IMG_0549.JPG
Here we have the genuine Mikuni carb kit on the right and the OSD Seadoo parts kit on the left along with two genuine Mikuni needles and seats.
I have always used the Mikuni kits and thought I would give the OSD kits a try for this rebuild. My opinion is the OSD kit is all genuine parts and good quality but seeing as most of the rubber parts are 20 years old I like to replace the large o-ring and shaped o-ring and lever arm and the OSD kit doesn't come with them but I think you can add them on as "extras". For me I will just stick with the full Mikuni kits.

Be very careful when opening the kits as the clear fuel pump and metering block check valves are easily to loose and drop. Unfold the paper very slowly over a rag until you find all three.

IMG_0560.JPG
Let's start with the fuel pump... The check valves are thin mylar film and because the are cut from a roll there is a curve to them. This curve must be installed up so they seal and because of this the factory marks them with a blue mark.

IMG_0561.JPG

It is hard to tell what side the mark is actually on so my trick is a drop of brake cleaner on a rag and wipe the mark, when you have the correct side the brake cleaner will remove some of the marker but will not harm the plastic. You can now set the check valve with mark up on the fuel pump body.

IMG_0562.JPG
For the rubber holders I use a small ball end allan wrench. You don't want anything sharp or with a point as it will break through the plug and then it is trash. I use a small smear of silicone grease int he end of the plug just to help it go in.

IMG_0563.JPG

The key here is to go slow and not apply too much pressure on the plug. I like to push it while moving the wrench around and around in a circle to slowly work it in. Eventually it will pop through and be seated.
Now just do the same for the other side.
IMG_0566.JPG
And done.

IMG_0567.JPG
Next install your new filter.
IMG_0569.JPG
The large shaped o-ring.
 
Last edited:
IMG_0570.JPG
Next the rubber membrane.
If you notice at the top/left is a notch for aligning the parts.
IMG_0571.JPG
The fuel pump block.
IMG_0572.JPG
The large o-ring.
IMG_0573.JPG
The mylar film.
IMG_0574.JPG
The gasket.
IMG_0576.JPG
Finally the cover, brackets and screws.

Now flip the carb over to the metering side....IMG_0577.JPG

IMG_0578.JPG
Next install the needle seat, I put a little silicone grease on the o-ring to help it in and install the retaining plate and screw. These are small screws in aluminum so don't get crazy torquing them.
IMG_0579.JPG
IMG_0580.JPG
Next the main jet. Remember brass in aluminum, two soft metals.

And 10 picture limit...........
 
IMG_0581.JPG
And the pilot jet.

IMG_0582.JPG
Followed by the metering block gasket.

Now onto the metering block check valve.
IMG_0583.JPG
The mylar check valve can only go one way since there is a hole for the screw and one for the alignment dimple on the retaining plate.
IMG_0584.JPG
IMG_0585.JPG
There is some wiggle room on the check valve so make sure it is centered between the two dots before you tighten the screw.

IMG_0587.JPG
Install the block and screws.

IMG_0588.JPG
Now install your pop-off spring. DO NOT use the spring in the kit!!!!! If you can't verify you have the correct spring buy new ones. The wrong spring will have you chasing your tail all summer. Most 787 skis without accelerator pumps use the 80 gram (black) spring, seadoo number ends in 267. Check the parts diagram or seadoosource to see what yours takes. This ski uses the black 80 gram spring.

IMG_0589.JPG
Next the spring arm, pin and needle. Make sure the dimple on the spring arm is aligned over the spring.
IMG_0590.JPG
Use a razor blade to make sure the arm is flush with the raised body of the carb. This is our base setting. We will do a final adjustment when setting pop-off. If you need to adjust the arm make sure you do not push down on the needle as the rubber tip can be damaged if pushed too hard into the seat causing it to leak and flood the engine.

Setting pop-off......
This next step is very important, please don't skip it, you have already come so far so don't cut corners now. You can either buy the tester or make one. I made mine for less than $20 and it can also be used to pressure test engines and pumps. Make one, buy one, steal one, just get one is my point. (Please don't steal).

IMG_0591.JPG
On the MAG carb you will have to plug the outlet and return ports. On the PTO carb it only has a return so you can use your thumb.

And out of picture space.......Next!
 
Last edited:
IMG_0592.JPG
Connect your tester to the inlet port... You can find your pop-off range in the manual or again, at seadoo source. Mine was between 23-43. It's a large range so I like to keep it in the upper range but you just need to see what yours do.
IMG_0594.JPG
You will only get an accurate "POP" if the needle seat is wet. You have to do this every time you check it even one after the next. Hold the arm down on the spring side to open the needle and squirt some WD-40 into the seat.

IMG_0595.JPG
Cover with a paper towel because when it pops it will spray into your face. I use a hand pump so I can go slow and see exactly where it pops.

IMG_0596.JPG
You should get a clean pop then the needle should close with no leaking. This one popped at 38 psi then set at 32 psi and held. I couldn't get a picture of the actual pop but you get the idea. I checked it 2 more times with WD-40 every time to confirm 38 psi.

Now rebuild the other carb and check it's pop-off. You want them to be as close to the same as possible. My other one was popping at 32 psi. I swapped springs and arms back and forth and got to 32 psi and 35 psi. Sometimes there is no rhyme or reason why swapping back and forth makes a change but it does. I wanted them a little closer so on the 32 psi carb I bent the arm over the spring down just a hair to get a little more tension on the spring and then they were both at 35 psi. You can only bend them up or down 1-2mm before it will cause a problem so don't get carried away. I would think being within a couple psi is fine.

Now that pop-off is set you can install the diaphragm and cover but you aren't done with the tester.
IMG_0601.JPGIMG_0602.JPG

IMG_0604.JPG

Now with the cover on we are going to put 10 psi into the carb and make sure it holds for a couple minutes. This is to make sure the needle is sealing and the diaphragm isn't holding it open. The cheap aftermarket kits will fail this test. If it is leaking you will have to find the cause, bad needle and seat, arm bent up too far, bad diaphragm. Either way you will have to fix it or the engine will flood and be hard to start if at all.
IMG_0598.JPG

Almost forgot about the adjusters.... Clean them up. I like a little waterproof grease under the spring and on the threads like the factory. On the o-rings I use silicone grease since it won't dry out the rubber.
IMG_0599.JPG
When you put them back you can go by the previous settings that you wrote down. If the ski had problems or never ran and the ski is stock set them to the book specs or again, seadoo source. A stock ski should run perfect on stock settings.

IMG_0605.JPG

Getting close..... Cut new carb hoses to match the old ones.

And next post......
 
Last edited:
IMG_0606.JPG
I use the Thomas & Betts expensive zip ties with the stainless locking tab for all the connections and have never had a leak or issue. Don't go cheap on these.
IMG_0607.JPG
And we are finished. I will update this with the accelerator pump rebuild supplement and carb installation shortly.
 
Thanks for doing this - the pics are superb and the presentation is excellent - best I have ever seen. I have a 97XP that might need a re-jet (bought R&D 3.5" flame arresters) and I may have to do the work myself. My carb does have an accelerator pump so I look forward to you getting to that.
 
This is great. I am having trouble finding the correct OEM Mikuni Carb Kit.

I have a 1998 speedster with twin 787 that I picked up over the winter and I want to go through the carbs before i run it.

I see you mentioned a few places in the first post but where do you get your carb kits from?
 
You can get the parts from OSD SeaDoo or the kits from amazon and eBay
2940661ee95e7966a5c281e51c3185e0.jpg
genuine part numbers.
 
Excellent write up. I want to thank you for your time making this post and let you know that it will help several people even if they don't post about it here. It's helped me as I will be cleaning/rebuilding them prior to the riding season.

You forgot to mention what your beverage of choice was when rebuilding the carbs though...
 
Great info, the only thing you can add is the 951 uses 5/16 line BUT the return line is 1/4.
 
Yes I know, I see you fixed it. Like I said, great info and pics. Wish I had this 18 years ago when I started working on them ;)
 
I used this thread to start tearing down my carburetors today. thank you miki for pointing it out to me.

the one small item that I thought would improve the process would be to use firm pipe cleaners instead of the Q-tip. you can buy a load of them on amazon for about 6 bucks. the brand is "ZEN". if you can't wait that long for them to arrive in the mail, you can probably also find them at the local smoke and sex shop.

I'm not even going to ask why a sex shop would have pipe cleaners or how you know they have them......
 
This story is so off topic, but I actually belong to a forum for clocks and clock repair. I was working on a grandfather clock movement and really needed pipe cleaners in a bad way to rod 100 years worth of gunk out of the holes. I searched everywhere locally for any type of pipe cleaner. Walmart, target, Michaels, dollar general, big lots, an independent craft store.....you name it. I kept coming up empty handed no matter where I looked.

On my way home I was passing the local “you know what” store and as an afterthought, I swung in there to see if by chance they might have what I was looking for. Low and behold....right there between the bongs and the....ehm.....”toys” was exactly what I needed.

I found out that they even come in “soft” and “hard”. (Just like a few other things you can find in a place like that) Who knew?

I made a posting about this on that other forum and of course someone had to ask where they were sourced from. Since the members there are generally much older than I am(and presumably very conservative), I was pretty apprehensive to tell. in the end I decided it was best to just “come clean”.(pun intended)
 
Last edited:
Status
Not open for further replies.
Back
Top