need some help guys i have a 1998 seadoo challenger and on second run i hit a rock on the left side of drive intake scraped through the jell coat 24" and 2" wide and cracked the fiber glass in 4 spots allong the way, does anyone know if the bottom of these boats are filled with foam or are they open to the rear of the boat i am going to start some grinding tonight and open up the cracks to see what it looks like under there ane allow it to dry so i can re fiberglass the bottom, any thing i am missing or should be doing? or know of a thread where someone has done this type of repair with picts?


-
This site contains eBay affiliate links for which Sea-Doo Forum may be compensated.
You are using an out of date browser. It may not display this or other websites correctly.
You should upgrade or use an alternative browser.
You should upgrade or use an alternative browser.
repairs to bottom of boat challenger 1800
- Thread starter my_nanc
- Start date
- Status
- Not open for further replies.
had a better look at it last night i have fans on it to dry and drilling holes in it, it actually cut the full 24" long and 2" wide folded in 1/8" so i am drilling the pushed in piece and will inject resen into the drilled holes and slope the edges and fiberglass it i will take picts as i go along dont really want to do this but oh well it is a boat and i need it to float ha ha.
parrothd
Active Member
had a better look at it last night i have fans on it to dry and drilling holes in it, it actually cut the full 24" long and 2" wide folded in 1/8" so i am drilling the pushed in piece and will inject resen into the drilled holes and slope the edges and fiberglass it i will take picts as i go along dont really want to do this but oh well it is a boat and i need it to float ha ha.
Search my username for my posts I repaired a similar size hole, there's no access..Once I grinned/cleaned and dried everything I used epoxy w/ filler with peanut butter consistency and packed it in the hole, then built it up with several layers..
http://www.pwctoday.com/showthread.php?t=146248&page=5 (has great info)
Last edited by a moderator:
do you have the thread when you did yours, or have picts, need more detail, i signed up on that forum as i was not allowed to view picts, man he did a nice job, i plan to get materials on tuesday and post picts all through this challenge on the challenger, ha ha, if you have a link to when you did yours pm me or post it on here thanks.
these boats have a double layer that is rather thin and between them is a wood core material. hard to dry once it gets wet.
these boats have a double layer that is rather thin and between them is a wood core material. hard to dry once it gets wet.
I was going to take picks of my Sportster 1800 when I fixed the bottom but I could just fit under there and the pics came out kind of crappy. My damage diddn't make throught the whole boat but the fireglass was damp and hard to grind quite a bit away to get rid of the soft areas. Mine was someone just 1/2 assed the repair and put bondo in the area and gel goated it. The bondo flexed to much; cracked and let water in to the fiberglass.
I just used the real thick fiberglass mat to build it back up, skim coated it with marine filler, and sprayed gelcoat. From Barnett marine they have a good video that goes over the whole repair process for like $60 or somehting like that. It is pretty good video and gives some good tips on the whole process.
I just used the real thick fiberglass mat to build it back up, skim coated it with marine filler, and sprayed gelcoat. From Barnett marine they have a good video that goes over the whole repair process for like $60 or somehting like that. It is pretty good video and gives some good tips on the whole process.
parrothd
Active Member
I was going to take picks of my Sportster 1800 when I fixed the bottom but I could just fit under there and the pics came out kind of crappy. My damage diddn't make throught the whole boat but the fireglass was damp and hard to grind quite a bit away to get rid of the soft areas. Mine was someone just 1/2 assed the repair and put bondo in the area and gel goated it. The bondo flexed to much; cracked and let water in to the fiberglass.
I just used the real thick fiberglass mat to build it back up, skim coated it with marine filler, and sprayed gelcoat. From Barnett marine they have a good video that goes over the whole repair process for like $60 or somehting like that. It is pretty good video and gives some good tips on the whole process.
Not sure what happened to the thread, but basically you need to grind/cut all the damage out and flair the hole out. I used a hair dryer to dry the inner hull wood and fiberglass, took a few days with the dryer on 24hours. There's lots of videos on hull repair, I think this one is very helpful. There's several others on the side..
http://www.youtube.com/watch?v=i97TlAdenv4
Once you get all the damage out and dried, you can use epoxy and filler, mix it to a peanut butter consistency paste. I forced as much as I could into the inner hull with a putty knife, then used some plastic and tape to shape and keep it all inside. Once it cures, I hit it with the grinder and made enough room to add a few(1 or 2) layers of fiber glass. Once that cures hit it with the grinder to roughen it up, then mix up some more epoxy and filler and used that to shape and finish and get everything as smooth and following the contours of the boat. You can always sand and shape and/or add more filler...
parrothd
Active Member
If the wood is not damaged or rotted I wouldn't replace it.
Ditto, with a hole that long make sure you leave enough room to add 1-2 layers of fiberglass...You don't want bump/hump sticking out when you get it all finished....
")
man that west epoxy is the sh/t works awsome and filled up the spots i needed to used tape to hold it in like you said and injected it into the holes and behind the tape now it has set up and tonight i will fiberglass it all in then epoxy again and the jell coat, i got white gell coat with a brown to add to make it a cream color.
parrothd
Active Member
man that west epoxy is the sh/t works awsome and filled up the spots i needed to used tape to hold it in like you said and injected it into the holes and behind the tape now it has set up and tonight i will fiberglass it all in then epoxy again and the jell coat, i got white gell coat with a brown to add to make it a cream color.
How are going to apply the gel coat?
I tried a roller but it created an orange peel effect, I don't have a sprayer and not sure if it will work upside down, maybe a foam or brush? I should sand it all out and try again, but I've upgrade so I'm selling this one...Hopefully they don't look underneath..
You'll need to wet sand the gel coat and then buff it what ever you do..
Last edited by a moderator:
ski-d00
Well-Known Member
I repaired a hole the size of a football in the bottom of an 05 speedster 200 along with several other holes. Just follow the west system videos, they show you how to "tip off" gelcoat so you don't get orange peel. You can wet sand and polish the gelcoat out after you have 3 or 4 layers and you won't see the repair at all.
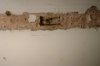
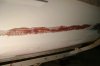
I will be painting on the gelcoat with a brush, but i guess i can roll it on. here are a few picts of the progress, should be fiberglass tonight hopefully.
Attachments

ski-d00
Well-Known Member
make sure you use epoxy and not fiberglass resin, the old school way of using resin can't hold a candle to the new epoxies of today.
you really should watch the west marine repair video series, it shows you how to do everything including the gelcoat. it will last forever if done right and will be stronger than new. if you use fiberglass resin, it will crack out in no time.
you really should watch the west marine repair video series, it shows you how to do everything including the gelcoat. it will last forever if done right and will be stronger than new. if you use fiberglass resin, it will crack out in no time.
The trick for the seadoo color with standard white gel coat is dash of yellow. It will blend real good. I repaired the back of my boat between the jets pumps that was scrapped and you can't tell the color difference. Here's the deal it's on the bottom the color doesn't need to be perfect if some cares about that they are crazy it's almost a 15 year old boat and nothing will be perfect. On mine you can see the patch on the bottom since I was working upside down and I really didn't care that much about the color. My damage is exacaly in the middle of bottom you wouldn't see the spot unless you are laying on the floor right under it.
I did use a gel coat gun. It lays it down pretty smooth. The trick with the gun is you need to put it on pretty thick until you see a shine in the gel coat. I tried the brush/foam brush and you get the brush marks in the gel coatafter it tries so just put it on thick and sand it if you don't have a gun.
It should come out better if you use cabo-sil and thicken up the gel coat and use the spreader like you are applying bondo. That works best with out a gun and has the least amout of sanding. I used that method on my bottom to tough up some spots. You can get away with it since your boat is on its side.
I just used acetone before I applied the gel coat. As long it doesn't have 'wax' in the prodcut you don't need to sand it, but my resin was sanded to make it flush. I used just standard Poly resin since I was just fixing a few scrapes like Maybe 1/2" deep. If I had a hole like you I would used the Epoxy since it is a stonger repair. The pics looks nice.
My boat was just bottomed out. I see why they added a depth finder now.
My boat was just bottomed out. I see why they added a depth finder now.
parrothd
Active Member
I will be painting on the gelcoat with a brush, but i guess i can roll it on. here are a few picts of the progress, should be fiberglass tonight hopefully.
Wish I would've rolled mine over, nice garage!
Wish I would've rolled mine over, nice garage!
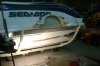
Thanks we had the garage built befor the house and actually lived in it for 3 months back in the day, has everything i need. just heading outside to put on the last layers of epoxy, i fiberglased last night, 4 layers in some spots 2 in others.
sanded it out nice added the epoxy now for it to dry and add the gell coat, i am using west systems is there anything that i might miss when applying the poleyester gell coat, should i wipe with accitone or just water? I have herd both but what works better i am also going to be sanding once more to give a rough serface for the gell coat to bond to.
- Status
- Not open for further replies.
Similar threads
- Replies
- 0
- Views
- 381
- Replies
- 3
- Views
- 570
- Replies
- 0
- Views
- 311
- Replies
- 13
- Views
- 839