Neglected 1996 Seadoo GSX rebuild thread (with lots of pictures!)

Note: This site contains eBay affiliate links for which SeaDooForum.com may be compensated
Status
Not open for further replies.

DanBBB

Member
Hey everyone! I wanted to share the story of my new Seadoo GSX because I thought some of you might enjoy reading about it and others might be able to gather some ideas for a work in progress.

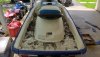
I was on Facebook Marketplace and came across someone selling a 96 seadoo GSX for $200. It had been sitting on the ground in a field since 2016 and looked pretty rough.

Here's the picture from the ad:
Screenshot_20200515-204644_Facebook.jpg
At the time, I had another Seadoo GSX that I was planning to fix so I figured I could probably get a couple parts from this one if I broke anything. What I did NOT realize, is that I would ultimately be fixing this one and ditching the other one. (Side-note, I will be selling a lot of parts for a 96 GSX soon)

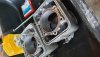
I picked it up and got it home and started digging into it to see what was wrong with it. I pulled the seat off and this is what greeted me:

Screenshot_20200502-222526_Facebook.jpg

At this point I realized I might have something special and started looking more closely at my "Junk, parts ski". Nothing crazy, but I found an R&C nozzle, intake, Coffman's Exhaust, and Buckshot Racing heads.
20200504_165642.jpg20200503_105210.jpg

I tried to start it and discovered the engine was seized up....

Pulled apart things and found a little spot of rust on the cyl wall where a piston was stuck. I let it sit with Marvel Mystery oil for a while and tried again. It moved a little so I kept carefully working it loose until it moved freely.

I put everything back together and it fired up, stalled, and wouldn't start again. Compression tested 145 and 90... <cue sad music>

Time to start the top-end rebuild!

(To be continued...)
 

Attachments

  • Screenshot_20200502-222526_Facebook.jpg
    Screenshot_20200502-222526_Facebook.jpg
    131.9 KB · Views: 15
On a ski like that with the pipe and head I would think twice about the crankshaft. If it’s not perfect it won’t survive the performance parts and new top end.
 
Once I started digging into the engine I pulled the rave valves and noticed they were already cut down. This piqued my curiosity and I measured the cyl walls and found the diameter to be 83mm exactly. =) Ok, so this is a rebuilt motor? Turns out the rings were stuck in the pistons, the cylinders were dirty, but not in rough shape, and after a quick honing job they looked pretty fantastic.
20200515_200351.jpg

Not sure if you can see in the picture, but whoever did the rebuild last time did an excellent job beveling the edges of the ports. At this point it's "so far so good" on the rebuild. Only issue is, during reassembly I tore the new head gasket! Arrgghh.. So I ordered a new one and started working on the handlebar cover and pad. Here's a few before/after pictures from that:
20200516_190503.jpg20200504_145947~2.jpg
20200517_190042.jpg20200517_190045.jpg

I used my vinyl cutting machine to make a stencil so I could paint the lettering on the center there. Looks a bit better I'd say. =)

I also took the seat apart, removed all the rusted staples, and re-tightened and re-stapled with stainless steel staples. It cleaned up surprisingly well. 20200514_201454.jpg

I also pulled the jet pump and replaced the wear ring (which was starting to crumble). The bearings were tight and smooth, so no concerns there. In fact, at this point I'm realizing this seadoo overall is in really good mechanical shape for what it is. Good bearings, clean grease, and the parts make me think this was very well taken care of at one point.

By this time, the new gaskets came back and I was able to put everything back together. The crank looked brand new so I suspect this was a very low hours build that didn't get used and sat neglected despite probably working when it was last parked. All of the bearings were smooth and quiet and nothing had any unwanted play in it. The paint on the heads was gray, as was the paint on the crankcase so I think they were rebuilt together rather than just a top-end rebuild before I got it.

I put some fuel in there and cranked it over for a bit and it started up. It sounded pretty good, though was putting out an insane amount of smoke (as expected with assembly lube). It eventually cleared out and ran excellent, no unwanted noises and everything seems pretty good.

With that out of the way, I got back to the appearance mods... continued...
 

Attachments

  • 20200503_144715.jpg
    20200503_144715.jpg
    1.5 MB · Views: 33
  • 20200503_144715.jpg
    20200503_144715.jpg
    1.5 MB · Views: 31
  • 20200515_200351.jpg
    20200515_200351.jpg
    704.3 KB · Views: 32
  • 20200516_190503.jpg
    20200516_190503.jpg
    470.2 KB · Views: 27
On a ski like that with the pipe and head I would think twice about the crankshaft. If it’s not perfect it won’t survive the performance parts and new top end.
Yes, good point though it appears to be a very low-hours rebuild. I found the bearings to be smooth and quiet and no play in anything so I opted to put it back together and run it as-is. Hopefully I don't regret that, but it's a done deal now.
 
The gauges had been sitting out in the sun for a very long time and boy it showed! They were in terrible shape, but I had some extra polarizing film and decided to replace the film to see if the information showed. 20200516_185456.jpg

I removed them, replaced the tach gauge and replaced the film on the info gauge. Turns out it works! This is when I discovered the ski has 134 hours on it. Which, I guess is pretty good for a 97 with a new engine, new pump, new bearings, new wear ring, nozzle, exhaust, hand grips, seat, etc etc etc...

20200520_215321.jpg

Here's the after (You can see I scratched the trim up pretty bad... oh well, it works!)

I pulled off the rear grab bar and painted that black, and took the time to clean and polish the hull without having that in the way. Also took this opportunity to de-sticker the whole thing since I planned to come up with something unique to set it off as the last step.

Time to replace the mats! A long time ago I had ordered an entire roll of the mat material so I could just cut my own and I'm so glad I did. I have used it on three skis and I still have a little left! Here's the before, during, and after pictures.

20200524_150230.jpg20200526_123238.jpg20200526_133627b.jpg20200527_111429.jpg

Next up, Graphics!!
 

Attachments

  • 20200516_204341.jpg
    20200516_204341.jpg
    609.3 KB · Views: 15
  • 20200526_122707.jpg
    20200526_122707.jpg
    872.4 KB · Views: 16
Nice resto!! It's a fun ski. I did my 96' GSX resto build last year, second season and I'm enjoying the hell out of it. If you want to add a speed o read out on the info gauge check my resto thread in my signature block. I also added the ambient temp and compass, which are plug and play.

You did away with the yellow I see, nice touch, the ski looks better with the black accents. pwcgraphics makes a nice blue carbon fiber set for this ski. Also, a swap to the black XPL sponsons is a nice upgrade and direct bolt on, little more aggressive to really grab in the turns.
 
After I finished up the mechanical stuff (new steering cable, rebuilt steering column, new linkages for steering and trim, and a few other things) I set to work on the graphics. I wanted to do something special that matched the blue and black in the seat so I started drawing things up on my computer.

I had come up with this on my last GSX rebuild: 20200402_140352.jpg
I liked how it turned out, but I wanted to do something different for this one.

I started drawing up logos and came up with this for the rear sides:

20200527_143519.jpg

20200527_150249.jpg

Then I was talking to a friend of mine trying to decide what to do for the front sides and he suggested tribal. It was all downhill from there and here is the final product.

20200528_131947.jpg
20200528_114813.jpg

Once things open and I get it registered I'll let the numbers and letters fill the small space there in front, but till then I'm extremely happy with how it came out.
 
Nice resto!! It's a fun ski. I did my 96' GSX resto build last year, second season and I'm enjoying the hell out of it. If you want to add a speed o read out on the info gauge check my resto thread in my signature block. I also added the ambient temp and compass, which are plug and play.

You did away with the yellow I see, nice touch, the ski looks better with the black accents. pwcgraphics makes a nice blue carbon fiber set for this ski. Also, a swap to the black XPL sponsons is a nice upgrade and direct bolt on, little more aggressive to really grab in the turns.
Per your advice I ordered the xpl sponsons. Thanks for the tip! I have been thinking about the worx set but they're hard to find and overpriced so I was grateful for your suggestion to help it bite a little better in the turns.

Cheers
 
Per your advice I ordered the xpl sponsons. Thanks for the tip! I have been thinking about the worx set but they're hard to find and overpriced so I was grateful for your suggestion to help it bite a little better in the turns.

Cheers

You're welcome, really nice build in the cosmetics department, I like the way you made the colors of white, black, and blue pop on the ski.
 
Great looking ski.

Thanks! Unfortunately I killed it today. I took it out for its maiden voyage and it died. Compression test showed 180 in one cylinder (yes 180! with the Buckshot Racing heads) and 60 in the other...

The autopsy shows that a wrist pin circlip let go and went through the cylinder. It tore it up really bad, but now I'm having trouble finding a replacement. It's 1.5mm over bored with wiseco pistons. Sheesh... wish me luck.
 
The autopsy shows that a wrist pin circlip let go and went through the cylinder

Well that's unfortunate, I have WISECO pistons in both of my skis. Standard bore (82mm) , I had resleeves done vs. overbore. The only way that circlip retainer popped out is it wasn't installed properly by the PO. People tend to forget the open end must be either facing upward or downward in relationship to the stroke of the piston, otherwise at higher RPM when facing sideways it could collapse and pop out.

Is there a scored cylinder wall? Or did it survive?
 
Bummer!! What kind of clip was used on the wrist pin??

Agreed, there’s some junk aftermarket clips floating around out there.

Wiseco are good pistons but make sure your machine shop sets them up correctly because you can’t use the same setup clearance on them as a stock or cast piston or they will seize and let them warm up a little longer also.
 
I don't like the snap ring type with the two holes in them.
WISCO pistons don't use that type of clip, I have two skis with these pistons, just a regular clip that presses into a groove. But like I said above, install any clip wrong and it could pop out.
 
Status
Not open for further replies.
Back
Top