injection oil check valve replacement

Note: This site contains eBay affiliate links for which SeaDooForum.com may be compensated
Status
Not open for further replies.

68ragtop

Well-Known Member
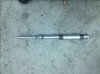
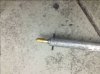
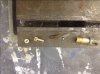
Have any of you guys replaced check valves on a 951?

When I tested the check valves at teardown, they seemed to be functioning as they should. They held vacuum & also a little bit of pressure before releasing. at the time they might have had some residual oil in them that caused them to hold a little better.

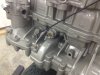
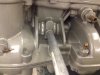
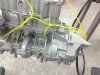
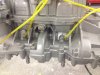
The engine is together, painted & I was putting on some of the accessories. When I installed the oil injection lines I found that one of the check valves leaks slowly under any amount of pressure or vacuum. While I know these are not normally problematic, I don't want to put this engine in & find the crankcase filling with excess oil over winter.

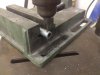
So, I can order new check valves, but how hard are they to pull out of the case? I have never removed one. It would have been stupid easy when everything was apart, but I didn't see any reason to remove them at that time.

Thoughts?
 
Here's the part in question. About the only thing I can do to remove it is grab it with a vise grips & see if it will twist & pull out.

My fear is if I try that & fail, the part will be destroyed & stuck in the block. Oooooooooh, how easy the would have been to tap it out a few weeks ago.....
maybe they normally come out easy? I have no idea.....

$_57.JPG
 
Last edited by a moderator:
Holy crap!!!! Subscribed! I need to see how this turns out... Good luck. I GOT AN IDEA! It just hit me as I was typing. MAYBE somebody has got a TRASHED 951 that can try it for you! Ah haaa....
 
might I suggest heating the nipple up gradually (ie. pencil torch or a strong soldering iron? then twist and pull? My guess is there would be a little sealant around the valve to create a perfect seal. Heating it up may loosen said sealant.
 
Actually both of the ones in the block are bad. I am not happy at all. This engine has been kicking my A$$ & apperantly its not finished yet.

I decided to temporarily hook up the oil lines & fill the ends with oil & drew a reference line. Hooked up an oil tank, bled the pump & let gravity do its thing like it would when installed in the ski.

Within an hour the oil was moving. Three hours the MAG line was empty & oil was coming out of the pump & heading towards the valve. I am absolutley PO'd at myself for not looking closer at these when I had the engine apart in my shop for the past 2 months. It would have been nothing to remove them in what ever way needed. heat, press, drill. whatever...... Now it's finished, & I don't feel good about this at all. If I have to tear this engine down again to get them out , Its going to have to go to the back burner for a while. The fun is disappearing on this one......
 

Attachments

  • photo 1-35.JPG
    photo 1-35.JPG
    123.1 KB · Views: 100
  • photo 2-38.JPG
    photo 2-38.JPG
    122.6 KB · Views: 110
Last edited by a moderator:
Pretty sure they are a tight press fit. I just looked at the ones on a 787( I know different--but not really) and there is not "sealant" that I see. So I would assume they're just pressed in. By looking at pics online you could press them out through the reed cages---IF the crank wasn't in there. I don't think there is any easy way to do it other than a tear down. You could try pulling them but I have a feeling they might break leaving the piece stuck in the case.
 
I had an idea pop into my head. Going to stop at the hardware store on my way home today & I will
fill you in this evening.....
 
Makes you wonder how many are working correctly. I would think leaking in would lubricate it until the oil pump refilled the lines.

Regardless you are prob. making the right decision by fixing it.
 
Last edited by a moderator:
My post above is a little misleading. I explained that poorly. Sorry.

I filled each line with a couple inches of oil, then marked the line with a red sharpe. I then hooked the lines to the oil pump, & hooked the pump to the oil tank, & positioned the oil tank about 10" above the engine. with the check valves leaking, gravity started to move the oil through the pump & into the lines. & my fears were confirmed. I left the trapped air in the oil line to give me a reference mark to see if the oil was moving from the gravity pressure from the oil tank. Once the oil on the mag side was pushed into the engine, it was then pushing in the trapped air in the line & the oil from the tank was moving at the same rate & would have been to the engine in probably another 12-24 hours?

The oil was moving about a half inch per hour on one valve & 1/4" over three hour on the other. So the sad part is this oil would never stop as the pump has no check valve in it. But, how much would it equate to? 2" in a 3/16" line is probably nothing more than a few drips, but its still a steady flow, right? Maybe just a smoky start up after siting for a few weeks? But I could see this being a substantial amount of oil if the boat was in long term storage. Reminds me of bad RV seal syndrome.
 
Success!!

I made a simple & crude tool that made it a breeze.

I picked up a few pipe fittings at the local hardware store:

1/8” X 12” pipe
¼” X 6” pipe
1”X6” pipe
½” X12” pipe
½” to ¼” reducer
½” locknut

I cut off the threads on one end of the ¼” pipe, cleaned it up with a 23/64” bit, & drilled an 1/8” hole 1/4” from the edge. Then I pulled the nipples out of the check valves and drilled all the way through them using an 1/8”x12” drill bit. Slid the "tool" over the valve, pushed in an 1/8” pin & gave them a few smacks by hitting the 1" pipe into the nut.

They didn’t budge at first with light hits, but after amping it up a bit they started to move
& out they came. Very happy with the result. Lots of screwing around, but it worked & now I don’t have to take anything else apart…… Didn't scratch up my paint job either ;)

Wheeew.
 

Attachments

  • valve1.JPG
    valve1.JPG
    56.1 KB · Views: 97
  • valve3.JPG
    valve3.JPG
    103.4 KB · Views: 93
  • valve4.JPG
    valve4.JPG
    110 KB · Views: 93
  • valve6.JPG
    valve6.JPG
    96.9 KB · Views: 92
  • valve7.JPG
    valve7.JPG
    55.4 KB · Views: 91
Last edited by a moderator:
Sweet! A little lower quality than harbor freights slide hammer, lol. Good thinking Carl!

I know you didn't want to mess up that pretty paint job.

Sent from my SGH-T889 using Tapatalk 2
 
Lower?? I'd say higher myself...LOL

Love the outside of the box thinking bro!!

One of my machines uses two pulse nipples, one for each carb. Well, I was tossing a used motor after a weird piston failure and forgot that I had to add that nipple on a complete motor.

I took the RV cover off, and put a glob of RTV on a rag and put it right over where I had to drill. Then as I drilled I had the shop vac sucking the pieces up. Once I got it drilled and the nipple pressed in, I carefully slid the rtv rag out, then cleaned it up with a rag of brake cleaner.
 
Tonka, Sounds like you might have missed your calling to be a dentist?

BTW, I was snowmobiling in the Keweenaw peninsula last weekend & there was a resort called the minnetonka. Took a picture of the sign & forgot to post it for you. Haha.
 
I took the check valves apart. The steel ball is clean & the seat is in nice shape, but the spring is shot. It's evident that the spring is what failed. What's interesting is, the two valves that are directly in the case are bad, but the one that is in the air pump cavity is strong. it held 2 psi before releasing. defiantly enough to keep oil from gravity feeding into the engine. But I am replacing all three anyway.

Tonkas comment above made me wonder too. are these failing in other 951DI engines & going unnoticed? With them exposed directly to the pulses of the crank case pressures & vacuum, I would have to believe they could wear out. These sure did. If they are installed behind the RV in other engines, or behind the reeds like the 951 carbed, they would not see the same abuse.

True?
 

Attachments

  • tonka.JPG
    tonka.JPG
    166.9 KB · Views: 55
  • valve.1.JPG
    valve.1.JPG
    56.9 KB · Views: 64
The big question is can you get replacements...?

Yes they are available, I ordered them already from SHS along with a few other parts. The part number 420956510, seems to be used in a lot of machines, including many of the ski-doo's. I was just surprised how weakened the springs were when compared to the one in the air pump section. all three in the DI are the same part number, same valve. With these things located right in the case, they are seeing compression & vacuum on every stroke. So even at an avg of 3K RPM's for a 100 hour engine thats something like 20 million cycles of direct crankcase exposure.

Is there any other seadoo engine that has these right in the case? Or are most of them injected behind the valves where they see mostly vacuum?

From the skis I am familiar with, The 580-720's have the check valves right at the pump & are injected through a tube behind the RV valve. The 800's appear to use the same check valve as the DI, but again its located behind the RV valve. Then there's the 951 carb'd that I am not familiar with, but I believe the check valve is in the carb boots behind the reed valves. Seems to me this valve existed in the 800's & early 951's way before the birth of the DI?

So maybe it's possible that these DI valves are just going to fail by design & location? Like you said earlier, who would know? a little smoke when it sits for a period of time. A lot of smoke when stored over winter. Run it & forget about it.

Sorry, I know I always get carried away with stuff like this, but I enjoy the details of how stuff like this works.
 
Last edited by a moderator:
LOL no reason to apologize! Yes you are correct, the Di is the only one pumping oil right into the cases.

I put a thread up a couple of years ago on the 580-720 banjo oil fittings. On those, when not working correctly you can see air getting blown into the lines from the manifold. into the first 1/2" of the line. I can only assume the oil is still pumping in half the line while air is going in the other half, but its the same kind of deal.
 
makes a guy wonder if bad valves can possibly reduce oil output from the pump. I have noticed on my other skis after changing oil lines, you can see a pulsing in the movement of the oil. I was thinking that was the pump, but in reality, that's the pulsing from the engine case pressures pushing & pulling on the line. Never really though about it.
 
no apology needed as i am enjoying how thorough you are and at times seem to be thinking out loud on the rebuild and post. = deeper understanding on how it all works for better trouble shooting in the future.:thumbsup:
 
Bad check valve =no oil being pumped. You can see the oil pulse back and forth in the line, but it will not pump. I had a bad check valve problem on a 720, so I know first hand. Replaced the valves and everything was Ok.
 
see i knew this thread would be helpful, i also have a bad oil line ck valve. i.m going to make my own thread.
 
Status
Not open for further replies.
Back
Top