I'll try to take a picture of the ones I have. Very small but still difficult to get in there. It is a battle of attrition. LOL I'm gonna get started on my skis pretty soon. I wanted to do some work today but got tied up with New Year's preparations and such. Happy New Year !!!
-
This site contains eBay affiliate links for which Sea-Doo Forum may be compensated.
You are using an out of date browser. It may not display this or other websites correctly.
You should upgrade or use an alternative browser.
You should upgrade or use an alternative browser.
Bowser’s SPX
- Thread starter Bowser
- Start date
- Status
- Not open for further replies.
Bowser
Active Member
Happy New Year as well! Now that the site is back online, let’s get it.
Ok SDF, I’ve come to terms with the jet pump and plan to trust in the mechanic to remove it. The bugger is stuck on there- I tried my hand at prying with a small crowbar and the combination of tight space, old adhesive, thinning patience has pushed me to this decision.
It’s a risk.. but I’ve spent too long on this step and need to take the chance. That motor needs to come out soon so I can prepare best I can for the season.
I’ve spoken with a handful of dealership service centers & power sports shops and none work on anything older than 2000 model year so this mech is my best bet.
Been in email correspondence with SBT scheming how to cash in the two extra cores I have; said they’d credit me $150 for them- we’ll see what shipping options look like..
They don’t install the starter flywheel which I may need the mech to do too.
Bowser
Active Member
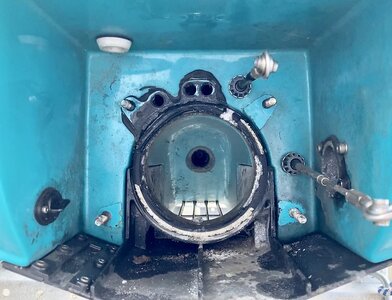
Progress! The pump has been pulled!
I trailered the ski an hour to the mechanic mentioned above. Couple of guys with plenty of ski’s and tools on hand. They mounted the proper pump puller to the housing and cranked on it; a little hammer gun action and the pump slid off.
NOW next step is to unscrew the motor mount bolts and lift the hunk of 657x out the hull. I need to coordinate with SBT soon to have the reman. motor shipped here. In the interim I’ll open up the impeller; replace the wear ring, and lube the cone. Any recommendations on how I should clean the empty space where the pump was would be appreciated- I’ll wipe it down and pick off the old neoprene ring + adhesive for starters.
Few details I gained from the mech.-
A). He mentioned that accurate alignment is not as critical with this driveshaft due to the crown spline?
B). Also said that if I leave the motor mounts untouched then reinstall is easier?
C). I could have them completely remove & replace with the new motor for a measly fee of $1,400 so I’m gonna opt to DIY.
Few details I gained from the mech.-View attachment 61148
Progress! The pump has been pulled!
I trailered the ski an hour to the mechanic mentioned above. Couple of guys with plenty of ski’s and tools on hand. They mounted the proper pump puller to the housing and cranked on it; a little hammer gun action and the pump slid off.
NOW next step is to unscrew the motor mount bolts and lift the hunk of 657x out the hull. I need to coordinate with SBT soon to have the reman. motor shipped here. In the interim I’ll open up the impeller; replace the wear ring, and lube the cone. Any recommendations on how I should clean the empty space where the pump was would be appreciated- I’ll wipe it down and pick off the old neoprene ring + adhesive for starters.
View attachment 61149
Few details I gained from the mech.-
A). He mentioned that accurate alignment is not as critical with this driveshaft due to the crown spline?
B). Also said that if I leave the motor mounts untouched then reinstall is easier?
C). I could have them completely remove & replace with the new motor for a measly fee of $1,400 so I’m gonna opt to DIY.
A). He mentioned that accurate alignment is not as critical with this driveshaft due to the crown spline? False it needs to be aligned or it will wear the splines on the driveshaft, impeller and PTO.
B). Also said that if I leave the motor mounts untouched then reinstall is easier?
You only need to remove the 4 bolts connecting the bed-plate to the mounts, not the entire motor mounts.
C). I could have them completely remove & replace with the new motor for a measly fee of $1,400 so I’m gonna opt to DIY.
Ridiculous amount of money for labor.
D) Make sure you go through the entire fuel system and rebuild carbs with all new Genuine Mikuni parts.
Bowser
Active Member
Your perspective is much appreciated Mac.
I’ll make sure the driveshaft is properly aligned then- hopefully the nearby dealer is open to atleast checking ’n adjusting alignment.
Yes I was briefly taken aback by the motor swap fee. I think he was shooting from the hip with the estimate- going off prev. jobs, not really knowing how much I’ve already done/ intend to do.. I've replaced the fuel lines, selector valve, and carb parts as of last summer.
_ _ _ _ _ _ _ _ _
Major relief- the prop came out smoothly.
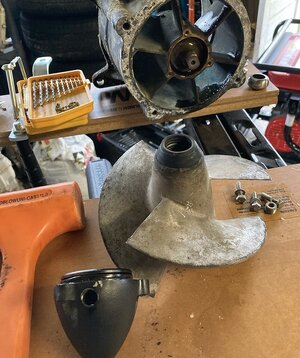
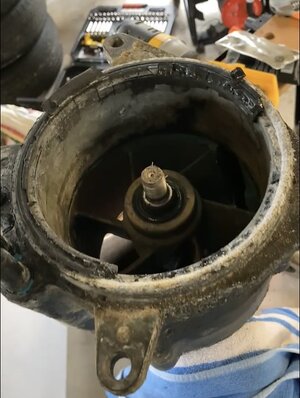
I intend to *lightly* file the blade edges, fixing any burrs. Will start grinding away at the wear ring to remove & replace too.
The only part of this assembly I’m curious about is taking out the impeller shaft from the bearings- I read it’s not good to remove unless rebuilding the bearings etc. is this true? I’d like to slide it out to clean off the old oil.
I’ll make sure the driveshaft is properly aligned then- hopefully the nearby dealer is open to atleast checking ’n adjusting alignment.
Yes I was briefly taken aback by the motor swap fee. I think he was shooting from the hip with the estimate- going off prev. jobs, not really knowing how much I’ve already done/ intend to do.. I've replaced the fuel lines, selector valve, and carb parts as of last summer.
_ _ _ _ _ _ _ _ _
Major relief- the prop came out smoothly.


I intend to *lightly* file the blade edges, fixing any burrs. Will start grinding away at the wear ring to remove & replace too.
The only part of this assembly I’m curious about is taking out the impeller shaft from the bearings- I read it’s not good to remove unless rebuilding the bearings etc. is this true? I’d like to slide it out to clean off the old oil.
Bowser
Active Member
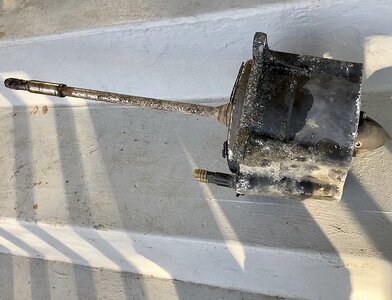
Here’s the driveshaft from the SPX.
Suggestions on how or if I should clean it? I read that sanding the rust allows more rust formation so won’t be doing that.
I’m considering using a metal polish like Mother’s Mag & Aluminum, atleast on the smooth part of the shaft's PTO end. Intending to clean the section where the prop boot contacts the shaft too.
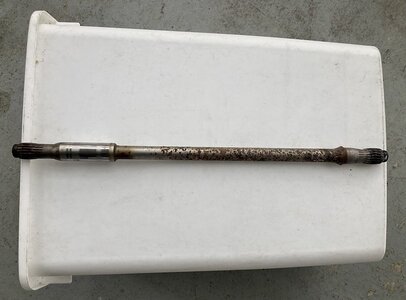
When removing the pump oil cone I was happy to find the oil normal looking; no water leaked in, no metal filaments. Smelled like a swamp though
Suggestions on how or if I should clean it? I read that sanding the rust allows more rust formation so won’t be doing that.
I’m considering using a metal polish like Mother’s Mag & Aluminum, atleast on the smooth part of the shaft's PTO end. Intending to clean the section where the prop boot contacts the shaft too.

When removing the pump oil cone I was happy to find the oil normal looking; no water leaked in, no metal filaments. Smelled like a swamp though
Bowser
Active Member
Alrighty I’ll re-install the prop shaft with some fresh synthetic grease and leave it as is. 
I’ve reserved an engine hoist to use this weekend. I’m renting the hoist to get under the motor a bit better to access oil lines, starter, and a more accurate removal.
Planning to run straps underneath the crank case and exhaust manifold for the lift. Any rec’s for where else to connect the hoist would be great too. Will be following SBT's instruction guide for the process.
I always put the ones I do on the wire wheel and geat all that crap off of there. It takes a long time for that stuff to form. If I do anything it would be rub some waterproof grease into it a bit then wipe it down. My opinion is that rust and corrosion begets more rust and corrosion and smooth is better than rough.  Good Luck !!
Bowser
Active Member
Woot I got the old motor out !
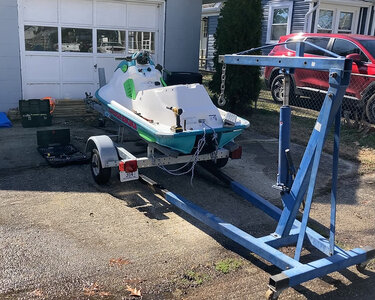
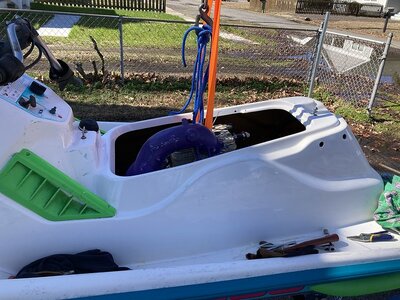
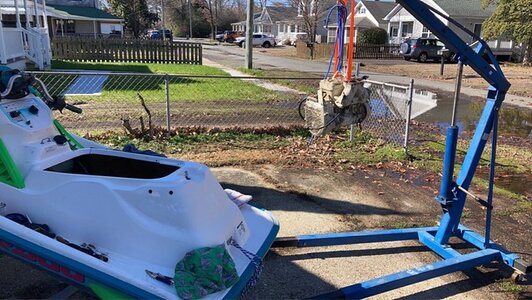
The engine hoist was crucial here; allowed me to suspend the motor to find my way around the remaining oil lines, breather tubes, and exhaust.
I ran a couple straps through the cylinder heads where a lil slot is; made sure to reinforce the straps with extra rope & zipties as insurance if the straps broke. In hindsight I should have removed the exhaust stinger at the start instead of fumbling around with it and the motor in the air..
I’ve proceeded to strip down the old 657x- just need to pop the flywheel off and it’ll be good to ship as a core for the replacement purchase.
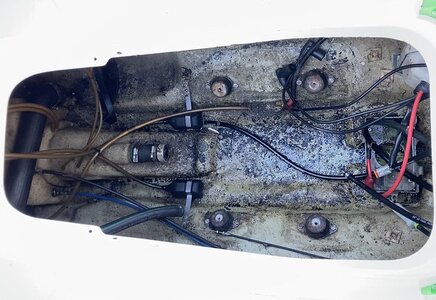
Motor mounts feel firm, inner hull looks good. I found an allen wrench, philips bit, circlip, and a couple washers beneath the bed-plate. Planning to squirt some degreaser in the hull and scrub out all the crud in the meantime.

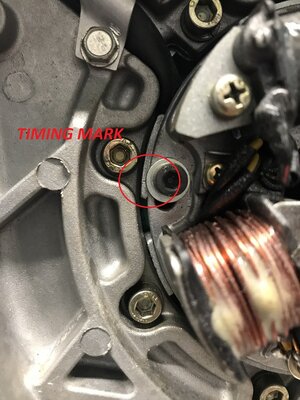
Be careful pulling the magneto coil. Make sure you have a mark for realignment. That will be the 3 small screws that hold the mag in place. I have an engine right now that I don't see the timing mark. I can only imagine the BS I'm gonna have getting this thing set up correctly. I'm gonna get creative when the time comes.

Bowser
Active Member
As I rack my brain over the process of motor installation, specific questions will arise SO I’m going to prompt them while gearing up for the event.
Mounting the Motor properly;
A). I found in the parts catalogue & guides the motor studs to bed-plate nuts take Loctite 242 blue instead of red? Just wanna make sure I use the right adhesive on this critical mount point- I read elsewhere that red is recommended.
B). While removing the old motor, one of the bed-plate to rubber motor mount screws was longer than the others; I can’t find it mentioned in the parts or service manual. Maybe incorrect leftover from PO; it’s ~25% longer.
Shouldn’t all four of these bolts be M8 x 20?
C). The alignment process must be done with the impeller NOT installed right? The pump just gets dry fitted to the hull for the engine aligning then I remove & reinstall it with the impeller etc.

I don't use locktite on any engine parts. I use marine Grease or Never Seez. These engines are very difficult to get apart and the next guy needs all the help I can give him. LOL I use blue loctite on the Jet pump nuts and steering and reverse linkage. I also slobber on egregious amounts of grease on the full length of exhaust manifold bolts and carb bolts.
Also on the jet pump impeller cover... definitely use blue loctite and clean the heck out of those threads and bolt thread so the loctite can grip.
Also on the jet pump impeller cover... definitely use blue loctite and clean the heck out of those threads and bolt thread so the loctite can grip.
The 720 and smaller engines have a tendency to loosen the bedplate to block bolts over time and the manual calls for blue. I always use red on them. Keep in mind red is not permanent, it just takes some heat to break it. I also don't run my skis in salt water so take that for what it's worth.
Grim
Well-Known Member
Have you tried the orange locktite, just ran across it myself, it says it has the strenght of red but you dont have to heat it to remove it. I have it on a few things on my truck. Haven't had to take anything off yet to see if the claims are true.The 720 and smaller engines have a tendency to loosen the bedplate to block bolts over time and the manual calls for blue. I always use red on them. Keep in mind red is not permanent, it just takes some heat to break it. I also don't run my skis in salt water so take that for what it's worth.
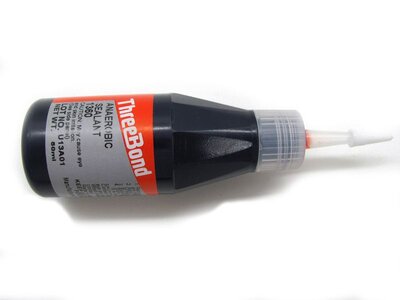
Actually I use ThreeBond 1360 and buy it in the big bottle. It is medium strength, high temp.Have you tried the orange locktite, just ran across it myself, it says it has the strenght of red but you dont have to heat it to remove it. I have it on a few things on my truck. Haven't had to take anything off yet to see if the claims are true.
Been doing that since the shop days in the 90's and like the hot sauce, I use that $hit on everything.
Bowser
Active Member
Alright thank ya all for the input. Will make sure to goop the bolts as suggested. 
I figure my second two questions from prev. are solved too-
B). All four motor mount bolts should be the M8x20. Here are the bolts I removed. The far left one is 10mm extra length. Per the manual they should all be equal length.

C). The impeller shaft should be out the pump housing for alignment so the aligning shaft can fit through to the PTO flywheel. I was just under the impression I should not remove the impeller shaft to keep the bearings debris-free as possible.
I figure my second two questions from prev. are solved too-
B). All four motor mount bolts should be the M8x20. Here are the bolts I removed. The far left one is 10mm extra length. Per the manual they should all be equal length.

C). The impeller shaft should be out the pump housing for alignment so the aligning shaft can fit through to the PTO flywheel. I was just under the impression I should not remove the impeller shaft to keep the bearings debris-free as possible.
Bowser
Active Member
- Ignition Timing Concerns -
In prepping to strip down the core motor, etemplate reminded me I need to note ignition timing [!!!] to adapt to the remanfactured motor. I pieced together the method below.
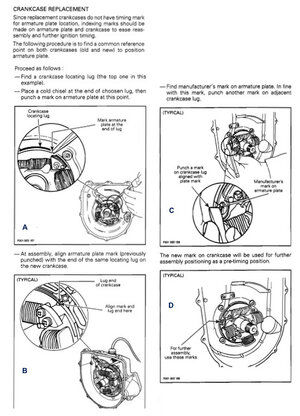
Now, I need to confirm if this step above is the only timing consideration?
Sure the rotary valve needs to be timed but I just want to make sure this is the only other specific step for proper reinstallation.
Lesser importance but it’d be nice to know.. how does rotating this armature plate advance/ retard timing? Starter mechanics is a bit of grey area for me.
In prepping to strip down the core motor, etemplate reminded me I need to note ignition timing [!!!] to adapt to the remanfactured motor. I pieced together the method below.

Now, I need to confirm if this step above is the only timing consideration?
Sure the rotary valve needs to be timed but I just want to make sure this is the only other specific step for proper reinstallation.
Lesser importance but it’d be nice to know.. how does rotating this armature plate advance/ retard timing? Starter mechanics is a bit of grey area for me.
It works just like a distributor on an automotive engine. As you move this plate it changes the point of the ignition trigger. I'm glad you posted this because I have one that doesn't have the timing mark. I'm gonna be some kinda chapped up if I gotta pull that mag flywheel to change the timing with the engine in the ski.  I was going to compare markes on other engines and do a match up. This should help for sure.
Bowser
Active Member
Need to get my *cough* taxes ducks in a line before I can proceed with buying the remanufactured motor..
Tinkering around with the starter, I snapped the rusted end off the retaining stud for the starter motor housing. Oops. Both studs came out smoothly but will have to be replaced anyways. Starter motor itself worked well during the intial testing.
Prepping engine pieces for painting as I go; washing with degreaser then scrub with metal bristle brush. Intending to wipe down with mineral spirits then spray primer followed by standard white paint. Atleast when the replacement motor does arrive all the parts will be ready.
Bowser
Active Member
It’s been a year since buying the SPX. Learned a ton at the start, still learning alot as this is the first ski, and the only power sports toy, I’ve tried to restore. I should have compression tested well before going down the rabbit hole of fixing the pulse line nipple; that would have saved a month or two of troubleshooting.
The trailer resto certainly took some time & effort too- I’ll make its own post later on.. really looks & works solid!
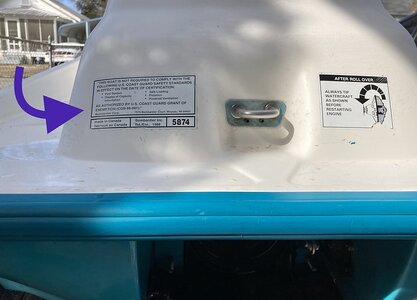
I can remove this exemption sticker and still be legal right? I'd like to polish/buff the surface so the less stickers the better- down the road I intend to apply the '94 SPX livery since I like that design more than the '95.
Popped the starter flywheel off the old motor yesterday. Bought quality spray paint & primer to refinish the motor pieces I'm keeping. Fuel cap gasket and starter retaining stud in the mail. Will be calling SBT sooooon
The trailer resto certainly took some time & effort too- I’ll make its own post later on.. really looks & works solid!
I can remove this exemption sticker and still be legal right? I'd like to polish/buff the surface so the less stickers the better- down the road I intend to apply the '94 SPX livery since I like that design more than the '95.

Popped the starter flywheel off the old motor yesterday. Bought quality spray paint & primer to refinish the motor pieces I'm keeping. Fuel cap gasket and starter retaining stud in the mail. Will be calling SBT sooooon
- Status
- Not open for further replies.
Similar threads
- Replies
- 38
- Views
- 1,337
- Replies
- 0
- Views
- 187
- Replies
- 25
- Views
- 1,864


