• This site contains eBay affiliate links for which Sea-Doo Forum may be compensated.

787 GTX - Do I Need To Replace These Rave Valves?

Status
Not open for further replies.
Working on a full 97 gtx rebuild and was wondering if these rave valves are ok? This engine was purchased used with aprox 60 hours on it, the ski has around 300 hours on it & this is the third motor for her.

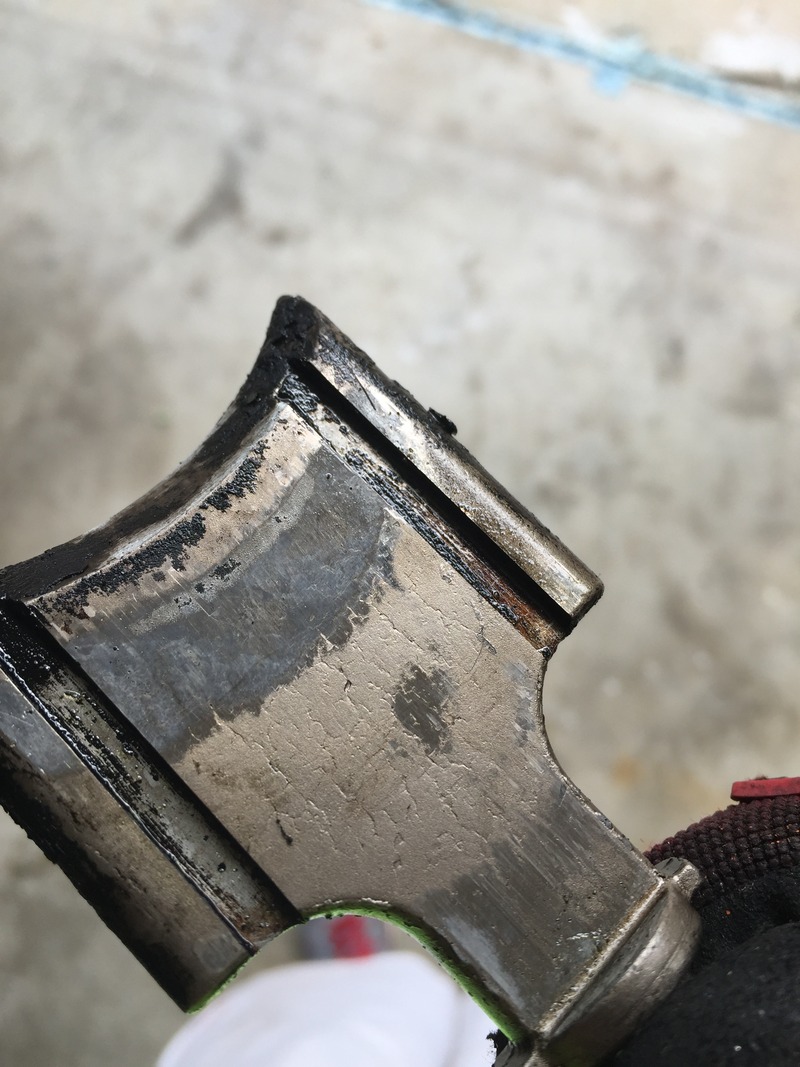
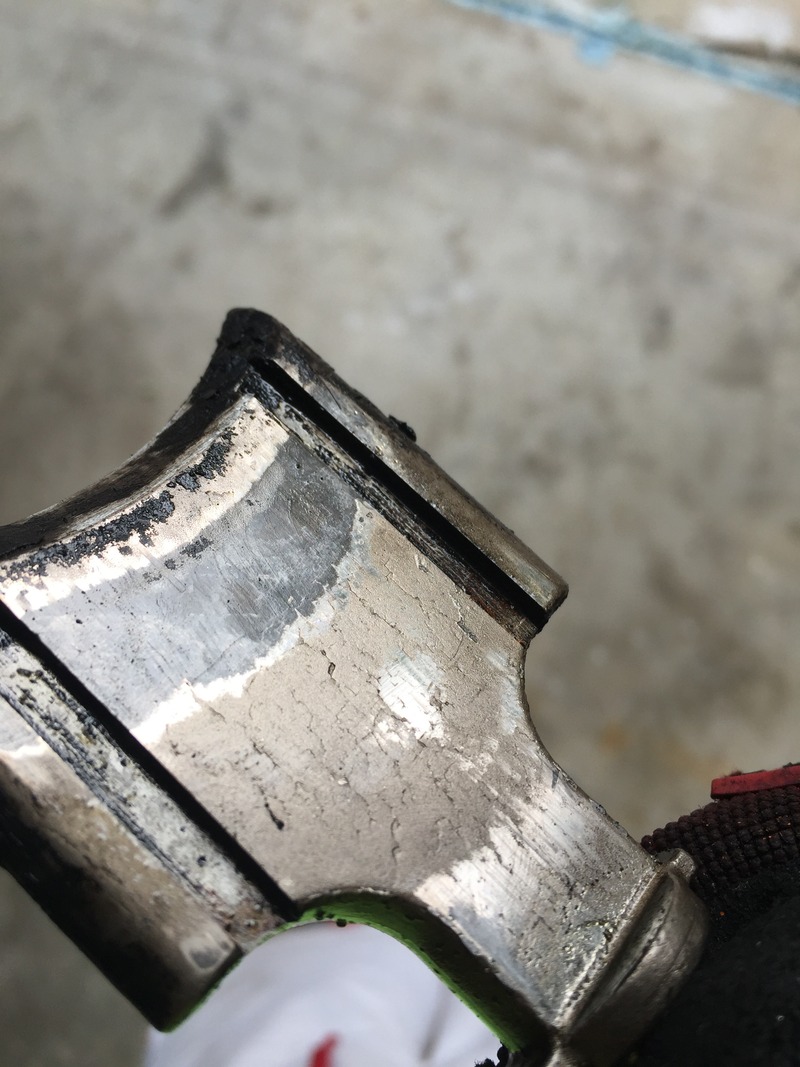
I am fixing/replacing lots of problematic items and I pulled the raves for cleaning, i used some chemical stripper to remove most of the carbon build up but wanted to get your opinion and see if you think these valves need replacement. They have some small pitting and/or scratching on them. They were really, really gummed up when I pulled them. I am trying to stay on a budget as I also have to

-rebuild carbs
-fix fuel tank issue
-fix 12v low issue
-fix speedo issue
-clean/paint/touch up several items
-replace floor mats

and various other things


Gave the housings some color. I plan to keep the red bellows as they are not torn or anything. I was going to keep the spring on the larger side and zip tie/metal tie the bottom portion to keep them in place. That or I heard using an oring on the bottom works wonders as well.

 
I am more of a car guy but used to fuel injection. Taking a stab at getting this 97 back up and kicking ass like it used to. Tore down the top end to check everything out. Pistons have some carbon but it would in my opinion be normal with 60-80 hours on it? I will replace the orings/seals while its apart for the valve cover/exhaust cover etc.

Should i try to clean the tops of the pistons? I dont plan on pulling the entire engine sooo not sure that would be a safe idea. I am running pre-mix only now & just cleaning her up.


The RAVE valves look great, they just need a good cleaning. I use EZ off oven cleaner and a 3M green scrubbie.

Lou
 
As LouDoo says, the RAVEs look ok. That is, what we can see if them. You have to inspect the stems for wear as well as the hole in the housing that the stem fits through. Make sure they are not over clearance or worn in an oval shape.


Sent from my iPhone using Tapatalk
 
That PTO piston isn't looking too good in my eyes. It looks like a rotted orange peel, and if it's thick that is not good. Something is not burning properly.
 
As LouDoo says, the RAVEs look ok. That is, what we can see if them. You have to inspect the stems for wear as well as the hole in the housing that the stem fits through. Make sure they are not over clearance or worn in an oval shape.


Sent from my iPhone using Tapatalk

I dont see any wear on the stem or inside the housing. Do you know what the inner housing measurements should be? I can pick up a caliper to measure it
 
That PTO piston isn't looking too good in my eyes. It looks like a rotted orange peel, and if it's thick that is not good. Something is not burning properly.

Ill take another look at it. Little history on the ski, this is the third motor. This engine was purchased as a used oem motor with aprox 60 hours on it pulled from fresh water ski. Cards were rebuild 3 years ago buuut it sat in storage for "2" years. Took it out this summer for the first time, had to replace the starter & then it still wasnt running right.

Idle in water was like 800rpm so it stumbled. Also it was very hard to start each day even with a fully charged battery. I think the carbs need to be rebuilt & all the settings checked. I just got my carb rebuild kit today from OSD. I also ordered a bigger aftermarket rectifier and harness as I also have the 12v low issue and my battery is dead every day its plugged into the ski. I tested the battery & it checked out alright.

2nd reason for my thoughts on carb's being out of spec is not only the idle issue but once its running you have to "ease" into the throttle or it dies. Ran great wide open throttle but had some studdering and slow to accelerate sometimes down low and mid range. I put maybe an hour on it a month or so ago before towing it home to work on it.

We have owned this since 97. First engine blew at around 260-270 hours. A rave broke & took out everything. We then purchased a brand new SBT engine & had a shop install it. We got 20 hours on that motor and oil pump starved engine and it ate itself that was a $2000 burn once you factor in the price the shop charged for labor etc. Although the hours on the new motor were stupid low they wouldnt do anything for us because it was over a year old. At the time we also had a nice ski boat so the sea doo spent its time in storage on the trailer. This engine was purchased used from a forum sponsor on another site & I installed myself & paid a shop to rebuild the carbs..put maybe 5 hours on it & then it went in storage for about 2 years. Now i have time & patience and want to fix it myself and get it back up and running.
 
Last edited by a moderator:
Those carbs are the possibly the root of all your engine woes after the original ones went. Does the ski still have the gray fuel lines on there? The carbs have little filters internally that clog up, especially with carbs that sit unused. The gas will dry up and turn to powder plugging the fuel flow to the cylinders.


This is what I pulled from a set of carbs that sat before. Sadly the boat ran but would have met it's demise thru a lean out in no time. Thankfully the engine was full of water and was junk to begin with, LOL.


551.jpg

Dang that's a lot of crud. Actually when I replaced the motor I replaced all the fuel lines with new black lines, cleaned out the fuel selector and switched to premix. I only have 1 grey line to the water valve on the exhaust pipe but I am going to replace that this weekend as well. Its held on with metal ties at the time & only transfers water so wasn't too concerned with it at the time but ill swap that out as well.

Do you know by chance if the fuel baffle is suppose to have a screen on that plastic piece underneath it? I found mine at the bottom of my fuel cell along with a sunken float but no mesh screen. Looked up the replacement part and it shows a built in screen/filter looking deal on it. I have a new float already & pulled/cleaned the tank inside & out. Im going through everything this time around to make sure she runs properly for a long time :)

I got my OSD oem carb rebuild kit today along with a pop off tester so I will take a peek at the carbs tomorrow or Thursday, thanks so much and Ill keep the thread posted!
 
Don't worry about the gray line feeding the wcv. Yes that disc with the screen should be on the bottom of the baffle. Also make sure the fuel separator is clean. Be careful when spinning the cup back on that you don't mess up the o-ring.

Sent from my SGH-T889 using Tapatalk
 
Don't worry about the gray line feeding the wcv. Yes that disc with the screen should be on the bottom of the baffle. Also make sure the fuel separator is clean. Be careful when spinning the cup back on that you don't mess up the o-ring.

Sent from my SGH-T889 using Tapatalk

What piece is the fuel separator? Are you talking about something on the baffle/fuel tank or inside the carbs? Sorry I am getting more familiar with everything but still learning as I go. Printing off lots of manuals and how to's along the way to simplify things.
 
I dont see any wear on the stem or inside the housing. Do you know what the inner housing measurements should be? I can pick up a caliper to measure it

I don't think there is any specifications on this. There just needs to be no slop and it needs to be shaped round not oval. They tend to wear oval. Then the O-rings can no longer seal properly.


Sent from my iPhone using Tapatalk
 
What piece is the fuel separator? Are you talking about something on the baffle/fuel tank or inside the carbs? Sorry I am getting more familiar with everything but still learning as I go. Printing off lots of manuals and how to's along the way to simplify things.

The water separator/ filter will be inline between the outlet of the fuel selector valve and fuel inlet at the engine.


Sent from my iPhone using Tapatalk
 
Here is the info you requested on the dimensions.

http://www.seadooforum.com/showthre...AVE-Guillotine&p=281220&viewfull=1#post281220


I have two brand new OEM in the bags (290854358-420854358) and they both measure .318 thick. Now for the stem diameter they measure .392 on both. I also have two brand new in the OEM bags RAVE housings (290854360-420854360) and the diameter where the valve stem rides measures .396 to .397 on both. You can get some great life out of these valves and housing. My speedster is going on 12 years with the original housings and valves on one engine and the other engine they are about 4 years old. I've never had leakers, burners or anything in between. On my 96 XP engine I'm building it's getting a boat load on new goodies. I got the new RAVE valves on Ebay from a dealer around the corner, it was almost like buy one get one free pricing compared to list price. Same with the RAVE housings, bought from a dealer out in western PA, shot them an offer and as compared to retail price it was almost buy one get one. If your patient enough there are some awesome deals on Ebay for OEM parts, you'll be able to rest easy as I am done buying all my engine hardparts, so now you won't get sniper bid in the last 2 seconds by me:cuss:

If you need anymore measurements just ask, glad to help if I can.
 
Status
Not open for further replies.
Back
Top