• This site contains eBay affiliate links for which Sea-Doo Forum may be compensated.

1997 GTX off season rebuild start.

Satisfied with oil injection study so on to the next endeavor.
This concerns the lubrication of the RV gear cavity. Lurked around a few of the Rotax/aviation forums & also called a few maintenance shops that specialized in Rotax engines in the aviation applications. There was one particular "mod" I'm going to explore but there's a disconnect that I couldn't pin down. The circulation of oil in the RV gear circuit.
Is there any circulation occurring @ all in the circuit, be it negligible but movement none the less?
No circulation in the RV
 
No circulation in the RV
I'll start there. Knowing this, the "flyboys" workaround is going closed loop, some with a small coolant M/C tank dedicated to RV oil (same injected oil) so as to monitor level. A regimented pm involves gently purging the oil & sent out to be analyzed for metal particulates. Granted this might seem extreme but their 2K feet in the air = Ouch. Dead pilots can't rebuild.
Myself, "leaning" towards closed loop with small vented tank & a more laxed pm regiment. Placement of tank height within hull in relation to oil cavity level will require some thought = ouch.😳.
Here's a couple few of pics of anxiety's belayed. No leaks @ grommet after 16 hrs.
Thanks for the info.
IMG_4291.JPGIMG_4292.JPGIMG_4293.JPGIMG_4296.JPG
 
Last edited:
This is coming out of left field so bear with me.
Does anyone know the oil temp or surface temp of the RV gear cavity area? A thermal map is present, just unknown for my Sea Doo.
I worked with various industrial screw compressors where temps mattered from start to finish & that is an understatement. ( circulated oil with aftercooler, that is)
Syn oil performs best in & around 180/220ish deg & depending on the environment/ambient temps, the "formula or setpoints " can be tweaked.
I have non reversible hi temp strips but I can't answer my own question until this summer & if I want to pull a rabbit out of my hat, the time would be before, not after.
So that being said......
A couple of sources from the aviation side of the tracks puts their engine temps anywhere in the range of 160/185 degrees @ the bottom cases. They didn't use temp strips, instead opted for IR gun.
On uncirculated oil temp @ RV gear cavity? No data to pin down specifics so just "spit balling" here but with open loop cooling, ballpark of 135/140ish deg range(?)Honestly, wont know until I put the temp strips on my own craft this summer.
Anyway, moving on towards the closed loop circuit on the RV gear cavity.
This area is going to get as much anal retentiveness that I can afford. I do not want to put up with a headache that seems to plague these engines/operators. I want this craft to be passed down @ least a generation before it's melted down & made into razor blades.
Imo, it's a weak link just because I have no experience with oil injected, rotary valve two strokes. I am out of my "comfort zone" with this concept.
That plus I'm getting to old for this shift. I don't do headaches as good as I use to.
The rest, CW/two stroke rebuild procedure? Old hat.
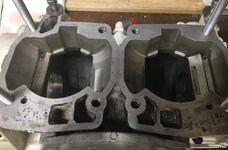
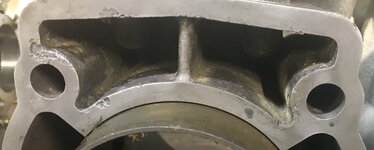
The crank/seals has only 40 hrs & it shows. Both seals /bearings are in outstanding shape. So, first & foremost, the inner seals go in absolutely dry, period.. Seal valley in cases ,will be devoid of any containments/moisture, no mystery there. Already "nested" (with previous witness line @ 90 deg), the seals/crank in case & there is no hint whatsoever that spinning would occur. Fitment is spot on & up to the task it was designed to do under torque.ID of seal seems uncompromised(?).
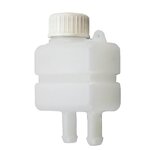
Incorporating Hydro Gear tank assembly, 350ml, just shy of 12 oz that's translucent so as to witness level & to be placed in the best height relationship(?) with the actual level in RV gear cavity. I do know the static pressure imparted on cavity will be reduced. This tank is going to undergo some slight modifications so as to easily disconnect (w/o the mess), gently (cannot emphasize "gently" enough), purge, flush/circulate gear cavity. I do expect to see bronze "dustings" (not slivers) in the oil removed. Hardened steel moving on bronze, of course. Expected decrease in dustings as gears mate & "settle in". If sudden increase in dustings, alarms go off. Simple logic.
Fast forwarding...
Break in? Somewhat different than what I'm used to but I do realize that this is a different animal & by the way, BIG Shout out to this forum & SD enthusiast who pointed me in the right direction.
Allow me to share what I know of "break ins" on two strokes I've learned over the years. (bring a few sets of new plugs) & use NON-ETHANOL.
*Initial carb adj,>stay rich but not to the point of underperforming during the varying of RPMs required in proper break in.
Next level of the varying higher RPMs,>again stay rich but read the plugs, the full measure read. cut up the plug & read the ceramic. Make determination,>adj but still stay on the rich side of "correct", Do this during cool down in the heat cycle.
Continue this throughout the break in period & for Pete's sake, have the patience & stick to the regimented break in procedure.
After "successful" break in, again bring a few more sets of new plugs & then perform WOT throttle chops & again cut plug, read ceramic>adj, rinse & repeat until that "perfect burn" & then just the smallest tweak to the rich side of correct.
* If there's only ETHANOL @ your destination, bring a couple of gallons of NON-ETHANOL (don't forget to premix if applicable) but go ahead & use the available ethanol there just be sure to run tank low/out before the extended, lengthy shutdown, few days>weeks. Pour in, run a minute or two> shutdown.
On the travel back, just remember...OBEY ALL TRAFFIC LAWS!😜
OIP.jpg
 
Last edited:
This 787 is the 1st engine for me that is to be assembled that has individual cylinders, been use to the siamesed tops for decades. Seen that the YT vids, all installs are done one @ a time. Ok, I get it.
I've decided to go "against the grain" & siamese the cylinders via by connected exhaust mani. So allow me to share the procedure to be that I plan on using. Bottom end assembled with pistons, set aside & sealant allowed to cure.
Then cylinders w/o gasket, loosely snugged to case>exh mani torque to half measure to cylinders then removed as one component. This to say the least has now become a very awkward/heavy component to handle diligently by one person but I have a "workaround" for that. This "fix" as far as I know has never been tried but is very practical,@ least for us older folk. Will have pics, vid..... or an emergency room bill.
Timed event. Thinly apply 1211 on case>apply gasket>apply 1211 on gasket. Cyl/exh component as one piece, lowered>rings compressed(this part is old hat)>torqued & allow to cure for 48 hrs. Theoretically done in 10 mins(?)
One of two things will transpire. Successful assembly w/o complication or the neighbor runs over my metric tools with his lawn mower this spring.
Thoughts?
IMG_4302.JPG
 

Attachments

  • IMG_4300.JPG
    IMG_4300.JPG
    552.3 KB · Views: 7
  • IMG_4301.JPG
    IMG_4301.JPG
    298.4 KB · Views: 9
As you already know I see no reason putting the cylinders on in the manner described wouldn’t work. The only issue I could foresee would be compressing the rings by hand while placing the cylinders on the pistons without the rings losing there position on the locating pins. May go ok, but it’s going to be weighty and you may need an extra set of hands to compress the rings on each piston. I have never rebuilt a Seadoo engine but have rebuilt a few BRP ( Ski Doo ) snowmobile engines and have always followed the instructions in the manual which is one cylinder at a time torqued down very lightly so they can still move a hair, bolt the exhaust manifold on which ensures all is lined up perfectly then torque as per manual specs.
If I had to chose I would still go one at a time so I could easily handle the weight with one hand while compressing rings slightly with the other hand. I like to be able to be right in there looking as well while they are going on.
Not sure about the 1211 on the cylinder to case gasket, I believe the manual calls for them to go on dry but I used 518 on that gasket with my snowmobile engine rebuilds, just enough to say it was there.
So I'll share the progress I've made so far.
IMG_4303.JPG
^This was a "no brainer".^
Installing siamesed top ends is definitely within my comfort zone. Just had to overcome the weight & bulkiness of this particular endeavor. The fulcrum I'm building will afford me hands free balance of no movement until my input. Notice the "guide" bolts on case on previous pics.
The timed torqueing sequence of all 3 mated components to be followed after rest will be critical so as to negate much as possible, shifting. (A little here, a little there). Because of similar metal, all components torqued @ room temp.
Mind you, this is a timed event.
As far as the 1211(?) application, I see no other choice. Some kind of sealant need to be applied. I do know it will not be 518. The pics I provided showing erosion/pitting in that particular machined area are like none I've never seen before on past rebuilds. That one area where the erosion actually bridges into the bolt hole is disconcerting to say the least.
That being said, I'm open to,
What sealant would be applicable to this area/situation?
ps: The intake rotary plate will be incorporated into the bottom case torqueing sequence @ the right time.
 
Last edited:
Back
Top