• This site contains eBay affiliate links for which Sea-Doo Forum may be compensated.

1991 weak spark on one cylinder

Status
Not open for further replies.

Ericbarner39

New Member
Hey all new to the forum however I've been reading information on here for awhile y'all seem very knowledgeable and helpful I'm having a weak spark condition on my SP it runs but there is a noticeable difference in spark strength between the two plugs when testing the ski is very and will flood if not quick to fire up generally hard to start. It will idle fine but bogs and spits when getting on the throttle I have ordered a carb rebuild kit but I'd like an opinion on the spark
 
What have you done to diagnose it so far? Have you swapped plugs with properly gapped new plugs? Have you trimmer the plug wires back? If you are just grounding the plug and looking at the spark, you can move the weak plug over to the other wire and see if it moves with the plug, or stays with the same wire. That will give you an idea where to start looking.
 
The coil on your ski is a single coil with a wasted spark. So basically a single coil sparks for every cylinder even if that cylinder isn't the one under compression. If one plug is sparking good and one isn't then more than likely it is either a bad plug, plug cap or high tension wire.
 
The coil on your ski is a single coil with a wasted spark. So basically a single coil sparks for every cylinder even if that cylinder isn't the one under compression. If one plug is sparking good and one isn't then more than likely it is either a bad plug, plug cap or high tension wire.

Sorry I guess I should have covered the basis of what I did Both plug wires have been trimmed back both spark plugs are brand new both of the spark plug caps Are waterproof brand new NGK All of the connections from the stator to the CDI have been replaced with new connectors And every wire from front to back has been ohm tested every connection looking corroded or badd in general has been replaced and heat shrunk All this was done because when I bought it there was no spark at all because the previous owner had a shorted out overheat alarm and didn't know it so he went to town to say the least on the wiring So now everything has been returned back to factory specifications per the service manual
 
Sorry I guess I should have covered the basis of what I did Both plug wires have been trimmed back both spark plugs are brand new both of the spark plug caps Are waterproof brand new NGK All of the connections from the stator to the CDI have been replaced with new connectors And every wire from front to back has been ohm tested every connection looking corroded or badd in general has been replaced and heat shrunk All this was done because when I bought it there was no spark at all because the previous owner had a shorted out overheat alarm and didn't know it so he went to town to say the least on the wiring So now everything has been returned back to factory specifications per the service manual

That reply was meant for jeremyD615
 
You need to make sure you got non-resistor plug caps if you are running BR-ES plugs. If your plug caps are resistor then you should be running B-ES plugs as you don't want resistor plugs and caps.
 
I would try non-resistor plugs with your new resistor caps. You might have had too much resistance with both plugs and caps being resistor.
 
I would try non-resistor plugs with your new resistor caps. You might have had too much resistance with both plugs and caps being resistor.

Could too much resistance have done any damage just went and tried it now theres no spark at all had spark at the ramp yesterday
 
Could too much resistance have done any damage just went and tried it now theres no spark at all had spark at the ramp yesterday

If your coil was breaking down, this might push it over the edge. BTW, The plug wires should always be grounded when off the plugs to avoid damaging the coil. It's also possible the CDI is faulty considering it's age but it really could be either or some other cause.

Make sure the coil is dry and observe in the dark around the coil looking for arcing. If there are minute cracks in the epoxy housing there could be internal carbon tracks for the spark to follow.
 
UPDATE! I went out and messed with it after work cranked it over and it sound like the starter was grinding terribly took the front cover off and the instantly seen pieces of of copper winding everywhere :mad: The PREV owner got on last jab in he never told me he took of the flywheel and stator and then just screwed all the bolts in hand tight I was able to remove everything no tools needed except the flywheel nut which i used a crescent wrench and hand held the the PTO absolute carnage to the charging coils nothing to the magneto I was able to clean up the flywheel put it back on and good spark returned


Now the question that I have is Does the stator plate have to Be clocked a certain way for timing or Just center it up in crank down tight New stator is already ordered I would like to know how to properly install it when it comes
 
Confirm best you can the crank bearings aren't hogged out allowing the flywheel to wobble and rub on the stator, can't have any of that. Stator is the charging system coil so timing is not a function just the rotating magnets inside the flywheel create a sinusoidal current in the stator windings producing power for the charging circuit.

While in there, make sure the ignition pickup coil isn't whacked up too.

Awesome thank you very much There feels to be About a 16th of end play on the crank and I can't feel any up-and-down or side to side I'm very certain that the previous owner in his infinite wisdom took the bolts out remove the fly wheel and said screw it I can't figure it out fingered all the bolts and nuts back on and sold it to me with a smile on his face previous to getting weak spark and running like crap it was rippin on the water just was flooding as soon as I shut it off I'd be willing that the carb rebuild and clean again will solve that problem
 
Yes, flooding is usually caused by those rubber tipped metering needles not seating in the brass seat, dribbling fuel into the intake even when there's no vacuum (engine not running or low speed running.) We refer to this as the pop-off pressure, which is the pressure on the fuel inlet required to lift the needle off (pop it off) the seat.

The rubber tip might be damaged or worn out, the metering arm might be bent in the wrong geometry, or the metering arm spring might be missing from previous goings-on or the incorrect strength spring may have been installed by mistake. Incidentally, don't bend these springs and if it was stepped on for instance, it is probably damaged.

There are four strength springs available according to your particular calibration, generally can't toss just anything in there and expect low speed fuel control to play nice.

Good luck, keep us informed!
I rebuilt the carb the metering arm was in my opinion way out of spec I made it level with the body that covers the jets it pops off at 22.5 psi and shuts back at 16 it holds pressure at 17 psi steady also the diaphragm was bellied out I guess the new diaphragm sat flat and flush on a table while the other rested on the metal nipple while the rubber remained in an inside out umbrella shape not touching the table at all I kept the spring that was in the carb originally should I replace it with the one from the kit ? The manual say pop off pressure should be 22-25 psi
 
The diaphragm should be comparably soft as a rose petal, slightly stiffer. And holding it up to light there should be no holes.

As the diaphragma age, they can develop holes or the neoprene stiffens to become inflexible.

Aftermarket diaphragms often have the incorrect length metal nipple on them so too long will strike the metering arm too early holding the metering needle open or too short won't lift the needle. Many consider the aftermarket material too thick and stiff, I agree.

Recommended pop varies largely with airbox design, if the factory manual calls for 22~25 you're close enough, shoot to make both carbs equal.

It's important to start with the correct spring. Working with the incorrect spring can result in a oddly shaped lever arm or inability to reach pop spec even by mangling the arm to odd shapes. New arms are available and may need slight adjustment, but certainly not need to be mangled.

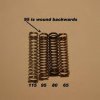
There are four different springs available for these Mikuni diaphragm carbs, and to make things really tricked out, occasionally spacers. To select the correct spring strength, the color is matched to the Seadoo factory specified strength in grams. Mikuni part numbers are on the right, I don't know the seadoo numbers, as through the years various superseding numbers were assigned for the same part by Seadoo seemingly at random.

The seat orifice diameter also plays a part in pop-off, the smaller diameter will result in higher pressure required to pop and smaller diameter than specified can cause lack of fuel at WOT. Too large of diameter and they leak from vibration at idle. Therefore, it's important to use the correct diameter seat orifice for your application (as important as selecting the specified spring)

Hopefully I'm not confusing you...Mikuni Spring Metering.jpgMikuni BN Spring Pop-Off Calibration.jpgMikuni Springs.jpg
 
Last edited:
If it;s the original spring yes, but someone may have changed it to the wrong spring which is why information and detail is required b/c in that case keeping it would be a bad idea.
 
Well, spec is 22-25 psi and he has 22 psi so the spring tested within spec.

I agree, if you have any doubt consult the Mikuni chart. Also the most recent Mikuni kits I have received don't include the 95 gram spring anymore, just he 65 and 115.
 
OK I got the carburetor back on it came with this filter I know it's supposed to just have a silencer Box will this filter cause me any issues I can't find nothing on them
 

Attachments

  • 15578572650382685479681374566905.jpg
    15578572650382685479681374566905.jpg
    3.4 MB · Views: 5
That filter isn't necessary and can have an effect on the jetting. If it gets wet it will not flow any air and choke the engine out. I am not a fan of the K&N filters especially on watercraft.
 
Got off work early today Took the entire gas tank out it was filled with crud from old rotten pick up lines cleaned it re installed stator came in installed it Drained all The old injection oil out replaced with fresh oil Primed the carburetor with some gas turn the valve on hit the button fired right up ran perfectStill have to go get non resistor plugs to counteract the resistor caps But as of now I am very satisfied We will see how it goes when I get it in the water Thanks everyone for the Help I'll let you all know how it does on the water
 
Status
Not open for further replies.
Back
Top