


As happens every season, we've had a few people this week sending in their superchargers with ceramic clutch washers that have experienced a failure. The following information was originally found on sea-doo.net but since the site closed down I figured I'd repost it here for others to reference.
The year 2003 saw the introduction of the new Supercharged Rotax 1500cc Power-Plant in the GTX series Sea-Doo.
One of the more common questions I am asked is about the new very powerful engine is;
What to do I do if the ceramic clutch-disc/s disappear, and where have they gone?
They have gone to the PTO Room and its’ Housing and also to the Scavenge Pump Housing. Proper “clean-up” is critical for engine longevity. The *proper* answer is take it to someone with 4-TEC experience, the special service tools to properly service the 4-TEC itself. Hopefully this will be a shop/dealer that has proven 4-TEC experience. The ceramic disk, are a very, very abrasive material and contrary to what many believe, the material is VERY damaging to parts of your engine. This is not doom however as the engine is able to have this material “caught” in primarily two-three places, and ALL must be cleaned and inspected if you expect a long-lasting trouble-free engine. These places being the Oil Separator, also known as the Oil Scavenging Pump, and the Magneto/PTO Housing/Oil Pump Housing located on each end of the engine respectively. Rotax refers to it as the former, the Oil Separator assembly. As seen in the exploded view the oil pump plate #4, the oil pump shaft #2, and the oil pump rotor #3 are the main composition of the components in the scavenging pump area that may be scared by the heavily abrasive ceramic “powder”.
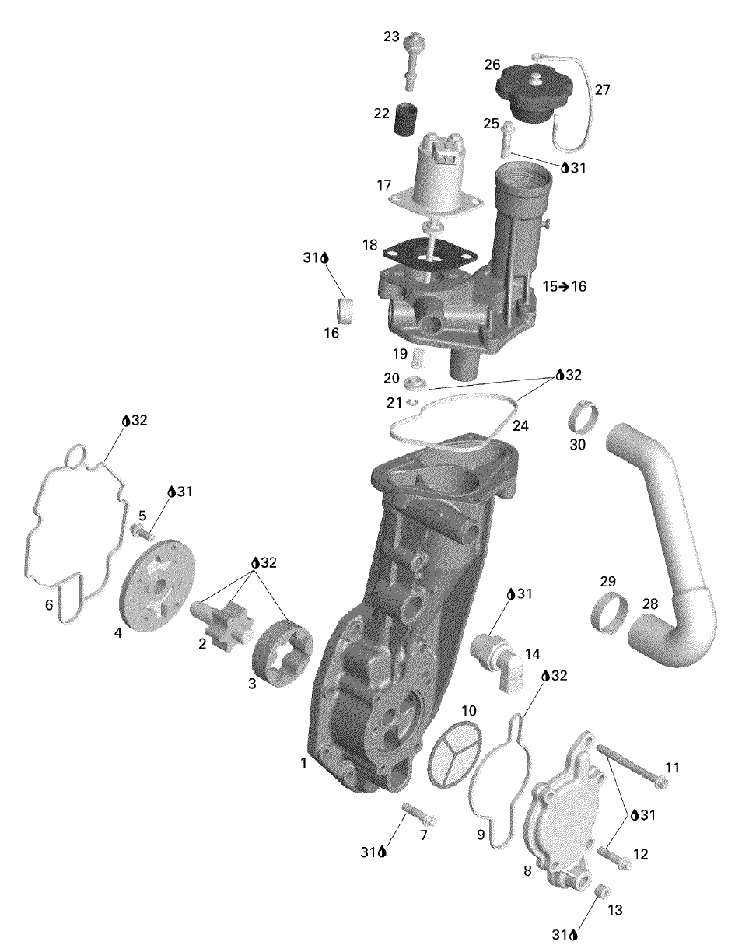
The good part is that the oil sieve or “screen” item #10 as seen in the diagram will keep most any real harmful debris from traveling any further into your engines oil passages in most cases. If any of the parts, #1-4, have any scaring/damage at all, they must be replaced. If not, it is wasted time and money. Clean all the components very well and inspect them carefully for grooving/scaring/deep scratches. If they have any of the aforementioned damage, they require replacement. This area uses mostly o-rings for sealing and the o-rings can be reused if the engine is low-hour and they are 100% unharmed, but they should be replaced when ever *relieved* by disassembly as a rule. This covers the Oil Scavenging Pump and its’ housing and the critical screen that needs a thorough cleaning as does all passages and surfaces of every part related to the Scavenge-Pump Housing.
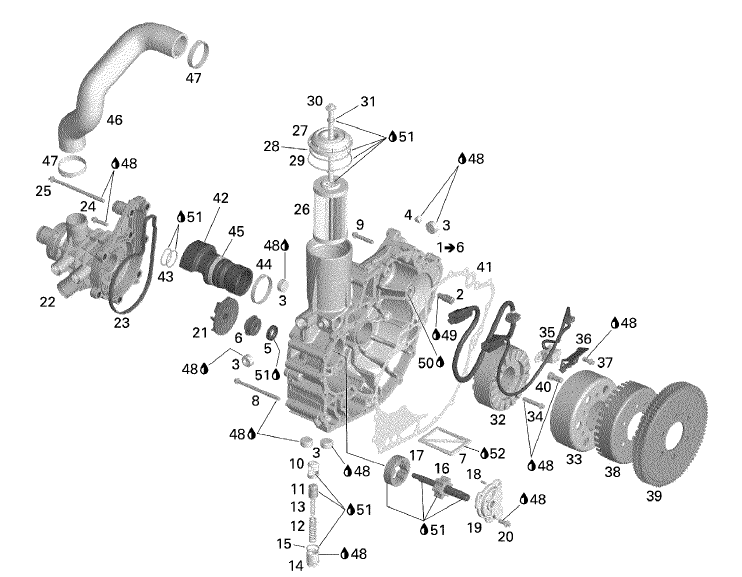
Next is the other end of the engine and the PTO Oil Pump Housing. This also house the magneto and other critical costly parts so be careful for any of you do it yourselfers and technicians alike. You need to first remove the drive-shaft with the separator tool from the PTO special tool # 529-035-841 and this one works on all 4-TECS for the correct removal procedure to remove the drive-shaft from the engine so little to no damage will occur to it’s sealing device/carrier unit. Oil should always be drained before pulling this shaft or it’ll make quite a mess. Please dispose of properly.
When removing the PTO/Oil-Filter Housing you use the same thoroughness in cleaning all the components and clearing all of the oil passages as you would in the separator unit.
Items #16-18 are the oil-pump cover, oil-pump shaft, and the oil-pump rotor. These are the parts that will require serious scrutiny when looking for the same types of damage as in the other end of the engine. The housing itself #1 may also be damaged, if so, it must be replaced along with any other damaged pieces.
 The square oil sieve or “screen” has to be cleaned and the oil filter will also need to be replaced.
To do this end of the engine is a little tougher and it can be done in the hull *but*, we always remove the engine to do it 110% and it is about the only way to be thorough enough to assure a proper job in an area where no compromise can be allowed.
As seen in the diagram you have one gasket, several o-rings and where the drive-shaft enters the engine, be sure and use the factory Oetiker Clamps to assure a proper oil-seal at the shafts entry to the engine when reassembling.
All the o-rings at the oil filter should ALWAYS be changed at every oil change and care given when reinstalling the filter cap as not to pinch the o-rings.
Using a high quality Electrical Contact-Cleaner for the spraying off of the magneto and other parts will work very well when combined with the light use of compressed air. The oil pump inspection is the same as the Oil Separator end of the engine.
Extreme attention to detail and cleanliness cannot be stressed enough.
By using this Article and the parts exploded view and suggestions it may help many save their engine/machine from a premature failure and keep you riding longer with a more powerful machine.
Hope this helps,
Glen Perry
Perry Performance Group, Inc.
The year 2003 saw the introduction of the new Supercharged Rotax 1500cc Power-Plant in the GTX series Sea-Doo.
One of the more common questions I am asked is about the new very powerful engine is;
What to do I do if the ceramic clutch-disc/s disappear, and where have they gone?
They have gone to the PTO Room and its’ Housing and also to the Scavenge Pump Housing. Proper “clean-up” is critical for engine longevity. The *proper* answer is take it to someone with 4-TEC experience, the special service tools to properly service the 4-TEC itself. Hopefully this will be a shop/dealer that has proven 4-TEC experience. The ceramic disk, are a very, very abrasive material and contrary to what many believe, the material is VERY damaging to parts of your engine. This is not doom however as the engine is able to have this material “caught” in primarily two-three places, and ALL must be cleaned and inspected if you expect a long-lasting trouble-free engine. These places being the Oil Separator, also known as the Oil Scavenging Pump, and the Magneto/PTO Housing/Oil Pump Housing located on each end of the engine respectively. Rotax refers to it as the former, the Oil Separator assembly. As seen in the exploded view the oil pump plate #4, the oil pump shaft #2, and the oil pump rotor #3 are the main composition of the components in the scavenging pump area that may be scared by the heavily abrasive ceramic “powder”.
Next is the other end of the engine and the PTO Oil Pump Housing. This also house the magneto and other critical costly parts so be careful for any of you do it yourselfers and technicians alike. You need to first remove the drive-shaft with the separator tool from the PTO special tool # 529-035-841 and this one works on all 4-TECS for the correct removal procedure to remove the drive-shaft from the engine so little to no damage will occur to it’s sealing device/carrier unit. Oil should always be drained before pulling this shaft or it’ll make quite a mess. Please dispose of properly.
When removing the PTO/Oil-Filter Housing you use the same thoroughness in cleaning all the components and clearing all of the oil passages as you would in the separator unit.
Items #16-18 are the oil-pump cover, oil-pump shaft, and the oil-pump rotor. These are the parts that will require serious scrutiny when looking for the same types of damage as in the other end of the engine. The housing itself #1 may also be damaged, if so, it must be replaced along with any other damaged pieces.
To do this end of the engine is a little tougher and it can be done in the hull *but*, we always remove the engine to do it 110% and it is about the only way to be thorough enough to assure a proper job in an area where no compromise can be allowed.
As seen in the diagram you have one gasket, several o-rings and where the drive-shaft enters the engine, be sure and use the factory Oetiker Clamps to assure a proper oil-seal at the shafts entry to the engine when reassembling.
All the o-rings at the oil filter should ALWAYS be changed at every oil change and care given when reinstalling the filter cap as not to pinch the o-rings.
Using a high quality Electrical Contact-Cleaner for the spraying off of the magneto and other parts will work very well when combined with the light use of compressed air. The oil pump inspection is the same as the Oil Separator end of the engine.
Extreme attention to detail and cleanliness cannot be stressed enough.
By using this Article and the parts exploded view and suggestions it may help many save their engine/machine from a premature failure and keep you riding longer with a more powerful machine.
Hope this helps,
Glen Perry
Perry Performance Group, Inc.

