Tweaking 92 SP bought at auction

Note: This site contains eBay affiliate links for which SeaDooForum.com may be compensated
Status
Not open for further replies.
I found a leak in between the oil pump cover and the rotary valve cover. I can't get new o-rings till early July. The service manual doesn't call out any gasket sealer. I have 518 and ultra-blue. Which one of these is appropriate to back up my old gaskets till the new seals arrive. I'll be using the ski every weekend till then. I also want to continue the pressure test and see if there are any other places that are leaking.

Also, since I have it apart, any chance the rotary valve is off a tooth with only symptoms of hard to start and dying on idle? I don't have a protractor to check it precisely.
 
Last edited:
I sealed up the intake manifold but my pressure leaks out faster than 2 psi per minute. I'm spraying soap water as well as I can behind the PTO flywheel and am not getting any bubbles. I'm venturing to the mag end so I took off the mag cover (there was no sealing rubber o-ring but only some sealant) but it looks like I'm at my limit without a drawer full of special tools like a puller plate, mag flywheel puller to start. If I have a leak in a crank seal, I'm going to need more special tools than this ski is even worth. Wondering where my next move should be. I've got a lake day with two families expecting the ski on Sunday. I can hold them close to the launch point due to the hard to start engine and keep them under 70% throttle so I am not expecting damage to the engine. I'm going to start researching pulling the gear off with common tools.
 
I couldn't get the 587 flywheel off with my generic steering wheel puller. Online shows several methods to get it off. I can't use heat because the engine is in the ski with a full tank of gas and I don't want to end up on a shade tree mechanic fails video or in the hospital.

I also can't pound on the end of the puller like SBT recommends. I have sprayed lube on the crankshaft and pulled about as hard as I can on the wrench. I've seen some pretty mangled pulling setups on YouTube before they tried other methods. Do some people put loctite on the shaft when they assemble the flywheel? I'm running out of options and need to get this back together for the lake tomorrow.
 
If you have an air leak you can’t run it. You are going to have to get the correct puller.
 
Happy Independence Day to all of you. :cool:

We won't be going onto the lake today. Last Sunday I did take the SP out and it still started hard even after sealing up one intake manifold leak. I've ordered some new fuel pickup filters and check valves because I did not test my check valves when I replaced my pickup tubes and mine were pretty bent up after I cleaned them out with solvent.

After a couple hours, the ski completely died in the water and would not start on the water or on the trailer. No spark - which I traced to a faulty tether switch, but strangely, the plugs were not wet either. It should have been massively flooded. So after I fixed the spark issue, I've commenced troubleshooting this fuel delivery symptom in earnest.

I re-checked my compression, pressure tested the pulse line, and performed a fuel pump test (plugs in on the starter) and got a whopping 1 psi and a delayed dribble of gas (like maybe a tsp/sec.) It might be due to the fuel draining back toward the tank so until I get new pickup filters (that explicitly say they have a check ball valve integrated) I don't even have the option of going out. I'll test the pump again with the check valves and if it still appears weak, will put a restrictor tube in the return line and see how it starts.
 
I finally got the fuel pickup check valves and put in a restrictor tube in the return fuel line. I opened up the carb and visually checked everything and sprayed brake cleaner everywhere. Pop-off pressure still 28 psi. This thing still will not start. It won't start by spraying WD-40 down the carb or putting fuel into the cylinders. It fires every once in a while but that's it.

I'm grasping for straws now. When I check the spark, it appears to be firing too often. The starter is only turning it over maybe 200 rpm (3x/sec) but it looks like it's sparking twice that. Is that possible after me working to get the mag flywheel off a few weekends ago?

Weird thing is, the ski ran okay up until it stalled in the water after a couple hours of use. The old plugs looked the right color after the break-in procedure and I have now put in new plugs. I feel like a real beginner here. I have spark and fuel, but the thing will not start. What could have happened with a couple of kids on it tooling around in the cove?

1 hr later: I assembled the spark arrestor base so I have actuation of the cables and I had fuel spraying out of the carb for a bit. Now the starter is working intermittently. When I rock the PTO flywheel, I hear a click that sounds like it's coming from the starter area. But it should be disengaged, right? I hope it's not connecting rods knocking.
 
Last edited:
Well, after posting my broken ski for sale for repair and it not selling, I posted to selling it for parts and could only get a bite for the trailer. So, I had an idea to check that valve timing since it was spitting mist out the carb. I bought my timing wheel and just pulled the valve cover off and find that the valve shaft has a ton of rotary play in it.

That would indicate that this engine is really not a new one from SBT after all if the brass gear is stripped. I tried to pull the shaft out but broke the puller bolt so now I'm pulling the engine out and will have to split the case to replace the gear.

No one on the forum diagnosed this all summer so newbies be sure to watch all the YouTubes you can because in my case, this problem was revealed on a video. It's not always a carb problem as many of the mechanics on here will suggest. The good thing is that by poking around yourself, you'll learn a lot more than if the folks on here spoon feed you. Then you can watch the forums and be a contributor like some of these moderators who also have a life and can't respond to everyone asking for direction.

A BIG thank you to those responding to my many questions throughout the summer.
 
I am sorry that you feel we didn’t help you here but we can only do so much diagnosing over the Internet and there are only so many of us that are here all the time.

Glad you finally found the issue and hopefully it will help someone down the road.
 
You guys do heroic work with all the other things you have to do in your life. 8120 messages (and counting) is nothing to apologize for. I am grateful for little tidbits to move me forward. I want my repair journal to be a record for others to see, even if I'm usually just answering my own questions. And maybe if more owners adopted a goal to answer at least as many questions as they ask as soon as they are qualified, there would be more questions answered and not so much burden falling on a few mechanics who take the time. Hats off to you Mikidymac.

BTW, I broke my puller bolt because I didn't know there was a snap-ring holding the shaft in. I didn't look at the parts diagram and didn't see the snap-ring until I pulled the engine. Hope this post saves someone else the trouble. The bolt should back out with a reverse drill in a moment.
 
Boys and girls, this is one thing that will keep your 2-stroke from starting. Now, what caused the rotary shaft gear to strip is another question, if the bearings are free.
 

Attachments

  • rotary valve shaft gear.jpg
    rotary valve shaft gear.jpg
    216.5 KB · Views: 14
The only time I have seen them strip is when something falls down the intake and locks the rotary valve.

I have seen pictures of the crank gear move too causing problems.

I would split the cases to see and buy a complete gasket kit. I typically use WSM with crank seals.
 
Yup, you're right... we dont know anything here. Good luck with your repair. I'll have a beer for you out on the lake today while I enjoy my perfectly running skis
 
The repair manual says that you can't install the rotary valve shaft into the block with the crankshaft installed. Why is that?
 

Attachments

  • valve shaft warning.JPG
    valve shaft warning.JPG
    13.8 KB · Views: 13
I'm back at having to pull the flywheels off to split the case. The mag flywheel is stuck. I let PB Blaster soak on it for 30 min while vertical. The flywheel doesn't have internal threads on a collar that would accept the factory puller. I put a steering wheel type puller on it full tension and heated up the flywheel close to the shaft; pounded on the puller screw till it's mushroomed out. Nothing. Should I put an extension bar on it and twist the puller screw till something breaks?
 
I hooked up my Harbor Freight puller to my impact wrench and it stripped the puller screw. Borrowed Autozone's harmonic balancer puller and one bolt broke as the bolt heads were pulling thru the slots. I'm planning on looking for some Grade 5 M8 bolts and putting the washer stacks on and banging away again till either something else breaks or the flywheel pops.
 

Attachments

  • screw.jpg
    screw.jpg
    216.6 KB · Views: 12
  • 20180912_194900_resized_1.jpg
    20180912_194900_resized_1.jpg
    334.8 KB · Views: 12
  • 20180912_195029_resized.jpg
    20180912_195029_resized.jpg
    404.8 KB · Views: 11
  • 20180912_195040_resized.jpg
    20180912_195040_resized.jpg
    351.7 KB · Views: 10
Last edited:
You just need a good puller and impact gun. Don’t thread the bolts in too far or you’ll damage the stator coils.
 
Success for me so I'll share what finally did work. Previously, what didn't work: 1) heat while under tension with a puller, 2) an impact wrench on my harbor freight puller till it stripped the puller screw, 3) an Autozone harmonic balancer puller with impact wrench till it broke one of the bolts.

I read in other posts that it's not as important to get a lot of force on the hammering on the end of the shaft as it is to get a sharp pop. I also read in some other ones that putting a LOT of tension on the puller could be distorting the tapered hole in the flywheel and causing it to clamp down even more on the shaft.

For those with stuck magneto flywheels looking for another trick or method to pop it off, here's one to try. It's a variation of the traditional procedures. Let's call it the Texas Method of flywheel removal. If yours is stubborn like mine was as well as the authors of several videos online are (see flying flywheels), this might get you on your way.

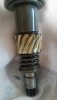
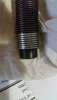
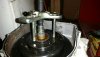
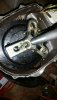
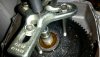
I put the harmonic balancer puller on with some replacement bolts (since I bent all the original ones) with some stacks of washers to keep the bolts from pulling down thru the puller slots. I chained the engine down so I could twist it with a breaker bar. Of course, I had already secured the crank by stuffing the near cylinder with rope and running the piston up as far as it would go, and tethered the puller with rope to support it after it pops so it doesn't drop and break any teeth. I also had the other end of the crank (PTO flywheel) lifted off the surface by putting wood blocks under the engine and mount. You want to give the crankshaft somewhere to go (slightly) when you are pounding on the other end.

I installed the puller and eyeballed the alignment of the puller bolt with the mounting bolts to make sure I was pulling straight up. I put the puller under a little bit of pressure and took the lightest hammer I have and rapped hard on the puller bolt about 10 times. Then I tightened the bolt about 1/4 turn and rapped 10 more times. I repeated this 3-4 times till the pressure started getting serious. Then I tightened about 1/8 turn and did this 3-4 more times until the flywheel finally popped off.

If I'm correct, the idea is to hit the sweet spot between pulling pressure and keeping the hole undistorted. Since you don't know where the sweet spot is, you use an iterative process by gradually adding pressure in hopes that somewhere along the spectrum you will find the right combination. I would say if you get the puller so tight that it starts bending the puller or breaking the bolts, you are too tight so start over. Keep lots of oil soaking on the shaft while it's vertical to give you every advantage you can. Sorry the pics are dark under the shadows.
 

Attachments

  • 20180915_115152_resized.jpg
    20180915_115152_resized.jpg
    392.6 KB · Views: 18
  • 20180915_115406_resized.jpg
    20180915_115406_resized.jpg
    555.9 KB · Views: 15
  • 20180915_115754_resized.jpg
    20180915_115754_resized.jpg
    447.5 KB · Views: 15
Last edited:
The only time I have seen them strip is when something falls down the intake and locks the rotary valve.

I have seen pictures of the crank gear move too causing problems.

I would split the cases to see and buy a complete gasket kit. I typically use WSM with crank seals.

My crank gear does not move so that might be one variable to remove from consideration. However, on the disassembly of the rotary shaft assembly, there was no loctite gluing the distance sleeve to the shaft and there is no .5 mm shim between the o-ring and the brass gear. Could this make the gear strip? It looks like the o-ring is compressed more than .5 mm if the cross section is circular. I don't have any Loctite 648 and am reluctant to buy it if it's optional. Is there a generic substitute that I might use more often? If I need the shim, I'll have to order that too along with the gaskets. I guess for $6 it's cheap insurance. The length of the sleeve is precise. I don't understand why they would require a shim next to a precision part holding gear alignment. There is nothing in the manual about gear alignment.

While looking at the manual, I notice that it shows two different rotary valves, depending on "watercraft model no." While I've got it apart, I should verify that I have the correct valve in it. But where do I find the Watercraft model number? There is no 58XX series number on the engine or hull that I can see. Where do I find that rascal?
 
I put Loctite 242 thread locker on the sleeve instead of nothing, the way it came out. I figure it might be better than nothing. Not sure why the Loctite is specified.

My next question is about the cage that covers the crank gear. It doesn't seem to be secured by anything. Mine has two tabs and one is currently sticking into the bearing bore for the rotary valve shaft. The other end is free as shown in the pic below. Since this was the ailment of my engine before, I'm trying to get some input before I put the grey goo on the crankcase and assemble it. There is nothing mentioned in the service manual.
 

Attachments

  • 20180927_200625_resized.jpg
    20180927_200625_resized.jpg
    354.5 KB · Views: 17
It appears that the cage is held in place by the opposite part of the crankcase. The tab should not be sticking into the counterbore for the bearing. Engine pressure tested will and now it's going back together just in time to crank it to spray fogging oil in for the winter. I've got oil leaking out somewhere so for now, I just have to locate that before I bolt the engine back down and assemble all the accessories.
 
Status
Not open for further replies.
Back
Top