You're not using heat to get that stuff off ? I don't know what kind of stickers you have as I'm sure some products work better on different materials. I use some sticker remover sometimes but lately I just get out the heat and use it carefully. Good luck and enjoy the ride.


-
This site contains eBay affiliate links for which Sea-Doo Forum may be compensated.
You are using an out of date browser. It may not display this or other websites correctly.
You should upgrade or use an alternative browser.
You should upgrade or use an alternative browser.
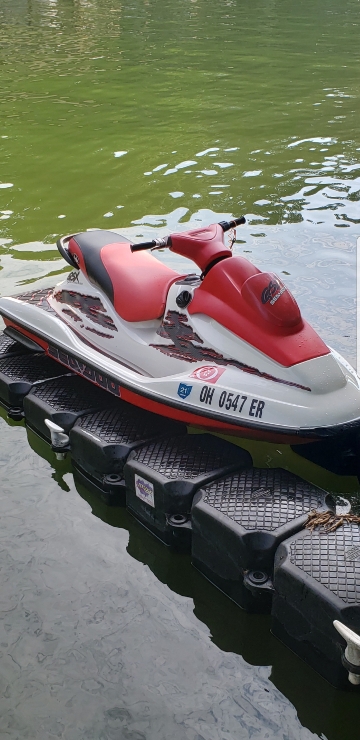
My new 96 XP project
- Thread starter Major Woody
- Start date
- Status
- Not open for further replies.
Major Woody
Active Member
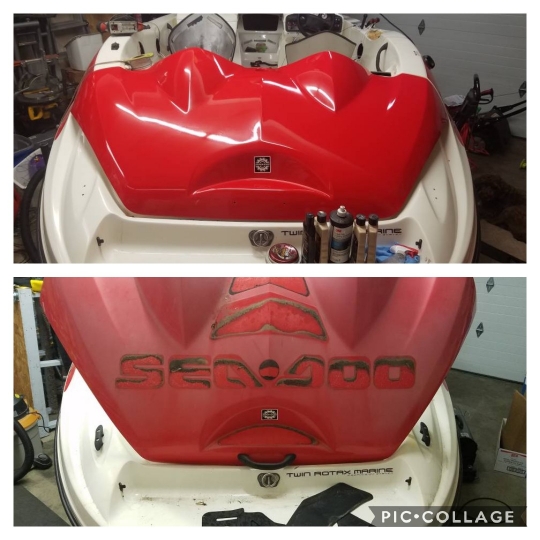
They aren't stickers--I wish they were! The original decals are long gone. This is automotive paint. Primer, base, then airbrushed and hand painted graphics, then urethane clear. There are 6 coats in some places.
YIKES !!!! I bought a 99 GTX some clown painted with white. Boy O Boy did I spend time cleaning that thing up. Then I had this 96 XP that was in bad shape. Got it ready and painted the upper side yellow. Might be easier to just prep and paint.They aren't stickers--I wish they were! The original decals are long gone. This is automotive paint. Primer, base, then airbrushed and hand painted graphics, then urethane clear. There are 6 coats in some places.
.JPEG")
Major Woody
Active Member
I hear ya but I want the durability of gelcoat. I don't want a ski with a finish that is so fragile that I have to worry about every bump. The way I use my ski, paint would just not survive. AND if I was going to paint this thing, it sure wouldn't be yellow. I would paint it green or gold metalflake, like a 1970s ski boat.
Anyway the painted graphics are almost off, just a little bit remaining. Once we're done with the hull, you'll never know how it used to look.
Anyway the painted graphics are almost off, just a little bit remaining. Once we're done with the hull, you'll never know how it used to look.
Where are the Pictures ??I hear ya but I want the durability of gelcoat. I don't want a ski with a finish that is so fragile that I have to worry about every bump. The way I use my ski, paint would just not survive. AND if I was going to paint this thing, it sure wouldn't be yellow. I would paint it green or gold metalflake, like a 1970s ski boat.
Anyway the painted graphics are almost off, just a little bit remaining. Once we're done with the hull, you'll never know how it used to look.
 I'm trying to figure out what to do with the gray metal flake on the RX.
GGuillot
Well-Known Member
I hear ya but I want the durability of gelcoat. I don't want a ski with a finish that is so fragile that I have to worry about every bump. The way I use my ski, paint would just not survive. AND if I was going to paint this thing, it sure wouldn't be yellow. I would paint it green or gold metalflake, like a 1970s ski boat.
Anyway the painted graphics are almost off, just a little bit remaining. Once we're done with the hull, you'll never know how it used to look.
Good choice, painting a ski won't last, it's more work sticking with gelcoat but it's durable to withstand season after season. I spent a ton of time doing the gelcoat on my skis, but it's wax once a season and it still looks good.
Let me know if you decide to re-gelcoat, I rolled it on, then sand, sand, sand then polish, glaze, and wax with 3M products.
Major Woody
Active Member
Oh I see how it is...you want evidence.

Before (the reg #s are painted on there, under the clearcoat):

After

All that is left is a little bit of the blue hand-painted striping. The remaining paint will come off tomorrow morning and then we'll be ready to take the ski on down to the coin-op carwash and blow the bilge out.
Here is the stuff we used. This stuff works great, doesn't smell at all, just takes time. Paint it on thick, cover with plastic wrap, wait at least 24 hours and everything underneath has turned to goo. Scrape it off with a plastic scraper. Get it on your hands? No problem, doesn't hurt at all.

Before (the reg #s are painted on there, under the clearcoat):
After
All that is left is a little bit of the blue hand-painted striping. The remaining paint will come off tomorrow morning and then we'll be ready to take the ski on down to the coin-op carwash and blow the bilge out.
Here is the stuff we used. This stuff works great, doesn't smell at all, just takes time. Paint it on thick, cover with plastic wrap, wait at least 24 hours and everything underneath has turned to goo. Scrape it off with a plastic scraper. Get it on your hands? No problem, doesn't hurt at all.
Major Woody
Active Member
Since we like pictures, here are some other parts of the project in progress.
Found the lower inner welch plug starting to go. Bubbling paint is a tell-tale sign, and there is evidence it was spraying onto the engine in this area. Between the bailer lines, the loose exhaust hose and this leaking plug, this ski must have had a constant river flowing through it whenever it was in the water.
Ordered a new disc to weld on. The others will likely be fine. If I was set up to TIG weld myself, I would replace all of them. But I have to pay, so I'm only doing this one. This is the one that failed on my GSX as well. All the purple exhaust components will be hammered silver and the rest of the engine will go back to factory white.

Other parts waiting to be prepped for basecoat

Found the lower inner welch plug starting to go. Bubbling paint is a tell-tale sign, and there is evidence it was spraying onto the engine in this area. Between the bailer lines, the loose exhaust hose and this leaking plug, this ski must have had a constant river flowing through it whenever it was in the water.
Ordered a new disc to weld on. The others will likely be fine. If I was set up to TIG weld myself, I would replace all of them. But I have to pay, so I'm only doing this one. This is the one that failed on my GSX as well. All the purple exhaust components will be hammered silver and the rest of the engine will go back to factory white.
Other parts waiting to be prepped for basecoat
Last edited:
Major Woody
Active Member
Pile of cleaned or replaced parts, ready to go back on when the time comes

RAVE valve housings cleaned, repainted, drying by the fire. These are SBT housings, apparently replaced when the engine was rebuilt.

I have new gaskets and O-rings. I got diaphragms too, but the ones on there look really good so I am going to put them back on. If anyone needs RAVE diaphragms, I have three new ones.

RAVE valve housings cleaned, repainted, drying by the fire. These are SBT housings, apparently replaced when the engine was rebuilt.
I have new gaskets and O-rings. I got diaphragms too, but the ones on there look really good so I am going to put them back on. If anyone needs RAVE diaphragms, I have three new ones.
Major Woody
Active Member
Tonight's project--rebuild these carbs. Wife is out with friends so I'll crank the music up, have a cold one and take these apart. All new genuine Mikuni parts ready to go in.

The outsides are already pretty clean after a trip through my parts washer. That is one of the most useful tools I have.
The outsides are already pretty clean after a trip through my parts washer. That is one of the most useful tools I have.
Major Woody
Active Member
And finally, looky what the UPS guy just dropped off!

Major Woody
Active Member
As I mentioned, the tank has a manufacturing date sticker on it indicating 2010. So it is not one of the bad tanks, must have been replaced under the recall.
Here is the stuff we used. This stuff works great, doesn't smell at all, just takes time. Paint it on thick, cover with plastic wrap, wait at least 24 hours and everything underneath has turned to goo. Scrape it off with a plastic scraper. Get it on your hands? No problem, doesn't hurt at all.
View attachment 45886
Wow that's some cool stuff.
") I've only used Aircraft Remover and that stuff is powerful mean. Don't get skin anywhere near it. Ouch !!
I've only used Aircraft Remover and that stuff is powerful mean. Don't get skin anywhere near it. Ouch !!Major Woody
Active Member
For anyone who wants to know, the hoods are made with HDPE--high density polyethylene. It cannot be solvent welded, must be heat welded. Normal glues don't stick, including all epoxies. Xylene and acetone have no effect on this plastic.
Despite trying to be very gentle, I managed to break off three of the little tabs on the outer hood that the inner hood screws into. Glued them with super glue and then surround each one of them with a mountain of construction adhesive. It will take about two weeks for that to fully harden. Oh well.
The painted-on graphics are now fully gone! Working on cleaning the hull now. There should be two drain plugs in X4s. Have to use a shop vac to clean out the hull in the back. Gross.
Last edited:
Major Woody
Active Member
I have won the Battle of the Bilge. It is finally clean. Made covers from scrap plastic for openings at rave valves, carbs and exhaust to keep water out during cleaning. Used spray-on engine degreaser followed by repeated applications of Purple Power and various brushes. Used Clorox Clean-Up on the discolored flotation foam. Turned out better than expected.


Discovered that the exhaust hose was loose at the back of the hull. In addition to letting water in, it allowed enough exhaust to leak that the foam in that area looks slightly melted. Luckily I caught it.

In this last picture, see the small poly coolant water hose crossing over the impeller shaft boot? They left it that way. I replaced it. There was also a loose bungee cord completely wrapped around the PTO. Some people...
Now I can turn my attention to color sanding.
Discovered that the exhaust hose was loose at the back of the hull. In addition to letting water in, it allowed enough exhaust to leak that the foam in that area looks slightly melted. Luckily I caught it.
In this last picture, see the small poly coolant water hose crossing over the impeller shaft boot? They left it that way. I replaced it. There was also a loose bungee cord completely wrapped around the PTO. Some people...
Now I can turn my attention to color sanding.
Last edited:
Major Woody
Active Member
Last question for those familiar with 96 XP's...when I got this ski, the bailers were sitting in the bottom of the hull and the bailer lines were not zip-tied to the underside of the hull behind the seat opening. The exhaust hose was also not supported by anything at the top, and was kind of flopping around. I assume that both are supposed to be zip-tied to these nylon zip tie supports glued to the underside of the hull, as they are on my GSX.
In the bilge I found one of these bases along with its glue. I can't tell where it came from. Are there supposed to be two zip-tie bases glued onto the inside of the hull behind the seat--one for the exhaust hose and one for the bailers? My ski only has one in place and I am wondering if there are supposed to be two, and if so where the other one is supposed to go.
This photo is of the area I am talking about. Behind the engine, facing up. That bolt/nut you see is for the post that the back of the seat latches to, and at the top of the frame you can just see the seat opening.

Thanks.
In the bilge I found one of these bases along with its glue. I can't tell where it came from. Are there supposed to be two zip-tie bases glued onto the inside of the hull behind the seat--one for the exhaust hose and one for the bailers? My ski only has one in place and I am wondering if there are supposed to be two, and if so where the other one is supposed to go.
This photo is of the area I am talking about. Behind the engine, facing up. That bolt/nut you see is for the post that the back of the seat latches to, and at the top of the frame you can just see the seat opening.
Thanks.
GGuillot
Well-Known Member
Who makes a small, custom colored gelcoat repair kit? I don't want to try to tint my own. There are a couple of small chips on the upper hull that I'd like to repair, and there is some damage to the keel that the PO painted over with some kind of brush-on crap. I'll be removing that unless it is real gelcoat, and will then repair it properly.
I use FGCI products FGCI | Fiberglass Coatings for gelcoating needs. They sell anywhere from repair kits to gallons. I used a quart kit ($45) to repair the bottom of my 96' GSX which was pretty beat up down the keel. Ck my links out, I rolled it on. Just prep it good, I used marine tex to fill imperfections, then sanded it smooth before applying gel coat.
No issues leaving the engine in, just a little heavy to flip it over.
ah64driver2002
Member
Gelcote international sell some seadoo colors from touch up kits to gallon size. They have colors broke down by year on their website
Sandman251
Well-Known Member
Exhaust hoses are softer on the xp than whats on my 97 GSX also. Wetsanding sucks but produces great results. This is my GSX resto from 2 winters back. It was a dullish yellow from the sun in many areas, but 10+ hours wet sanding and buffing it still shines like brand new today. Same for a 98 speedster i did the winter prior to the gsx.
I've gotten to the point where ill pay a premium for a non running ski in good cosmetic condition as id rather rebuild an engine than wetsand and buff! Plus you can't really ever trust a running 20+ year old ski anyways.
Aren't all the engine hatch covers on those boats plastic? You're saying you could wetsand and compound plastic and have it turn out like that? Wow.
Major Woody
Active Member
Carbs done. Pop-off 35 both carbs. Nozzle and trim ring removed, cleaned, polished, replaced. Jet pump oil replaced (old oil was BLACK and reeked), anti-rattle nose cone installed, VTS reinstalled. Handlebar pad and new grips on. Corroded welch plug on tuned pipe replaced (quarter cup of wet sand trapped in the lower pipe behind it) and all purple exhaust parts repainted hammered silver. I have now eradicated nearly all the pink and purple from this ski, and feel like I have reclaimed a little bit of my manhood in the process. Now when my friends come over, I don't have to endure all the "Crockett and Tubbs" comments about the colors.
All exhaust parts other than the front tuned pipe are installed and look new. Nick at West Side Powersports has the new/used MPEM for this ski and the MPEM for my GSX and is programming them so the keys work on both. Should have all that stuff back in a week. I would like to note how helpful Nick was through this process in order to make sure I ended up with working MPEMs and matching DESS keys.
When the oil pump shows up, I'll install that and the oil lines and then the pipe and the carbs.
This weekend I was installing the small oil lines to the RV cover and thought, "Hell, I'd better check to make sure those oil injectors aren't plugged." Glad I did because they were both plugged solid. Compressed air had no effect. Ended up having to remove the RV cover and clean out the injectors. Went at them with pieces of wire, tiny nails, itty bitty drill bits and carb cleaner before they would finally work. SO glad I checked them!
Ordered a gelcoat repair kit and repaired a few little chips in the top deck.
I think I am going to get the engine compartment and the upper deck done before flipping it on its side to work on the bottom.
Major Woody
Active Member
Well that sucks to hear. I will test them, make sure they block flow up to 2.5 psi (already know they allow flow). If not, will see if they can be repaired in place. I did find another thread where the owner of a 951 pulled them and disassembled them, so that may be in my future as well.Be careful putting anything in the oil injectors as you can damage the little ball and spring check valves with wires and nails. If they leak it will flood your engine with oil when sitting.
Part number is 420956510, pressed in.
Last edited:
- Status
- Not open for further replies.
Similar threads
- Replies
- 1
- Views
- 410