Line the rings up with the locating pin in the piston. Grip the top ring and make sure you are exactly lined up with the pin and slide the cylinder over that ring, let go of the ring and do the same with the next one. Make sure your lined up with the pin before the entire process was started. It's real easy, did I mention to make sure your lined up with the pins BEFORE your start, you can't be close, you have to be dead on. Should be a one man job.


-
This site contains eBay affiliate links for which Sea-Doo Forum may be compensated.
You are using an out of date browser. It may not display this or other websites correctly.
You should upgrade or use an alternative browser.
You should upgrade or use an alternative browser.
My FIRST 97 SEADOO GSX PROJECT.
- Thread starter sselzer
- Start date
- Status
- Not open for further replies.
kicker
Well-Known Member
Racer beat me to it. :agree:
In the groove of the cylinder where the rings go into there will be a little nob in that groove, that is where the ring gap goes. This is so your rings dont slide around to an open port. If this were to happen there would be a chance of the ring end getting caught on the intake or exhaust port.
In the groove of the cylinder where the rings go into there will be a little nob in that groove, that is where the ring gap goes. This is so your rings dont slide around to an open port. If this were to happen there would be a chance of the ring end getting caught on the intake or exhaust port.

I think this is getting a little confusing for a novice. Kicker keeps refering to a pin on the cylinder but is is trying to tell you that there is a small pin on the piston(not cylinder) that keeps the ring gap in place. Also the rings must be installed the correct way. If you are using OEM rings and pistons the top ring is obvious that it can only go one way but the bottom ring actually has a taper to it and must be installed the correct way or it will not go all the way into it's groove and be too tight in the cylinder. All rings that are directional will have a very small stamp on them, that stamp should always face up. It is on the flat part of the ring, sometimes it is a dot, and "R" or a square. That mark should be facing up towards the cylinder head. I think this might be why your cylinder will not go past the second ring. You should be able to do this by yourself.
1. Apply a light coat of injector oil to the cylinder walls.
2. Make sure your base gasket is installed.
3. Install rings correctly on piston.
4. Make sure cylinder is facing the correct way, arrow on piston faces exhaust.
5. Hold the top ring in it's groove and aligned with th pin with one hand and lower the cylinder with the other.
6. Repeat with the second ring.
7. It should go on easy with no force. If there is resistance stop and determine why. Do not bend a ring.
Finally do not spin the cylinder if it is a little twisted on the ring, you can break the ring. If it is a little off you can rotate it while sliding it down. To clarify only rotate the cylinder on the piston while it is moving either up or daown on the piston.
kicker
Well-Known Member
I think this is getting a little confusing for a novice. Kicker keeps refering to a pin on the cylinder but is is trying to tell you that there is a small pin on the piston(not cylinder) that keeps the ring gap in place. .
Unbelievable, I cant believe I did that. Sorry for the confusion.
") . Remember it is friday, you must have already clocked out for the weekend.
. Remember it is friday, you must have already clocked out for the weekend.When the rings are located correctly around that pin or dowel that will prevent them from turning.
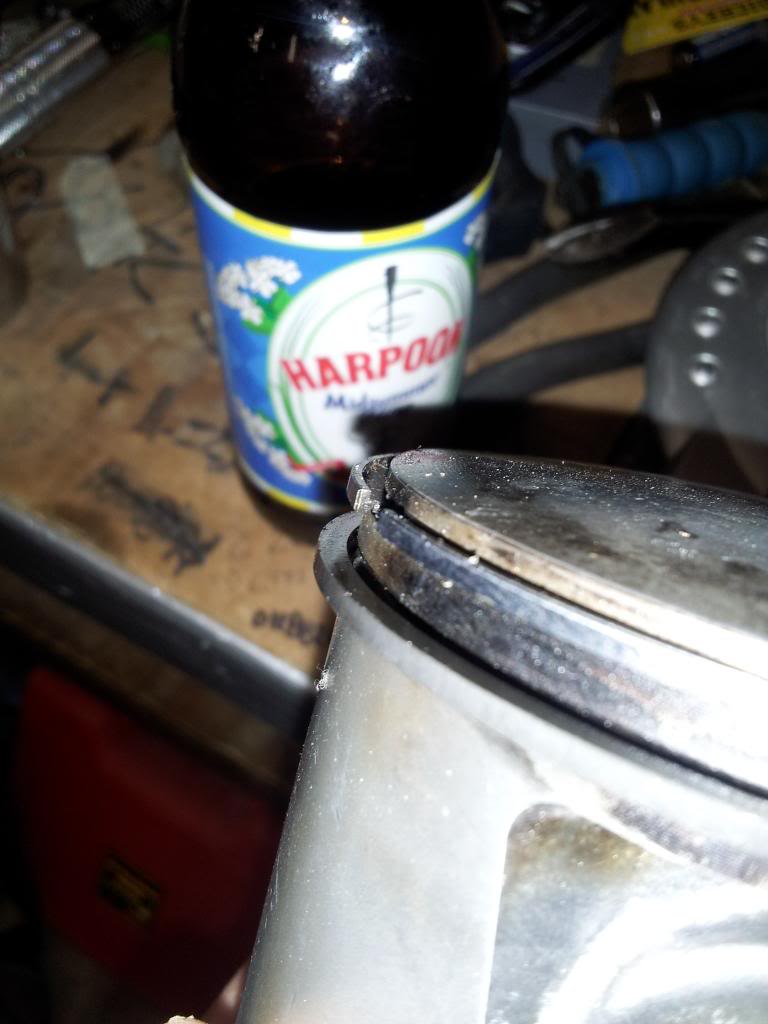
This is a SBT remand motor, that I had to replace a jug on becsuse of a broken bolts. Theres only a small hole in the ring area on the piston, nothing else.
Here's what your looking for. You can clearly see a pin. Now look to the left and you will see the other ring gap on the lower ring, that is where the other pin is. Also the top ring is L shaped, the L would be laid down with the short leg facing up. If you're just seeing a hole without a pin, you'll need to get a piston, and I'd be curious as to where it got to???
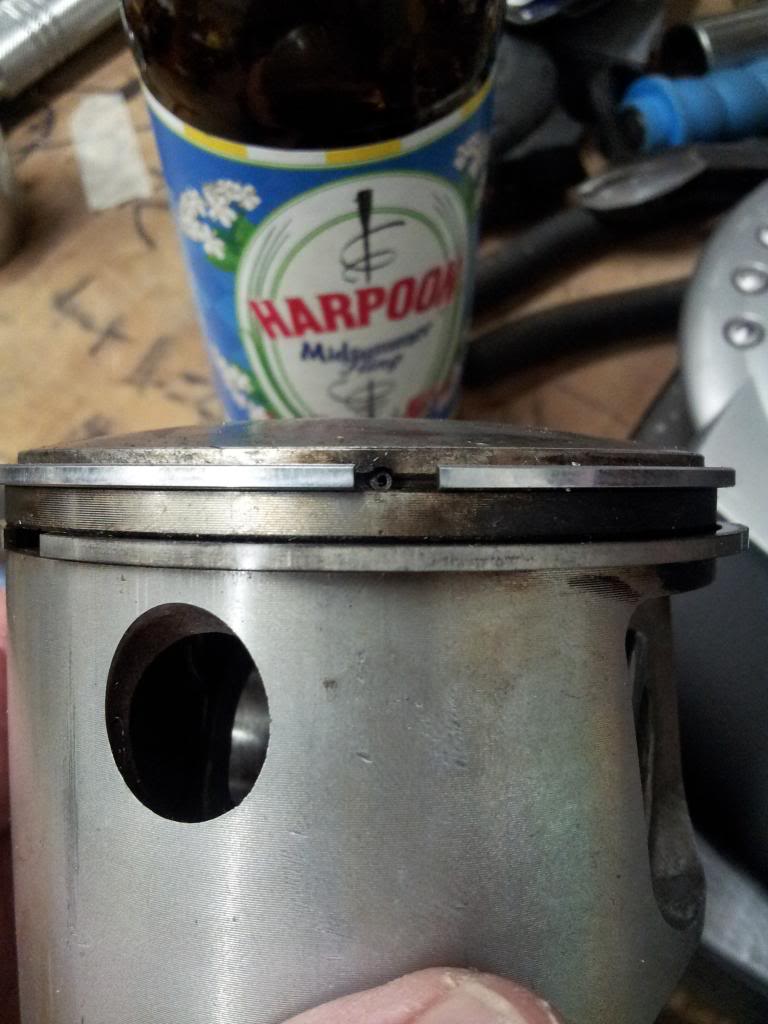


As I stated above there is a pin to the left in that picture, if all you see is a hole and no pin, I wouldn't use the piston. Or confirm with SBT that there is not supposed to be one. Also since you were lining both up to that pin, that is telling me that you must have another pin since you couldn't get past the second ring. As further knowledge, rings will should never line up.
Racer i will look at the pistons again in the morning, when i get home from working my 12 hour shift as a deputy.
Right on!!
Racer, here another question. I managed to get both jugs on, now that i know both rings each have a pin and tighted the bolts to 15lbs. I'm having trouble getting one of the black o-rings around the outter part of the jug, so can install the top plate, it seems like it slightly too big. Its always popping off on one side when i press the other side into the groove. Is there a trick to getting it to stay in that square groove?
Yes, you really should seat them in with the Loctite 518 or 515, can't remember exactly which one of the top of my head. Or try and roll that ring the opposite way while putting it in. Its probably trying to roll back out. So I'd say to try and roll it in ward as you stretch it around.
Sent from my SGH-T989 using Tapatalk 2
Sent from my SGH-T989 using Tapatalk 2
Last edited by a moderator:


CReynoldsMIZ
Well-Known Member
The starter for sure, now that you have it out is the time to make sure the starter is good
The starter for sure, now that you have it out is the time to make sure the starter is good
The starter is fine, and had been repainted. I wanted to know if i could install the carbs and exhuast manifold before install the engine in the hull.
CReynoldsMIZ
Well-Known Member
You can definitely install the exhaust manifold, make sure you use the correct tightening and torquing pattern on that. I usually install the carbs after the ski is installed because I think it is easier if you install all of the hoses and cables on them and then just attach all of it at the same time. But if you want you can install the carbs on there yes
That is not foot pounds, it is inch pounds. which is alot less.
in lbs = ft lbs X 12 or ft lbs = inch lbs / 12
You wouldn't be the first one to mix up ft lbs and inch lbs. At least these units are kinda easy to visualize, ie you don't torque a 1/4 inch bolt to 88 ft lbs, but metric units they are totallt meaningless to me.
- Status
- Not open for further replies.
Similar threads
- Replies
- 9
- Views
- 360
- Replies
- 30
- Views
- 1,151
- Replies
- 15
- Views
- 489