• This site contains eBay affiliate links for which Sea-Doo Forum may be compensated.

Leaking Drive Shaft

Status
Not open for further replies.

b6r2a4d1

New Member
I took my ski out this weekend and noticed that there was some water leaking from the rear boot on the drive shaft. It's coming from part 9 on the engine side in the picture. I have the hose clamp (part 6) tightened down and it still leaks. Help?
 

Attachments

  • 5620C4.gif
    5620C4.gif
    13 KB · Views: 201
If you have a leak there... I wouldn't even mess with it. Pull it apart, and put in a new boot and carbon ring.

If the boot is ripped, and you continue to run it... it could split the rest of the way. When that happens... you will essentially have a 1.5" hole in the bottom of your boat... and it will sink rather quickly. (that's why they got away from the seal pack)

The other problem is that the insert could have cracked or come loose. (in the hull)

Ether way... you have to take it apart to properly find the issue.
 
I got the same problem...my carbon ring shattered on my 1996 seadoo GTX, can you talk me threw how to replace the carbon ring?...got any pictures?
 
97 XP leak around driveshaft

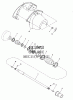
I just got my girlfriend's 97 XP fixed-it was leaking rapidly between the carbon and the slipring-turns out that the o-ring that holds the slipring tight against the carbon ring had disintegrated, nowhere to be found. Pulled the pump off the back (remove steering and trim linkages from the pump, then four bolts and the whole pump and shaft came out). Got 3 new o-rings (2 inside the slip ring, and the fatter one behind it) and replaced the 2 in the slip ring, applying great gobs of grease on them and the splines on the shaft. Inserting the pump and shaft partially, then putting carbon ring and slip ring on, then the fatter o-ring while the shaft is all-but-engaged. Be careful here to be sure trim/steering linkages don't get in your way of inserting the pump! All parts on the shaft, slip the shaft in the rest of the way. Then, pull the boot and carbon ring and slip ring all back far enough to allow you to move that fat o-ring into the groove on the shaft, pack some more grease onto the o-ring and slip-ring's forward-facing groove. Tighten 4 pump nuts, reattach linkages, go for a ride. Oh, when I had the slipring off I did clean up the area where that fat o-ring sits-used a dremel with a fiber wheel for most of it, #400 wet/dry paper to make it shiny clean, and also cleaned up rough edges where slots were cut into that area of the slip ring-probably why it chewed the o-ring in the first place.
 
If you are running into silicone, be sure you're taking apart the right spot-on my 97 XP, starting from the rear of the machine there are four bolts that hold the pump together, then, moving forward there are four studs that hold the pump to the rear plate on the hull-these are the ones that I removed to pull the pump out. Still forward from that are four bolts that hold that rear plate to the hull, and that plate is indeed heavy with silicone-I did not disassemble this. The pump is not siliconed to the plate, however, and it came off for me with a fairly gentle side-to-side wiggling motion (yeah, baby!)
One thing I now embarassingly mention is that my fix didn't work at first. This was because when we had the rear shaft out the forward shaft (from crankshaft under the fuel cell) fell off at the crank end. So, we had to pull the pump off again, get the forward driveshaft in place, and hold the forward driveshaft (and damper) in place when re-inserting the pump (complete with the rear shaft). It helped to partially disassemble the origami of metal that sits on top of the damper-part of the support for the rear of the seat. Then I could get a hand in there to hold the damper/forward shaft while the XP owner brought the pump etc. forward to mate with the forward shaft/damper.
 
Status
Not open for further replies.
Back
Top